
EA Settings
Learn how to configure TradeSgnl EA settings and trading parameters. Optimize risk management, position sizing, and trading behavior.
This guide provides detailed information about all the configurable parameters in the TradeSgnl MT5 Expert Advisor. Understanding these settings is crucial for optimizing your trading performance and managing risk effectively.
Pro Tip
Start with the basic settings and gradually explore advanced features as you become comfortable with the EA's operation. Always test new configurations on a demo account before using them in live trading.
Disclaimer
Trading involves significant risk. Advanced features like Pyramid Trading, Recovery, and Hedging can amplify both profits and losses. It is your responsibility to understand how these features work before implementing them. Past performance is not indicative of future results.
Understanding Management Modes
Several EA features offer three control modes that determine how and when they activate. Understanding these modes helps you choose the right approach for your trading strategy.
| Mode | Description | Best For |
|---|---|---|
| Disabled | Feature is completely turned off and will not activate under any circumstances | When you don't want to use the feature at all |
| Enabled | Feature is always active and uses the parameters you've configured in the EA inputs | When you want consistent behavior across all trades using your EA settings |
| Signal | Feature activation and parameters are controlled by your webhook signals on a per-trade or per-strategy basis | When you want dynamic control through your webhook signals rather than fixed EA settings |
The "Signal" mode allows you to enable or disable features dynamically through your webhook signals. Choose "Enabled" for consistent behavior across all trades, or "Signal" when you want to control features on a per-trade or per-strategy basis through your own signals.
General Settings
Basic parameters for EA operation and signal handling.
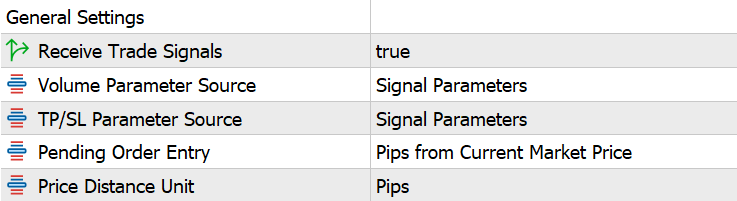
| Parameter | Description | Importance |
|---|---|---|
License ID | Your unique license code provided by your license provider | Required |
Receive Trade Signals | Enable/disable receiving trade signals | Required |
Volume Parameter Source | Source of lot size parameter (Signal Inputs or EA Inputs) | Optional |
TP/SL Parameter Source | Source of take profit and stop loss parameters (Signal Inputs or EA Inputs) | Optional |
Pending Order Entry | How pending order levels are calculated (Pips from Current, Absolute Price, or Percent of Price) | Conditional |
Price Distance Unit | Unit type for SL/TP values. Choose Pips for Forex or Currency Points for Indices/CFDs where values represent direct price distance | Optional |
Detailed Explanation
- License ID: Your unique license code is provided after purchase. This code links your EA to your account and enables signal reception.
- Receive Trade Signals: Master switch to enable or disable receiving trade signals from the webhook server. When disabled, the EA will not execute any new trades but will continue to manage existing positions.
- Volume Parameter Source: Determines whether the EA uses lot size from incoming signals or from the EA inputs.
- Signal Inputs: Lot size (
risk=parameter) comes from the signal. - EA Inputs: Uses the default volume configured in EA settings.
- Signal Inputs: Lot size (
- TP/SL Parameter Source: Determines whether the EA uses take profit and stop loss values from incoming signals or from the EA inputs.
- Signal Inputs: TP/SL values (
tp=,sl=parameters) come from the signal. - EA Inputs: Uses the default TP/SL configured in EA settings.
- Signal Inputs: TP/SL values (
- Pending Order Entry: Determines how pending order entry levels are calculated.
- Pips from Current Price: Level calculated as offset from current price (e.g.,
pending=20means 20 pips above/below current price). - Absolute Price Level: Specify exact price level for entry (e.g.,
pending=1.1050means enter at exactly 1.1050). - Percent of Current Price: Distance calculated as a percentage of the current price (e.g.,
pending=1means 1% away from current price).
- Pips from Current Price: Level calculated as offset from current price (e.g.,
- Price Distance Unit: Choose the unit type for all SL/TP distance values in signals and EA inputs.
- Pips: Standard pip calculation for Forex pairs (accounts for 5-digit vs 4-digit brokers).
- Currency Points (for Indices/CFDs): Values directly represent price distance in the instrument's currency. Perfect for US30, NAS100, DAX40, Gold, Silver, and crypto where 1 point = 1 unit of currency.
Volume Settings
Parameters for controlling position sizing and risk-based lot calculation.
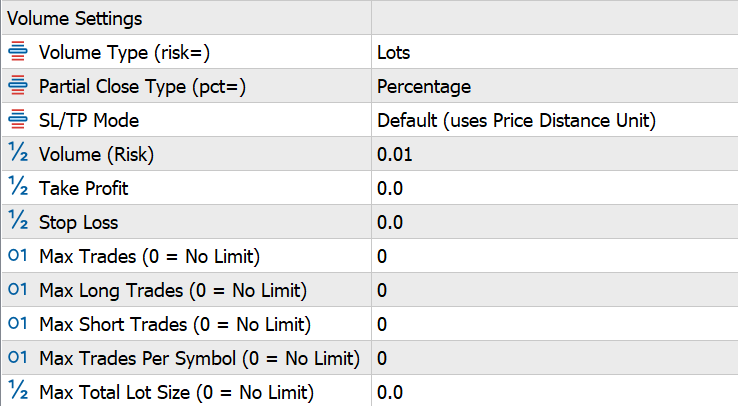
| Parameter | Description | Importance |
|---|---|---|
Volume Type | Method for calculating position size (see details below) | Required |
Partial Close Type | How to interpret pct= signal parameter (Percentage or Lots) | Required |
SL/TP Mode | How to interpret SL/TP values. Distance Unit Setting uses the Distance Unit (pips/points) from General Settings. Percentage interprets values as percentage of entry price. Absolute Price Level treats values as exact price levels. | Optional |
Volume (Risk) | Lot size or risk value based on Volume Type | Required |
Take Profit (Pips) | Default take profit distance (0 = disabled) | Optional |
Stop Loss (Pips) | Default stop loss distance (0 = disabled) | Recommended |
Max Trades | Maximum open trades across all symbols (0 = no limit) | Recommended |
Max Long Trades | Maximum open long (buy) trades (0 = no limit) | Optional |
Max Short Trades | Maximum open short (sell) trades (0 = no limit) | Optional |
Max Trades Per Symbol | Maximum open trades per symbol (0 = no limit) | Recommended |
Max Total Lot Size | Maximum total lot size (0 = no limit) | Recommended |
Understanding Volume Types
Standard Volume Types calculate lot size based on fixed values or account size:
- Lots: Uses the exact lot size you specify. Example:
risk=0.01opens 0.01 lots for every trade. - Percentage of Balance (Lots): Calculates lot size based on a percentage of your account balance. Example:
risk=1on a $10,000 balance opens 0.1 lots. - Percentage of Equity (Lots): Same as above but based on current equity instead of balance.
SL-Based Risk Volume Types calculate lot size based on how much you're willing to lose if your stop loss is hit. A stop loss value is required for these methods:
- Dollar Amount (Risk): The
risk=value specifies the dollar amount you're willing to lose if the SL is hit. Example:risk=10calculates lot size so the SL hit loses approximately $10. - Percentage of Balance (Loss): The
risk=value specifies the percentage of your balance you're willing to lose if the SL is hit. Example:risk=1on a $10,000 balance calculates lot size so the SL hit loses approximately $100. - Percentage of Equity (Loss): Same as above but based on current equity instead of balance.
SL Required
Dollar Amount (Risk), Percentage of Balance (Loss), and Percentage of Equity (Loss) require a stop loss value. If no SL is provided in the signal or EA settings, the trade will be rejected with error code 6013.
Other Volume Settings
- Partial Close Type: Determines how the EA interprets the
pct=parameter in partial close signals.- Percentage: The
pctvalue is treated as a percentage to close (pct=0.5closes 50% of position volume). - Lots: The
pctvalue is treated as the exact number of lots to close (pct=0.5closes exactly 0.5 lots).
- Percentage: The
- SL/TP Mode: Controls how stop loss and take profit values are interpreted.
- Distance Unit Setting: SL/TP values use the Distance Unit from General Settings (pips or currency points). Example:
sl=50means 50 pips from entry. - Percentage: SL/TP values represent a percentage of the entry price. Example:
sl=1means stop loss at 1% below entry for buys, 1% above for sells. - Absolute Price Level: SL/TP values are exact price levels. Example:
sl=1.0800sets the stop loss at exactly 1.0800 regardless of entry price.
- Distance Unit Setting: SL/TP values use the Distance Unit from General Settings (pips or currency points). Example:
- Max Trade Limits: Control the number of positions the EA can open. Max Trades limits the total number of open positions across all symbols. Max Long Trades and Max Short Trades allow independent limits on buy and sell positions. Max Trades Per Symbol prevents overexposure on single instruments.
- Max Total Lot Size: This safety feature limits your total exposure across all open positions. When enabled (non-zero value), the EA rejects new trades if opening them would exceed the maximum total lot size.
For consistent risk management, consider using "Percentage of Balance (Loss)" or "Percentage of Equity (Loss)" with values like 1-2%. This ensures you risk the same percentage of your account on every trade regardless of stop loss distance.
Risk Management
Parameters for controlling account risk and protecting capital.
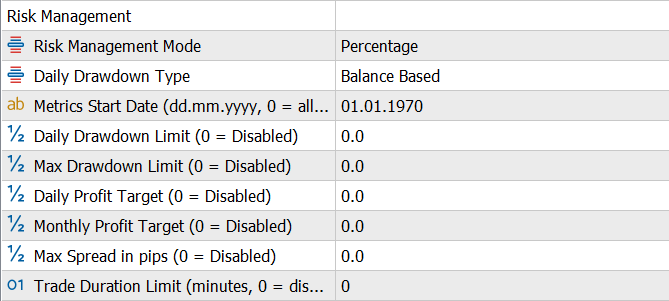
| Parameter | Description | Importance |
|---|---|---|
Risk Management Mode | How drawdown and profit limits are interpreted (Percentage of balance or fixed Currency amount) | Optional |
Daily Drawdown Type | Method for calculating drawdown (Balance Based or Equity Based) | Optional |
Metrics Start Date | Custom start date for performance metrics calculation in dd.mm.yyyy format (01.01.1970 = use all-time history) | Optional |
Daily Drawdown Limit | Maximum daily drawdown before closing positions and pausing EA. Interpreted as % or currency based on Risk Management Mode (0 = disabled) | Recommended |
Max Drawdown Limit | Maximum total drawdown before stopping the EA. Interpreted as % or currency based on Risk Management Mode (0 = disabled) | Recommended |
Daily Profit Target | Daily profit target. EA pauses when reached. Interpreted as % or currency based on Risk Management Mode (0 = disabled) | Optional |
Monthly Profit Target | Monthly profit target. EA stops when reached. Interpreted as % or currency based on Risk Management Mode (0 = disabled) | Optional |
Max Spread in pips | Maximum spread allowed for trade execution (0 = disabled) | Recommended |
Trade Duration Limit | Maximum duration for trades in minutes (0 = disabled) | Optional |
What is Risk Management?
Risk Management protects your account by automatically enforcing drawdown limits, profit targets, and trading constraints. Essential for prop firm challenges and capital preservation.
Example: Prop Firm Challenge Settings
$100,000 account | 5% daily limit | 10% max drawdown | Mode: Percentage
- Daily Drawdown Limit: 5 → Trading pauses if daily loss reaches $5,000
- Max Drawdown Limit: 10 → EA stops completely if total loss reaches $10,000
- All positions auto-close when limits are hit to prevent further losses
Risk Management Mode
- Percentage: Limits are % of balance. "5" = 5% of account.
- Currency: Limits are fixed amounts. "500" = $500 regardless of account size.
Daily Drawdown Type
- Balance Based: Measures loss from opening balance each day (more forgiving).
- Equity Based: Measures loss from highest equity point (stricter, matches most prop firm rules).
All Settings Explained
- Metrics Start Date: Custom baseline for calculations. Leave default for all-time history. Set to challenge start date for prop firms.
- Daily Drawdown Limit: Max daily loss before closing positions and pausing for the day. 0 = disabled.
- Max Drawdown Limit: Max total loss before closing all and stopping EA permanently. 0 = disabled.
- Daily Profit Target: Lock in gains by pausing when daily profit is reached. 0 = disabled.
- Monthly Profit Target: Stop trading for the month when target is reached. 0 = disabled.
- Max Spread (pips): Reject signals when spread exceeds this. Protects against poor fills during news.
- Trade Duration Limit: Auto-close trades open longer than X minutes. Useful for scalping strategies.
Daily Reset
Daily limits reset each new trading day and trading resumes automatically. Max drawdown does NOT reset. Once hit, EA stops permanently until you restart it.
For prop firm challenges, set daily drawdown slightly below the firm's limit (e.g., 4.5% if limit is 5%) to give yourself a safety buffer.
Trailing Stop Management
Parameters for automatic trailing stop functionality.
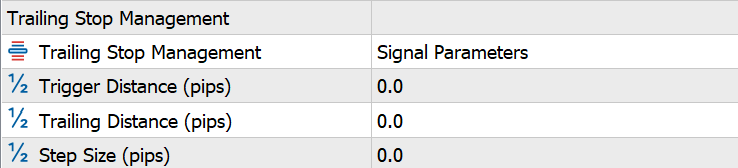
| Parameter | Description | Importance |
|---|---|---|
Trailing Stop Management | Source of trailing stop parameters (Signal Parameters or EA Inputs) | Optional |
Trigger Distance (Pips) | Price movement required to activate trailing stop | Conditional |
Trailing Distance (Pips) | Distance to maintain between price and stop-loss | Conditional |
Step Size (Pips) | Minimum price movement required to adjust trailing stop | Conditional |
How Trailing Stop Works
Trailing stops work on individual trades, automatically moving your stop-loss to lock in profits as the market moves in your favor.
Parameter Source Options
- Signal Parameters: Trailing stop values (
trtrig=,trdist=,trstep=) come from your webhook signals. Use this for per-signal trailing stop customization. - EA Inputs: Uses the Trigger Distance, Trailing Distance, and Step Size configured in this EA section for all trades. Use this for consistent trailing stop behavior.
The Three Key Settings
- Trigger Distance: How far price must move in profit before trailing begins. Your stop-loss remains static until this threshold is reached.
- Trailing Distance: How far behind the current price your stop-loss trails. A smaller distance = tighter protection but more prone to being stopped out by noise.
- Step Size: Minimum price movement required before the stop-loss is adjusted. Prevents excessive modifications from tick-by-tick movement.
Example: BUY trade at 1.1000
Settings: Trigger = 20 pips, Trailing Distance = 15 pips, Step Size = 5 pips
- Price at 1.1000 → Stop-loss stays at original level (trigger not reached).
- Price hits 1.1020 (+20 pips) → Trailing activates! Stop moves to 1.1005 (15 pips behind).
- Price rises to 1.1025 (+5 pips) → Stop moves to 1.1010 (still 15 pips behind).
- Price rises to 1.1040 → Stop moves to 1.1025.
- Price drops to 1.1030 → Stop stays at 1.1025 (never moves backward).
Result: If price reverses and hits your stop at 1.1025, you lock in +25 pips profit instead of potentially losing your entire position.
For trending markets, use a larger Trailing Distance (15-20 pips) and smaller Step Size (3-5 pips). For scalping, tighten both values. Always test on demo first.
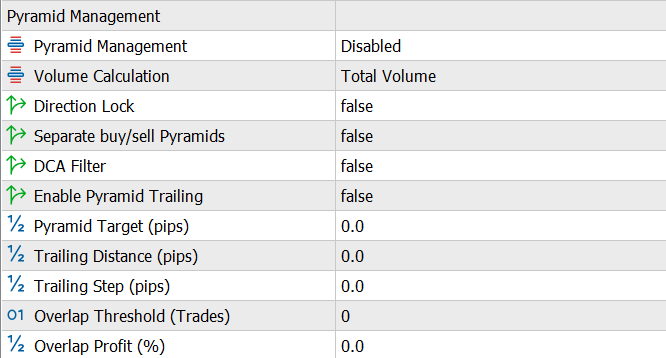
Pyramid Management
Parameters for managing multiple positions with the same comment (strategy).
| Parameter | Description | Importance |
|---|---|---|
Pyramid Management | Pyramid management mode (Disabled, Enabled, or Signal) | Optional |
Volume Calculation | Method for calculating profit target (Initial Volume, Total Volume, or Average Volume) | Conditional |
Direction Lock | Restrict pyramid trades to the same direction | Conditional |
Separate Buy/Sell Pyramids | Manage buy and sell positions separately within the same strategy | Conditional |
DCA Filter | Only allow entries at better prices than the previous entry | Conditional |
Enable Pyramid Trailing | Enable trailing stop for pyramid target exit | Conditional |
Pyramid Target (Pips) | Profit target for the pyramid strategy | Conditional |
Trailing Distance (Pips) | Distance for pyramid trailing stop | Conditional |
Trailing Step (Pips) | Step size for pyramid trailing stop | Conditional |
Overlap Threshold | Minimum number of trades before profit overlap feature activates | Conditional |
Overlap Profit % | Percentage of profit to use for overlapping trades | Conditional |
What is Pyramid Management?
Pyramid Management groups multiple trades with the same strategy name (comment) and manages them as a single coordinated position with a combined profit target. Instead of closing each trade individually, all trades in the group close together when the target is reached.
Example: 3 trades with 50 pip combined target
Strategy: "EURUSD_Long" | Pyramid Target: 50 pips | Volume Calculation: Total Volume
- BUY 0.1 lot at 1.1000 (Trade #1)
- Price drops → BUY 0.1 lot at 1.0950 (Trade #2) — Better entry!
- Price drops more → BUY 0.1 lot at 1.0900 (Trade #3)
- Breakeven = (1.1000 + 1.0950 + 1.0900) ÷ 3 = 1.0950
- Price hits 1.1000 → All 3 trades close together with combined +50 pips profit!
Result: Trade #1 = +0 pips, Trade #2 = +50 pips, Trade #3 = +100 pips. Net: +$150 profit on 0.3 total lots.
Key Settings Explained
- Direction Lock: When enabled, new entries are restricted to the same direction as existing trades in the strategy. Prevents mixed buy/sell positions within the same pyramid.
- Separate Buy/Sell Pyramids: Manages long and short positions independently with separate profit targets and breakeven calculations.
- DCA Filter: Only allows new trades at BETTER prices than the previous entry. For buys, price must be lower. For sells, price must be higher.
- Pyramid Trailing: When the strategy reaches its profit target, instead of closing immediately, the target trails the market, locking in gains while allowing the profit to grow on strong trends.
- Overlap Feature: After reaching the Overlap Threshold (number of trades), the EA uses a percentage of unrealized profits to offset the risk of new entries. Example: with 3 trades in profit, new entry risk can be partially covered by existing floating profit.
Volume Calculation (determines profit target sizing)
- Initial Volume: Target = Pyramid Target × first trade's lot size. Fastest exit, smallest profit.
- Total Volume: Target = Pyramid Target × sum of all trades' lot sizes. Largest profit but requires more price movement.
- Average Volume: Target = Pyramid Target × average lot size across trades. Balanced approach.
Combine Pyramid Management with Pyramid Levels to automatically control entry spacing and lot sizing per level. Use DCA Filter for true averaging down, or disable it for grid-style strategies.
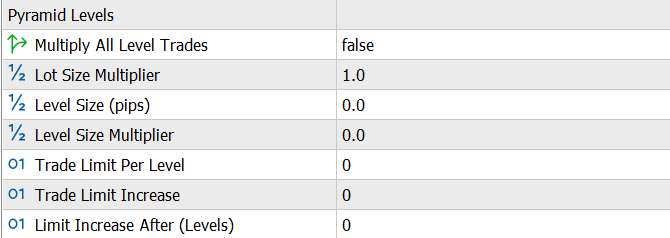
Pyramid Levels
Parameters for controlling pyramid level structure and trade entry conditions.
| Parameter | Description | Importance |
|---|---|---|
Multiply All Level Trades | Apply lot multiplier to all trades in a level | Conditional |
Lot Size Multiplier | Multiplier for lot size in subsequent pyramid levels | Conditional |
Trade Limit Per Level | Maximum trades allowed per pyramid level (0 = unlimited) | Conditional |
Level Size (Pips) | Price distance between pyramid levels | Conditional |
Level Size Multiplier | Multiplier for increasing level size at each level | Conditional |
Trade Limit Increase | Amount to increase trade limit after specified levels | Conditional |
Limit Increase After | Number of levels before increasing trade limit | Conditional |
What are Pyramid Levels?
Pyramid Levels divides your pyramid entries into price-based zones. Each "level" is a price range where trades can be placed. This controls entry spacing, position sizing, and trade limits as price moves away from your initial entry.
Example: BUY pyramid with Level Size = 20 pips
Initial entry at 1.1000, Level Size Multiplier = 1.5, Lot Multiplier = 2.0
- Level 0: 1.1000+ (initial entry zone) → 0.1 lots
- Level 1: 1.0980 (20 pips below) → 0.2 lots (2× multiplier)
- Level 2: 1.0950 (30 pips below L1, 20×1.5) → 0.4 lots
- Level 3: 1.0905 (45 pips below L2, 30×1.5) → 0.8 lots
All Settings Explained
- Level Size (pips): Distance from initial entry to Level 1. Set to 0 to disable level-based spacing.
- Level Size Multiplier: Each subsequent level is this × further apart. 1.0 = equal spacing, 1.5 = 50% wider each level.
- Lot Size Multiplier: Trade size increases by this factor per level. 2.0 = double the lots at each new level.
- Multiply All Level Trades: When ON, ALL trades at a level use the multiplied lot size. When OFF, only the first trade at each level is multiplied.
- Trade Limit Per Level: Maximum trades allowed in each level zone. 0 = unlimited.
- Trade Limit Increase: Add this many more allowed trades after X levels.
- Limit Increase After: How many levels before the trade limit increases. Example: Limit=2, Increase=1, After=3 → Levels 0-2 allow 2 trades, Levels 3-5 allow 3 trades.
Use Level Size Multiplier > 1 to give more breathing room as drawdown increases. Use Lot Multiplier > 1 to average down more aggressively at deeper levels (higher risk).
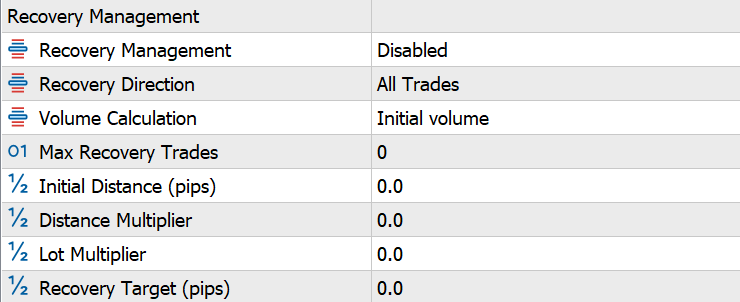
Recovery Management
Parameters for automatic recovery trading during drawdowns.
| Parameter | Description | Importance |
|---|---|---|
Recovery Management | Recovery system mode (Disabled, Enabled, or Signal) | Optional |
Recovery Direction | Apply recovery to All Trades, Long Only (buys), or Short Only (sells) | Conditional |
Volume Calculation | Method for calculating recovery profit target (Initial Volume, Total Volume, or Average Volume) | Conditional |
Max Recovery Trades | Maximum number of recovery trades allowed (0 = disabled) | Conditional |
Initial Distance (Pips) | Price distance for first recovery trade | Conditional |
Distance Multiplier | Multiplier for distance in subsequent recovery trades | Conditional |
Lot Multiplier | Multiplier for lot size in subsequent recovery trades | Conditional |
Recovery Target (Pips) | Profit target for recovery trades | Conditional |
What is Recovery Management?
Recovery Management automatically adds trades when a position moves against you, attempting to recover losses through averaging. When the combined position reaches the Recovery Target, all trades close together for a net profit.
High Risk Strategy
Recovery trading is similar to Martingale. It can recover losses but also amplify them significantly. Always use Max Recovery Trades limit and test thoroughly on demo.
Example: BUY at 1.1000 goes wrong
Initial Distance: 20 pips | Distance Multiplier: 1.5 | Lot Multiplier: 2.0 | Recovery Target: 10 pips
- Original BUY: 0.1 lots at 1.1000
- Price drops 20 pips → Recovery #1: 0.2 lots at 1.0980
- Price drops 30 more pips (20×1.5) → Recovery #2: 0.4 lots at 1.0950
- Breakeven now at ~1.0964 (weighted average)
- Price rises to 1.0974 (+10 pips from breakeven) → All 3 trades close!
Result: Original trade still in loss, but recovery trades generated enough profit to offset it plus hit the 10 pip target.
All Settings Explained
- Recovery Direction: Filter which trades can trigger recovery. "All Trades" applies to any position, "Long Only" only to buys, "Short Only" only to sells. Useful for directional bias strategies.
- Initial Distance (pips): How far price must move against you before first recovery trade triggers.
- Distance Multiplier: Each subsequent recovery triggers this × further. 1.5 = 50% wider spacing each level.
- Lot Multiplier: Each recovery trade is this × larger. 2.0 = double lots each time (Martingale style).
- Recovery Target (pips): Combined profit target for all trades from breakeven price.
- Max Recovery Trades: Safety cap. If reached, no more recovery trades open.
- Volume Calculation: How recovery target is calculated (Initial/Total/Average volume).
Trade Limits Respected
Recovery trades respect all max trade limits (max trades, max long/short, per symbol, total volume). If limits are reached, recovery trades are silently skipped.
Use conservative settings: Max 3-4 recovery trades, small lot multiplier (1.2-1.5), and always set a stop loss at your maximum acceptable drawdown level on the original trade.
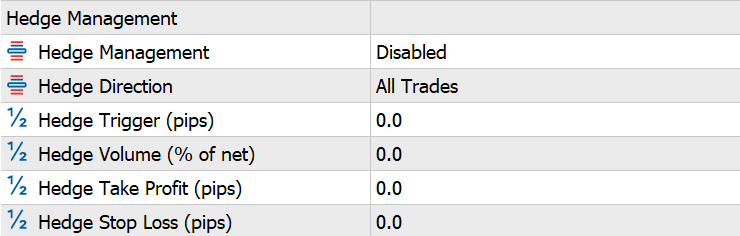
Hedge Management
Parameters for automatic hedging during drawdowns.
| Parameter | Description | Importance |
|---|---|---|
Hedge Management | Hedge management mode (Disabled or Enabled) | Optional |
Hedge Direction | Apply hedging to All Trades, Long Only (net long strategies), or Short Only (net short strategies) | Conditional |
Hedge Trigger (Pips) | Loss required to trigger hedge position | Conditional |
Hedge Volume | Percentage of net position volume to use for hedge | Conditional |
Hedge Take Profit (Pips) | Take profit for hedge positions | Conditional |
Hedge Stop Loss (Pips) | Stop loss for hedge positions | Conditional |
What is Hedge Management?
Hedge Management protects your pyramid strategies by automatically opening an opposite-direction trade when losses exceed a threshold. If your longs keep falling, the hedge (a short) profits and reduces overall drawdown.
Example: Hedging a losing BUY strategy
Strategy: "EURUSD_Long" with 0.5 total lots | Hedge Trigger: 50 pips | Volume: 50%
- Your BUY trades are at 1.1000 and falling.
- Worst trade hits -50 pips loss → Hedge activates!
- EA opens SELL 0.25 lots at 1.0950 (50% of 0.5 lots).
- If price drops to 1.0900: BUY trades lose more, but SELL hedge gains +50 pips.
- Hedge has its own TP/SL — can close independently for profit.
Result: The hedge offsets further losses. If market bounces back, close the hedge at SL and let original trades recover.
All Settings Explained
- Hedge Direction: Filter which strategies can trigger hedging. "All Trades" hedges any net exposure, "Long Only" only hedges when net long (more buys than sells), "Short Only" only hedges when net short.
- Hedge Trigger (pips): The loss threshold on the worst trade before a hedge opens.
- Hedge Volume (%): Hedge lot size as % of your total strategy exposure. 50% = half the size of your combined longs.
- Hedge Take Profit (pips): TP for the hedge trade. Closes hedge at profit while original trades may still be open.
- Hedge Stop Loss (pips): SL for the hedge. Limits hedge loss if market reverses quickly in your favor.
One Hedge Per Strategy
Each strategy can only have one active hedge at a time. The hedge is a separate trade with its own TP/SL and does not affect the pyramid's profit target.
Trade Limits Respected
Hedge trades respect all max trade limits (max trades, max long/short, per symbol, total volume). If limits are reached, hedge trades are silently skipped.
Use hedging as insurance, not a profit strategy. Set the hedge TP smaller than the original strategy target so it locks in partial protection before the main trades fully recover.
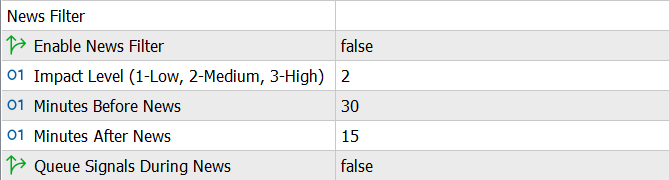
News Filter
Parameters for avoiding trading during high-impact economic news.
| Parameter | Description | Importance |
|---|---|---|
Enable News Filter | Enable/disable news filter functionality | Optional |
Impact Level | Minimum news impact level to filter (1-Low, 2-Medium, 3-High) | Conditional |
Minutes Before News | Minutes before news event to stop trading | Conditional |
Minutes After News | Minutes after news event to resume trading | Conditional |
Queue Signals During News | Queue incoming signals during news events instead of rejecting them. Signals execute after news period ends | Conditional |
What is News Filter?
News Filter automatically pauses trading around high-impact economic events (NFP, FOMC, CPI) to protect you from sudden, unpredictable volatility spikes.
Example: NFP Release at 8:30 AM
Settings: Impact Level = 3 (High) | Before = 30 min | After = 15 min
- 8:00 AM → Trading pauses (30 min before)
- 8:30 AM → NFP released, market spikes 50+ pips
- 8:45 AM → Trading resumes (15 min after)
- Any signals received during pause are rejected OR queued (if enabled)
All Settings Explained
- Impact Level: Minimum news severity to filter. 1 = filter all news, 2 = medium+high, 3 = high only (NFP, FOMC, etc.).
- Minutes Before News: How early to pause trading. 30 minutes is common to avoid pre-news positioning volatility.
- Minutes After News: How long to wait after release before resuming. 15-30 min lets the initial spike settle.
- Queue Signals During News: When ON, signals during the filter window are saved and executed after the pause. When OFF, they're rejected.
Existing Trades
News Filter only blocks NEW trades. Existing positions continue to be managed (trailing stops, pyramid targets, etc.) during the filter window.
For prop firm challenges, set Impact Level to 2 (Medium+High) with 30/15 minute windows. This avoids most volatility spikes while not pausing too frequently.
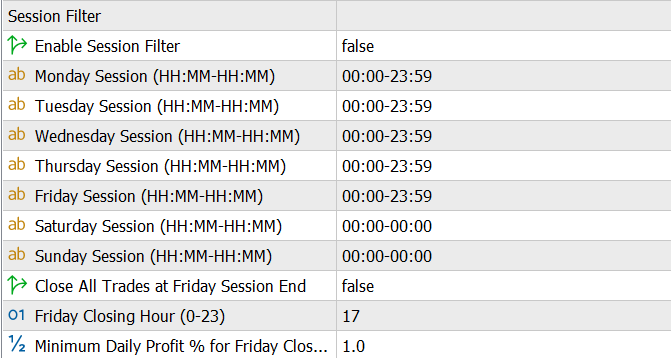
Session Filter
Parameters for restricting trading to specific time periods.
| Parameter | Description | Importance |
|---|---|---|
Enable Session Filter | Enable/disable session filter functionality | Optional |
Monday Session | Trading hours for Monday (format: HH:MM-HH:MM) | Conditional |
Tuesday Session | Trading hours for Tuesday (format: HH:MM-HH:MM) | Conditional |
Wednesday Session | Trading hours for Wednesday (format: HH:MM-HH:MM) | Conditional |
Thursday Session | Trading hours for Thursday (format: HH:MM-HH:MM) | Conditional |
Friday Session | Trading hours for Friday (format: HH:MM-HH:MM) | Conditional |
Saturday Session | Trading hours for Saturday (format: HH:MM-HH:MM, 00:00-00:00 = disabled) | Conditional |
Sunday Session | Trading hours for Sunday (format: HH:MM-HH:MM, 00:00-00:00 = disabled) | Conditional |
Close All Trades at Friday Session End | Automatically close positions at Friday session end | Conditional |
Friday Closing Hour | Hour to close positions on Friday (0-23, broker time) | Conditional |
Minimum Daily Profit % for Friday Closure | Minimum daily profit percentage required for Friday closure | Conditional |
What is Session Filter?
Session Filter restricts trading to specific hours each day. Trade only during London/NY overlap for volatility, or avoid Asian session if your strategy struggles in ranging markets.
Example: London + NY Sessions Only
All times in broker server time (usually GMT+2 or GMT+3)
- Monday-Thursday: 08:00-20:00 (London open to NY close)
- Friday: 08:00-17:00 (stop early before weekend)
- Saturday-Sunday: 00:00-00:00 (disabled, markets closed)
All Settings Explained
- Day Sessions: Format is HH:MM-HH:MM (24-hour). "00:00-00:00" disables trading that day completely.
- Close All Trades at Friday Session End: Auto-close all positions at the specified Friday hour to avoid weekend gap risk.
- Friday Closing Hour: When to close (0-23 in broker time). Example: 17 = 5 PM broker time.
- Minimum Daily Profit % for Friday Closure: Only auto-close if your daily profit is at least this %. Prevents closing losing positions at end of week.
Broker Server Time
All session times use your broker's server timezone, NOT your local time. Check your MT5 Market Watch to see current broker time.
For best fills and tightest spreads, focus on London/NY overlap (12:00-16:00 GMT). Avoid low-liquidity hours like 20:00-00:00 GMT.
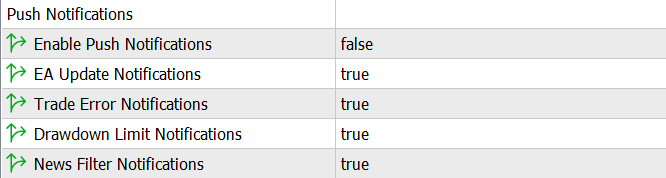
Push Notifications
Parameters for controlling MT5 mobile push notifications.
| Parameter | Description | Importance |
|---|---|---|
Enable Push Notifications | Enable/disable all MT5 push notifications to mobile device | Optional |
EA Update Notifications | Receive notifications when EA updates are available | Conditional |
Trade Error Notifications | Receive notifications when trade execution errors occur | Conditional |
Drawdown Limit Notifications | Receive notifications when daily or maximum drawdown limits are reached | Conditional |
News Filter Notifications | Receive notifications when news filter pauses trading | Conditional |
How Push Notifications Work
- MT5 Mobile Integration: Push notifications use MetaTrader 5's built-in mobile notification system to send alerts directly to your mobile device.
- Setup Requirement: To receive push notifications, you must first configure your MetaTrader 5 mobile app and link it to your trading terminal.
- Master Control: The "Enable Push Notifications" setting acts as a master switch.
- Notification Types: Each notification type can be independently enabled or disabled:
- EA Updates: Alerts you when a new version of the EA is available.
- Trade Errors: Notifies you of failed trade executions or errors.
- Drawdown Limits: Warns you when risk management limits are reached.
- News Filter: Informs you when trading is paused due to upcoming news events.
- Different from Telegram: MT5 push notifications are separate from Telegram notifications.
- Real-Time Alerts: Push notifications are sent immediately when events occur.
Setting Up MT5 Push Notifications
Before you can receive push notifications from the EA, you need to configure MT5 to enable push notifications.
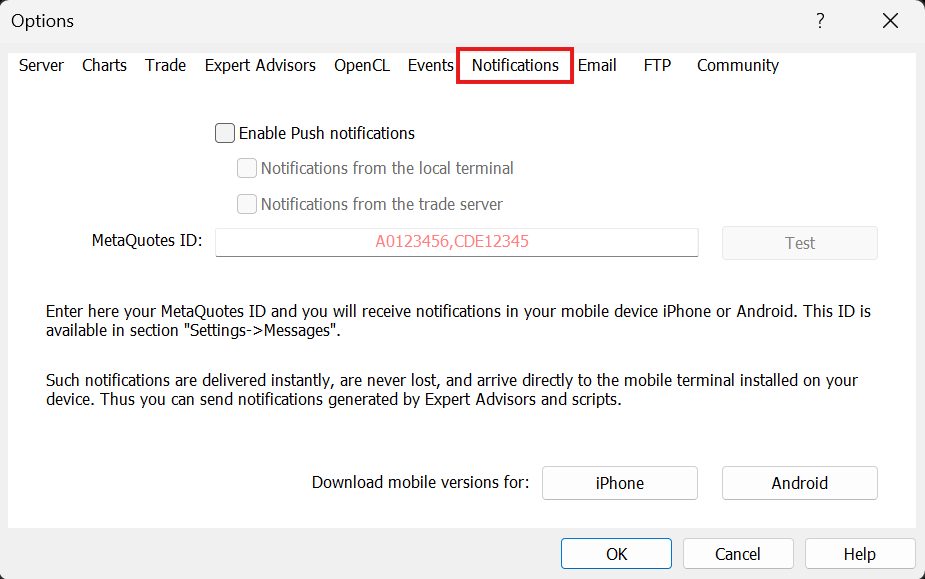
Open MT5 Options
In your MetaTrader 5 terminal, navigate to Tools → Options.
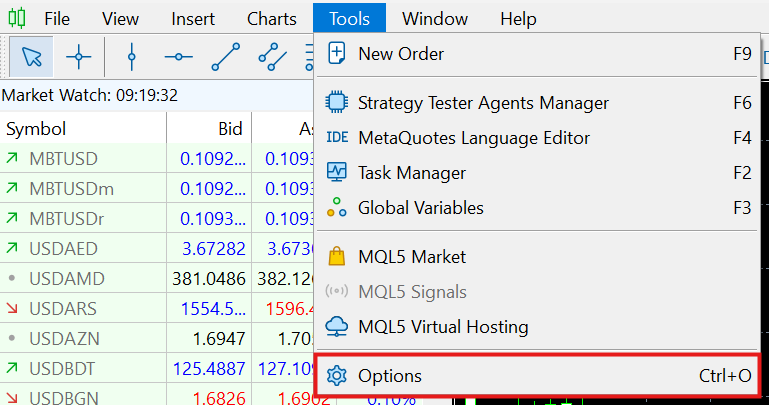
Navigate to Notifications Tab
Click on the Notifications tab at the top of the window.
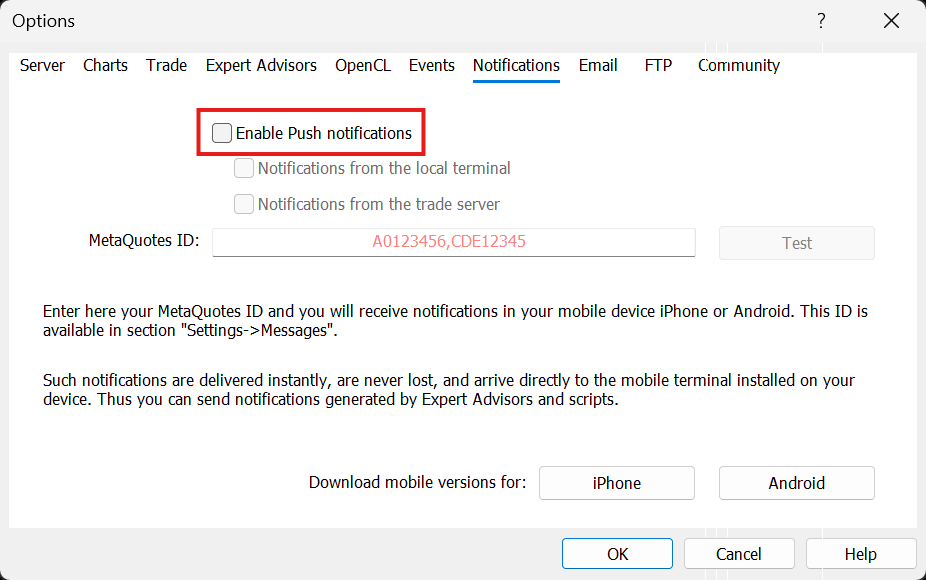
Enable Push Notifications
Check the box labeled "Enable Push notifications" to activate the push notification system.
Enter Your MetaQuotes ID
In the MetaQuotes ID field, enter your unique MetaQuotes ID. This ID can be found in your MetaTrader 5 mobile app under Settings → Messages.
How to get your MetaQuotes ID
Open your MT5 mobile app, go to Settings, tap on Messages, and you'll see your MetaQuotes ID displayed.
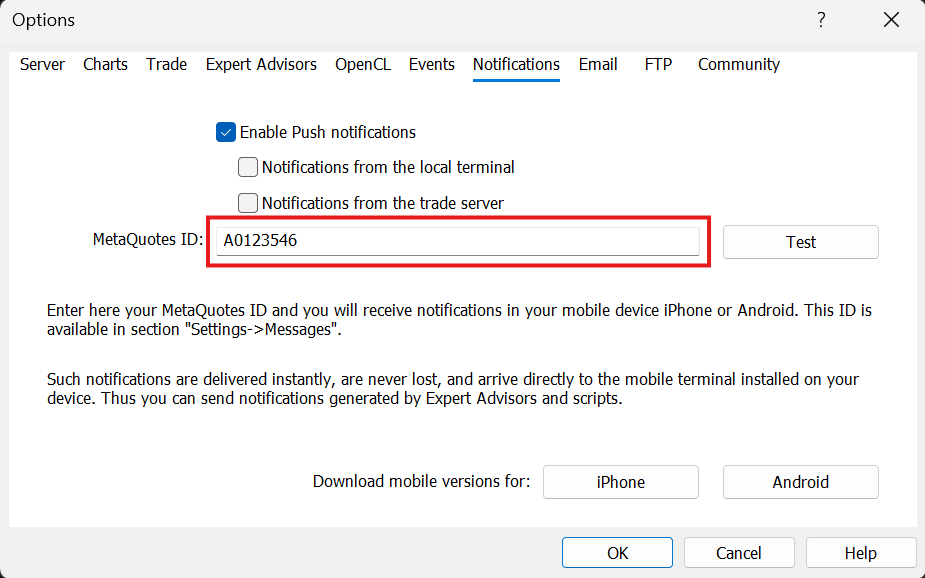
Click the Test button to verify your setup. Once verified, click OK to save your settings.
Setup Complete!
Once you've completed these steps, your MT5 terminal is ready to send push notifications to your mobile device.
Dashboard Settings
Parameters for controlling the on-chart dashboard panel display.

| Parameter | Description | Importance |
|---|---|---|
Show Dashboard Panel | Enable/disable the on-chart dashboard panel | Optional |
Font Size | Dashboard text font size in points | Optional |
Panel Width (pixels) | Width of the dashboard panel in pixels | Optional |
Show Performance Stats | Display performance statistics (win rate, avg win/loss, R:R ratio, expectancy) in dashboard | Optional |
Show Upcoming News | Display upcoming high-impact news events in the dashboard panel | Optional |
Global Breakeven | Display global breakeven line on chart | Optional |
Strategy Target Lines | Display strategy target lines on chart | Optional |
What is the Dashboard?
The on-chart dashboard displays real-time account metrics, performance statistics, and strategy status directly on your MT5 chart.
All Settings Explained
- Show Dashboard Panel: Master toggle to show/hide the entire dashboard.
- Font Size: Text size in points (default: 10). Increase for high-resolution monitors.
- Panel Width: Width in pixels (default: 450). Adjust if panel overlaps your chart.
- Show Performance Stats: Display win rate, average win/loss, expectancy, and other trading metrics.
- Show Upcoming News: Display next high-impact news events with countdown timer.
- Global Breakeven: Draw a horizontal line showing breakeven price for all open positions combined.
- Strategy Target Lines: Draw horizontal lines showing pyramid profit targets for each active strategy.
The dashboard updates in real-time. Disable it during backtesting for faster performance.
Backtesting Settings
Parameters for strategy testing and CSV-based signal processing.

| Parameter | Description | Importance |
|---|---|---|
CSV File Name | Base name for CSV file when using CSV signals during backtesting | Conditional |
Exits From CSV | Process exit signals from CSV file | Conditional |
Timezone offset hrs (UTC=0) | Timezone of CSV timestamps relative to UTC. Set to 0 if CSV uses UTC time (recommended). EA automatically converts to broker server time. | Conditional |
What are Backtesting Settings?
These settings enable the EA to process trading signals from CSV files in the Strategy Tester. Useful for backtesting TradingView strategies or replaying historical signals.
All Settings Explained
- CSV File Name: Base name for your signal file (without .csv). File must be in MT5 Common Files folder.
- Exits From CSV: When ON, process exit signals from CSV. When OFF, use only EA's own exit logic (TP/SL/trailing).
- Timezone Offset: Your CSV timestamp timezone relative to UTC. Set to 0 if CSV uses UTC (recommended).
CSV File Location
Place your CSV file in: File → Open Data Folder → MQL5 → Files (or Common Files folder for shared access).
For complete backtesting instructions and CSV format details, see the Backtesting Guide.
Miscellaneous
Additional configuration options.
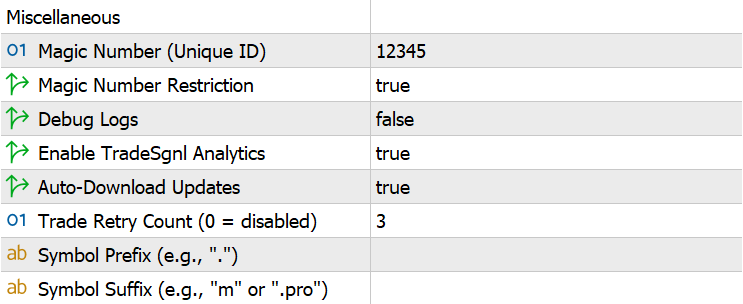
| Parameter | Description | Importance |
|---|---|---|
Magic Number (Unique ID) | Unique identifier for trades placed by this EA | Optional |
Magic Number Restriction | Only manage trades with matching magic number | Optional |
Debug Logs | Enable detailed debug messages in logs | Optional |
TradeSgnl Analytics | Enable collection and upload of trade statistics to TradeSgnl server | Optional |
Auto-Download Updates | Automatically download new EA versions to the Experts folder | Optional |
Trade Retry Count | Number of retry attempts for failed trade operations (0 = disabled) | Optional |
Symbol Prefix | Broker-specific symbol prefix (e.g., "." for some brokers). Applied to trade symbols for proper matching. | Optional |
Symbol Suffix | Broker-specific symbol suffix (e.g., "m", ".pro", "_raw"). Applied to trade symbols for proper matching. | Optional |
Additional Settings
General EA settings for trade identification, logging, and updates.
All Settings Explained
- Magic Number: Unique ID assigned to all trades by this EA (default: 12345). Use different numbers if running multiple EAs on the same account.
- Magic Number Restriction: When ON (default), EA only manages trades with matching magic number. Prevents interference with other EAs or manual trades.
- Debug Logs: Enable verbose logging to MT5 Experts tab. Useful for troubleshooting but generates large log files.
- TradeSgnl Analytics: Send anonymous trade statistics to TradeSgnl servers for performance tracking in the portal.
- Auto-Download Updates: Automatically download new EA versions to your MQL5/Experts folder when available.
- Trade Retry Count: Number of automatic retry attempts for failed trade operations (default: 3). Set to 0 to disable retry functionality.
- Symbol Prefix: Broker-specific prefix added to symbols (e.g., "." for some brokers). Leave empty if your broker uses standard symbol names.
- Symbol Suffix: Broker-specific suffix added to symbols (e.g., "m", ".pro", "_raw"). Required for brokers that append codes to symbol names.
Running multiple strategies? Use different Magic Numbers (e.g., 11111, 22222) so each EA only manages its own trades.
EA Setup
Complete setup guide for TradeSgnl. Install the Expert Advisor with the EA Manager, the standalone installer, or manually, then connect your account and start automated trading.
Telegram Copier
Automatically copy trading signals from Telegram channels to MetaTrader 5. Configure signal parsing with AI or regex, set up templates, and execute trades in real-time.