
Low-Code Alert Setup
Learn how to add alert functionality to TradingView scripts for automated trading
Introduction
This guide shows you how to modify existing TradingView strategy scripts to send automated trading signals to your MT5 EA via TradeSgnl. You'll learn how to add alert functionality to your Pine Script strategies to enable automated trading.
What You'll Learn
Add alert message inputs to your strategy settings
Allow easy signal configuration directly in TradingView's settings panel
Attach alert messages to strategy calls
Ensure reliable communication between TradingView and your MT5 platform
Configure signal parameters for automated trading
Include risk settings, stop-loss, take-profit, and other trading parameters
This guide is ideal for traders who already have custom TradingView strategies and want to connect them to TradeSgnl EA for automated execution. We'll walk through the process step-by-step, from adding alert inputs to configuring webhook alerts.
Strategy Lab (Recommended)
Strategy Lab is our AI-powered coding assistant designed specifically for TradeSgnl automation. Instead of manually writing Pine Script or figuring out where to place alert inputs, you can simply chat with the AI to build new strategies from scratch or adapt existing code in seconds.
It features a powerful split-pane interface with a conversational chat on the right and a live code preview on the left. All the strategies you generate are automatically saved to your account so you can revisit and iterate on them later.
Key Features
Conversational Generation
Describe your ideal trading strategy in plain English, and the AI will write the complete, automation-ready Pine Script for you.
Code Adaptation
Already have a script? Paste it into the chat and ask the AI to "Add TradeSgnl alerts" to instantly upgrade it for automation.
Cloud Sync & History
Your generated strategies are automatically saved. Access your entire library of artifacts anytime from the Strategy Lab sidebar.
How to Use Strategy Lab
Open Strategy Lab from the TradeSgnl Portal. In the chat area, either ask the AI to build a new strategy (e.g., "Build a moving average crossover strategy") or paste your existing pinescript code.
The AI will stream the generated code with syntax highlighting into the Live Preview panel on the left. Once complete, hit Copy and paste the result into your TradingView Pine Editor.
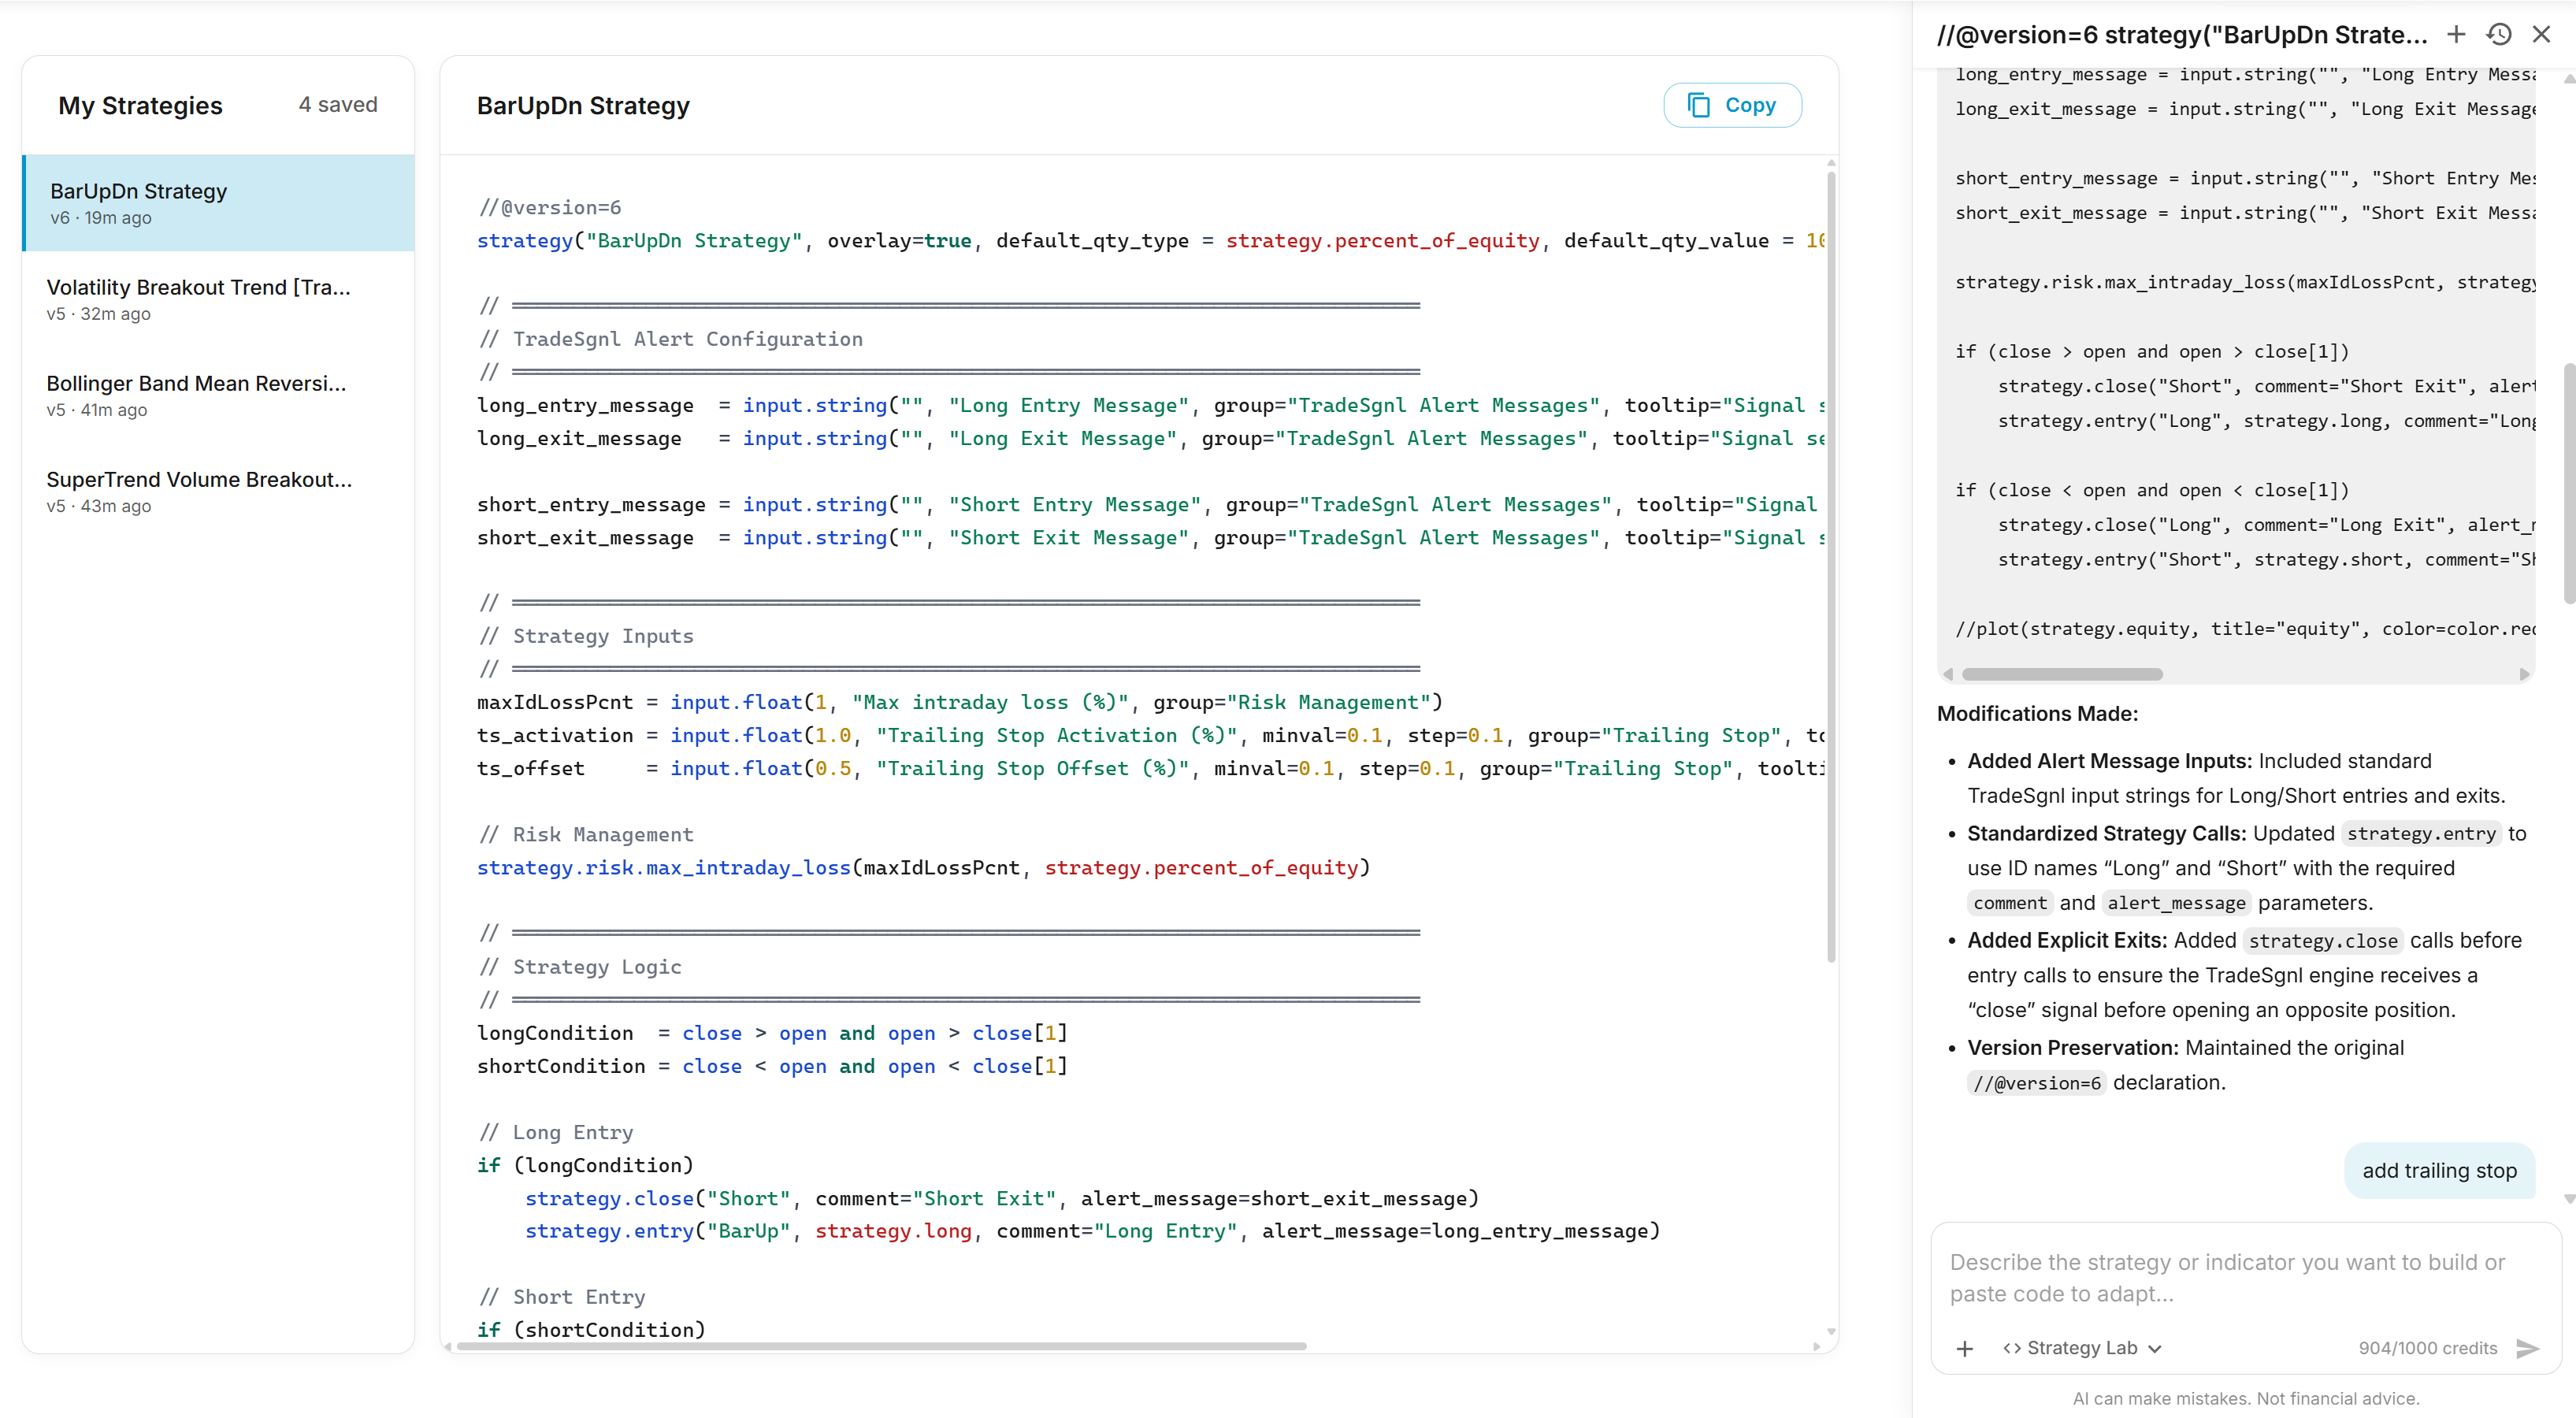
What the AI Modifies
Strategy Lab makes the following changes to your script while preserving all of your original logic, calculations, and plots:
The AI uses TradeSgnl's standardized comment labels ("Long Entry", "Short Entry", "Long Exit", "Short Exit") on all strategy calls. This ensures consistent trade markers on your TradingView chart and proper signal formatting for the EA.
Example: Indicator to Strategy Conversion
If you paste an indicator like an RSI-based signal or a moving average crossover indicator, the AI will detect the signal conditions and automatically convert it into a tradeable strategy. For example:
Original Indicator Code
//@version=5
indicator("RSI Signal", overlay=true)

rsi = ta.rsi(close, 14)
buySignal = ta.crossover(rsi, 30)
sellSignal = ta.crossunder(rsi, 70)

plotshape(buySignal, "Buy", shape.triangleup,
  location.belowbar, color.green)
plotshape(sellSignal, "Sell", shape.triangledown,
  location.abovebar, color.red)
Adapted Strategy Output
//@version=5
strategy("RSI Signal", overlay=true)

// ═══════════════════════════════════════
// TradeSgnl Alert Configuration
// ═══════════════════════════════════════
long_entry_message = input.string("",
  "Long Entry Message",
  group="TradeSgnl Alert Messages")
long_exit_message = input.string("",
  "Long Exit Message",
  group="TradeSgnl Alert Messages")
// ... (short messages omitted for brevity)

rsi = ta.rsi(close, 14)
buySignal = ta.crossover(rsi, 30)
sellSignal = ta.crossunder(rsi, 70)

if (buySignal)
    strategy.entry("Long", strategy.long,
      comment="Long Entry",
      alert_message=long_entry_message)

if (sellSignal and strategy.position_size > 0)
    strategy.close("Long",
      comment="Long Exit",
alert_message=long_exit_message)Try Strategy Lab
Strategy Lab is available to all TradeSgnl users with an active subscription. Chat with our AI to build, adapt, and refine your TradingView scripts in seconds.
Open Strategy LabIf you prefer to manually modify your script, follow the steps below.
Adding Alert Functions
To connect your strategy to TradeSgnl, you need to add alert inputs and attach them to your strategy calls. This is a two-step process.
Step 1 — Add Alert Input Fields
Add these input fields right after your strategy() declaration and any existing input.* declarations at the top of your script. They must be declared before any strategy.entry() or strategy.close() calls that reference them:
TradeSgnl Alert Inputs
// ═══════════════════════════════════════════════════════════════════════
// TradeSgnl Alert Configuration
// ═══════════════════════════════════════════════════════════════════════
long_entry_message = input.string("", "Long Entry Message", group="TradeSgnl Alert Messages", tooltip="Signal sent when a long position is opened")
long_exit_message = input.string("", "Long Exit Message", group="TradeSgnl Alert Messages", tooltip="Signal sent when a long position is closed")

short_entry_message = input.string("", "Short Entry Message", group="TradeSgnl Alert Messages", tooltip="Signal sent when a short position is opened")
short_exit_message = input.string("", "Short Exit Message", group="TradeSgnl Alert Messages", tooltip="Signal sent when a short position is closed")
Step 2 — Attach alert_message to Strategy Calls
Add the alert_message and comment parameters to each strategy.entry() and strategy.close() call:
Strategy Calls with Alert Messages
if (longCondition)
    strategy.entry("Long", strategy.long, comment="Long Entry", alert_message=long_entry_message)

if (exitLongCondition)
    strategy.close("Long", comment="Long Exit", alert_message=long_exit_message)

if (shortCondition)
    strategy.entry("Short", strategy.short, comment="Short Entry", alert_message=short_entry_message)

if (exitShortCondition)
strategy.close("Short", comment="Short Exit", alert_message=short_exit_message)Using alert_message directly on strategy calls is more reliable than separate alert() calls because the alert only fires when the trade actually executes. The comment parameter controls the label shown on TradingView's built-in trade markers on your chart.
Complete Example
Complete Strategy with TradeSgnl Alerts
//@version=5
strategy("TradeSgnl MA Crossover Strategy", overlay=true)

// ═══════════════════════════════════════════════════════════════════════
// TradeSgnl Alert Configuration
// ═══════════════════════════════════════════════════════════════════════
long_entry_message = input.string("", "Long Entry Message", group="TradeSgnl Alert Messages", tooltip="Signal sent when a long position is opened")
long_exit_message = input.string("", "Long Exit Message", group="TradeSgnl Alert Messages", tooltip="Signal sent when a long position is closed")

short_entry_message = input.string("", "Short Entry Message", group="TradeSgnl Alert Messages", tooltip="Signal sent when a short position is opened")
short_exit_message = input.string("", "Short Exit Message", group="TradeSgnl Alert Messages", tooltip="Signal sent when a short position is closed")

// Example strategy (simple moving average crossover)
fastMA = ta.sma(close, 10)
slowMA = ta.sma(close, 20)

// Strategy conditions
longCondition = ta.crossover(fastMA, slowMA)
shortCondition = ta.crossunder(fastMA, slowMA)

// Strategy entries and exits with alert messages
if (longCondition)
    strategy.entry("Long", strategy.long, comment="Long Entry", alert_message=long_entry_message)

if (shortCondition and strategy.position_size > 0)
    strategy.close("Long", comment="Long Exit", alert_message=long_exit_message)

if (shortCondition)
    strategy.entry("Short", strategy.short, comment="Short Entry", alert_message=short_entry_message)

if (longCondition and strategy.position_size < 0)
    strategy.close("Short", comment="Short Exit", alert_message=short_exit_message)

// Plot indicators
plot(fastMA, color=color.blue)
plot(slowMA, color=color.red)Signal Parameters
When setting up your alert messages, you can include various parameters to customize how trades are executed by your TradeSgnl EA. Here's a guide to the most common parameters and how to use them.
How Alert Inputs Work
After adding the alert message inputs to your script as shown above, you'll see these fields in your strategy settings in TradingView. Users paste their full signal string (which includes the license ID) directly into each field.

You only need to enter action parameters (buy, sell, closebuy, etc.) and any optional parameters in the alert message inputs. Your license code is automatically prepended to create the complete signal message.
Basic Signal Structure
Every TradeSgnl alert message follows this basic structure:
LicenseID,SYMBOL,ACTION,risk=VOLUME,[OPTIONAL_PARAMS]For example:
LicenseID,EURUSD,buy,risk=0.01Common Signal Parameters
| Parameter | Description | Example |
|---|---|---|
| symbol | Symbol for the trade | EURUSD, GBPUSD, etc. |
| action | Action to perform | buy, sell, closebuy, closesell |
| risk | Position size in lots or risk percentage | risk=0.01 |
| sl | Stop Loss in points/pips | sl=50 |
| tp | Take Profit in points/pips | tp=100 |
| comment | Trade comment (use quotes) | comment=Strategy 1 |
Signal Examples
Basic Buy Signal:
LicenseID,EURUSD,buy,risk=0.01Buy with Stop Loss and Take Profit:
LicenseID,EURUSD,buy,risk=0.01,sl=50,tp=100Sell Signal with Comment:
LicenseID,GBPUSD,sell,risk=0.02,comment=SMCClose Sell Positions:
LicenseID,EURUSD,closesellAlert Configuration
Once you've added the alert code to your script, you need to create the actual alert in TradingView and configure it to send signals to your TradeSgnl EA.
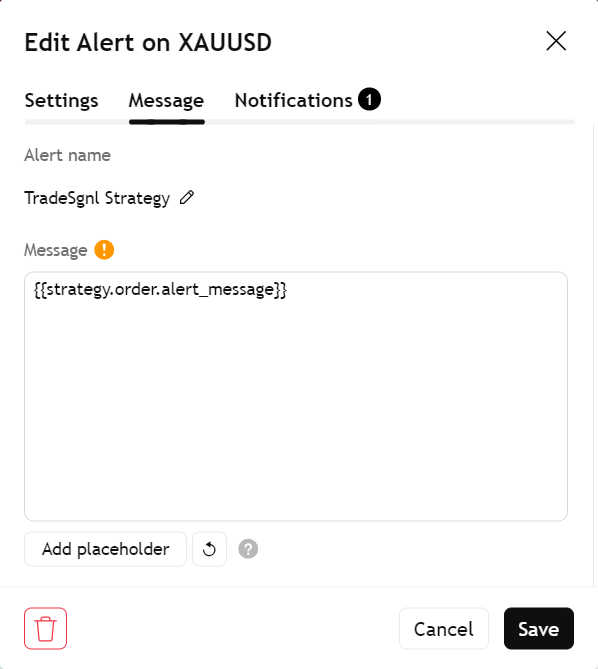
Open Alert Dialog
Click the Alerts Button in the top toolbar of your TradingView chart to open the alert creation dialog.
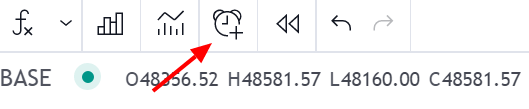
Set Alert Message
Select your script name from the Condition dropdown, then in the Message field, enter the following placeholder:
{{strategy.order.alert_message}}This tells TradingView to send the alert_message content from whichever strategy call triggered the alert.
Set Webhook URL
In the Notifications tab, enable 'Webhook URL' and enter the following URL as the destination for your alerts:
https://webhook.tradesgnl.com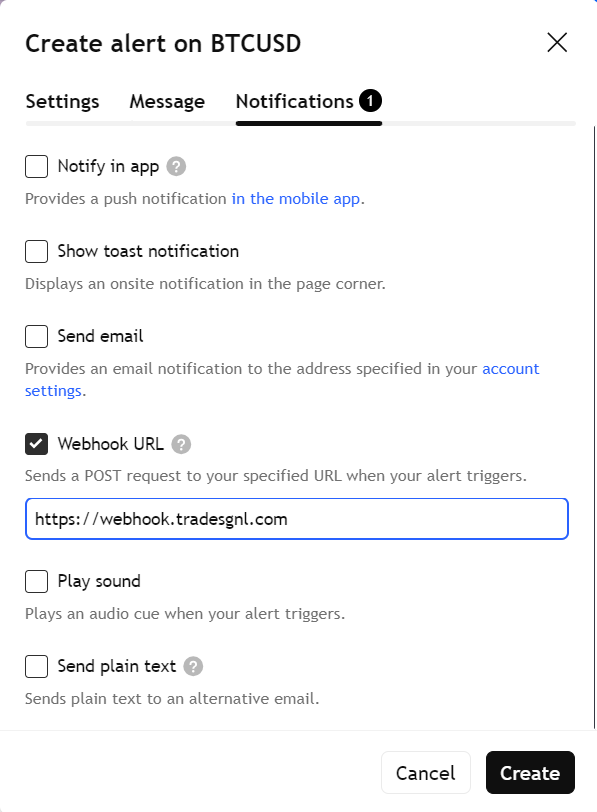
Important Alert Settings
Testing Your Alert
After setting up your alert, follow these steps to test it:
1. Use a Demo Account
Always test your alerts with a demo trading account first to ensure they're working correctly before using real funds.
2. Check EA Logs
Monitor your MT5 EA's logs to verify that alerts are being received and processed correctly by the EA.
3. Start with Small Positions
When testing with real accounts, use minimal risk settings (small position sizes) until you're confident in your alert configuration.
Need Additional Help?
Our support team is ready to assist you with any questions you might have.