
Strategy Builder
Build TradingView strategies and connect to MetaTrader with one-click alert setup. Configure entry, exit, and risk signals visually — no code required.
Introduction
The TradeSgnl Strategy Builder is a customizable TradingView Pine Script that lets you create, test, and automate trading strategies directly in TradingView. It generates alerts that can be sent to your TradeSgnl EA for automated execution.
Key Benefits:
Flexible Data Sources
Use any indicator or data source available on your TradingView chart.
Custom Conditions
Create flexible entry and exit conditions with multiple data comparisons.
Dynamic Risk Management
Set take profit and stop loss levels based on indicators or fixed values.
Getting Started
To get immediate access to the Strategy Builder, navigate to the Strategy Builder page in your portal, enter your TradingView username, and click Get Access. This will instantly add the Strategy Builder to your TradingView account under invite-only scripts.
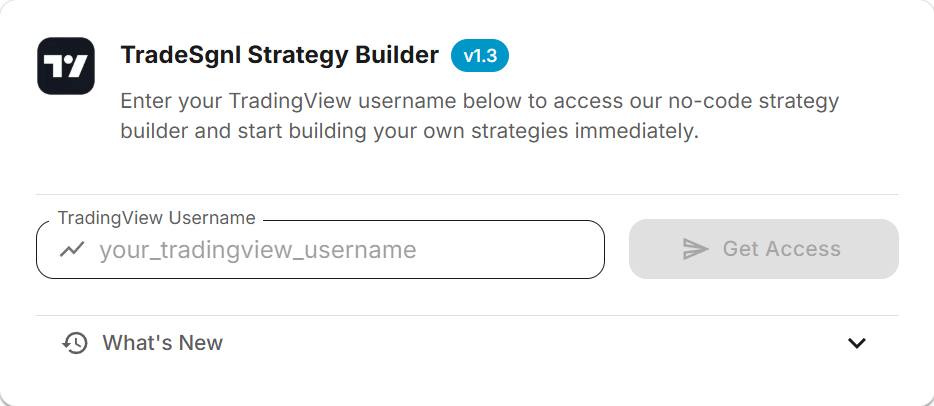
Need to move access to a different TradingView account? Update your username from the same Downloads page and click Update Username.
Open a TradingView Chart. Log into TradingView using the account with the username you provided during your TradeSgnl subscription. Open any chart of your choice where you want to apply the strategy.
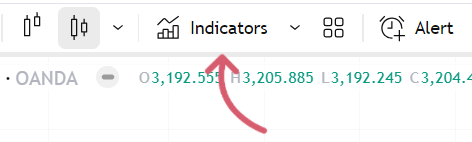
Click Indicators in the Top Toolbar. Locate and click on the "Indicators & Strategies" button in the top toolbar (or press the / key as a shortcut) to open the indicator browser.
Navigate to Invite-only Scripts. In the indicator browser, look for the "Invite-only Scripts" section. Here you'll find the TradeSgnl Strategy Builder that has been shared with your account. Click on it to add it to your chart.
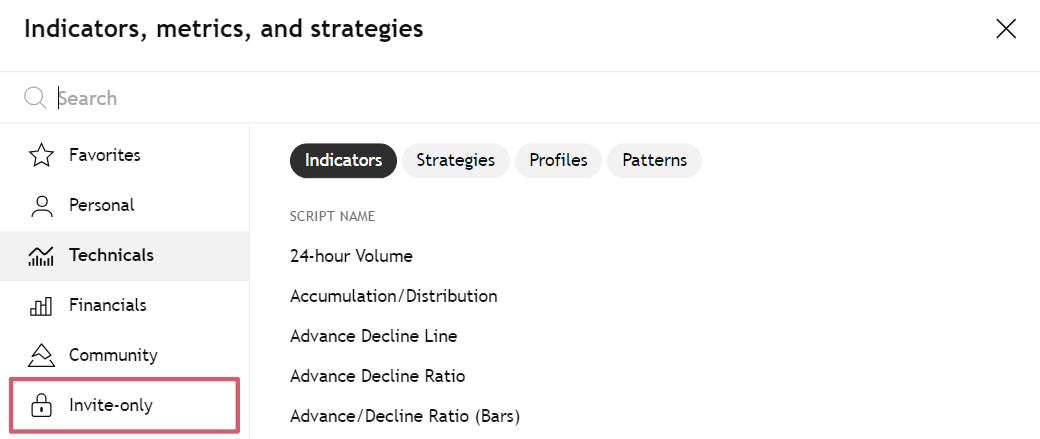
If you don't see the Invite-only Scripts folder or cannot access the Strategy Builder, try refreshing your browser. If issues persist, please contact support with your TradingView username.
Automate Any Indicator
Any TradingView indicator that displays Buy and Sell signals can be automated using the Strategy Builder. This walkthrough demonstrates the complete process using the popular Supertrend indicator as an example. The same technique works for any indicator with signal plots.
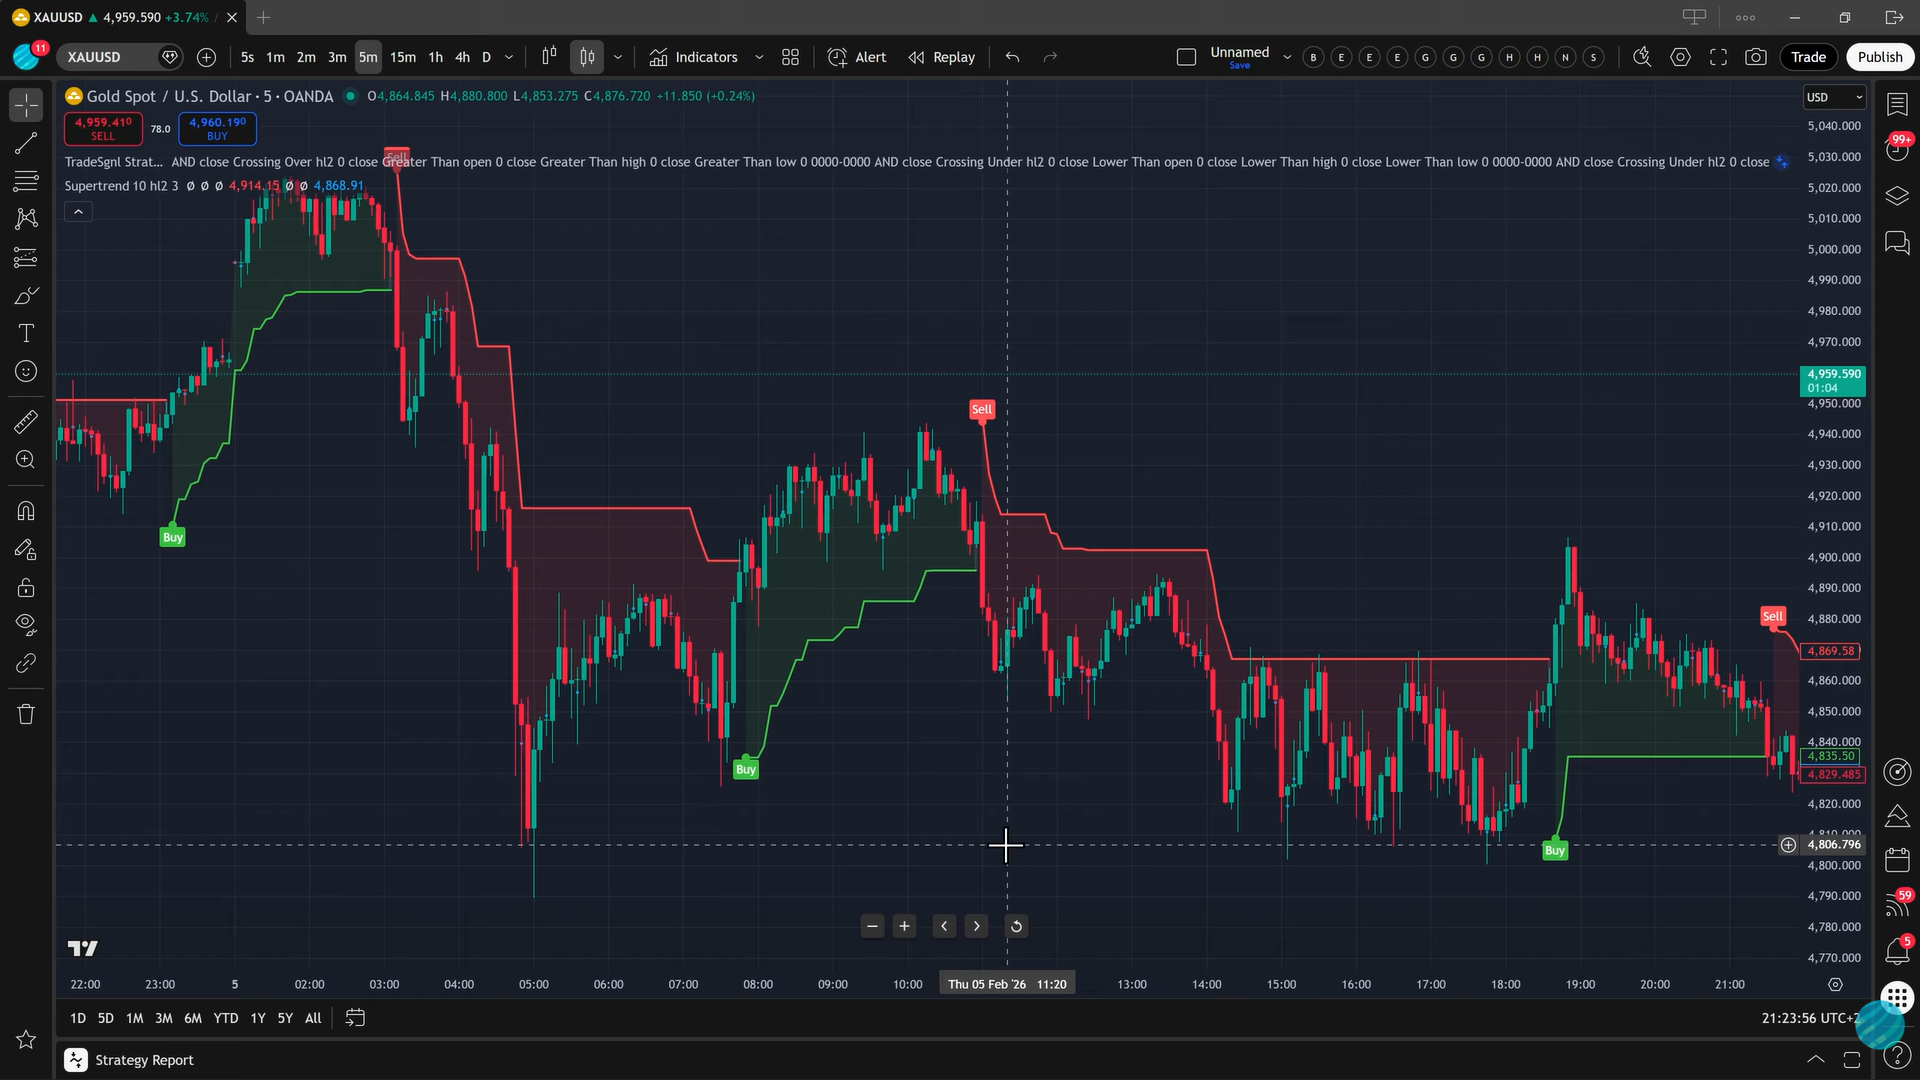
Add the Strategy Builder and Your Indicator. First, add the TradeSgnl Strategy Builder to your chart from the Invite-only Scripts section. Then add the indicator you want to automate. In this example, we're using the Supertrend indicator with its default settings.
You'll see the indicator plotted on your chart. For Supertrend, this appears as a green line during uptrends and a red line during downtrends, with Buy and Sell arrows at trend reversals.
Open the Data Window to Identify Signal Plots. The secret to automating any indicator is the Data Window. Open it from TradingView's right sidebar (the icon looks like a list). This window shows you the exact plot values of every indicator on your chart.
Hover your cursor over the chart and watch the Data Window. When you hover over a candle where a Buy signal appeared, you'll see the indicator's "Buy" plot showing a numerical value while the "Sell" plot stays empty (shown as n/a or blank). When the trend flips to a Sell signal, the values swap.
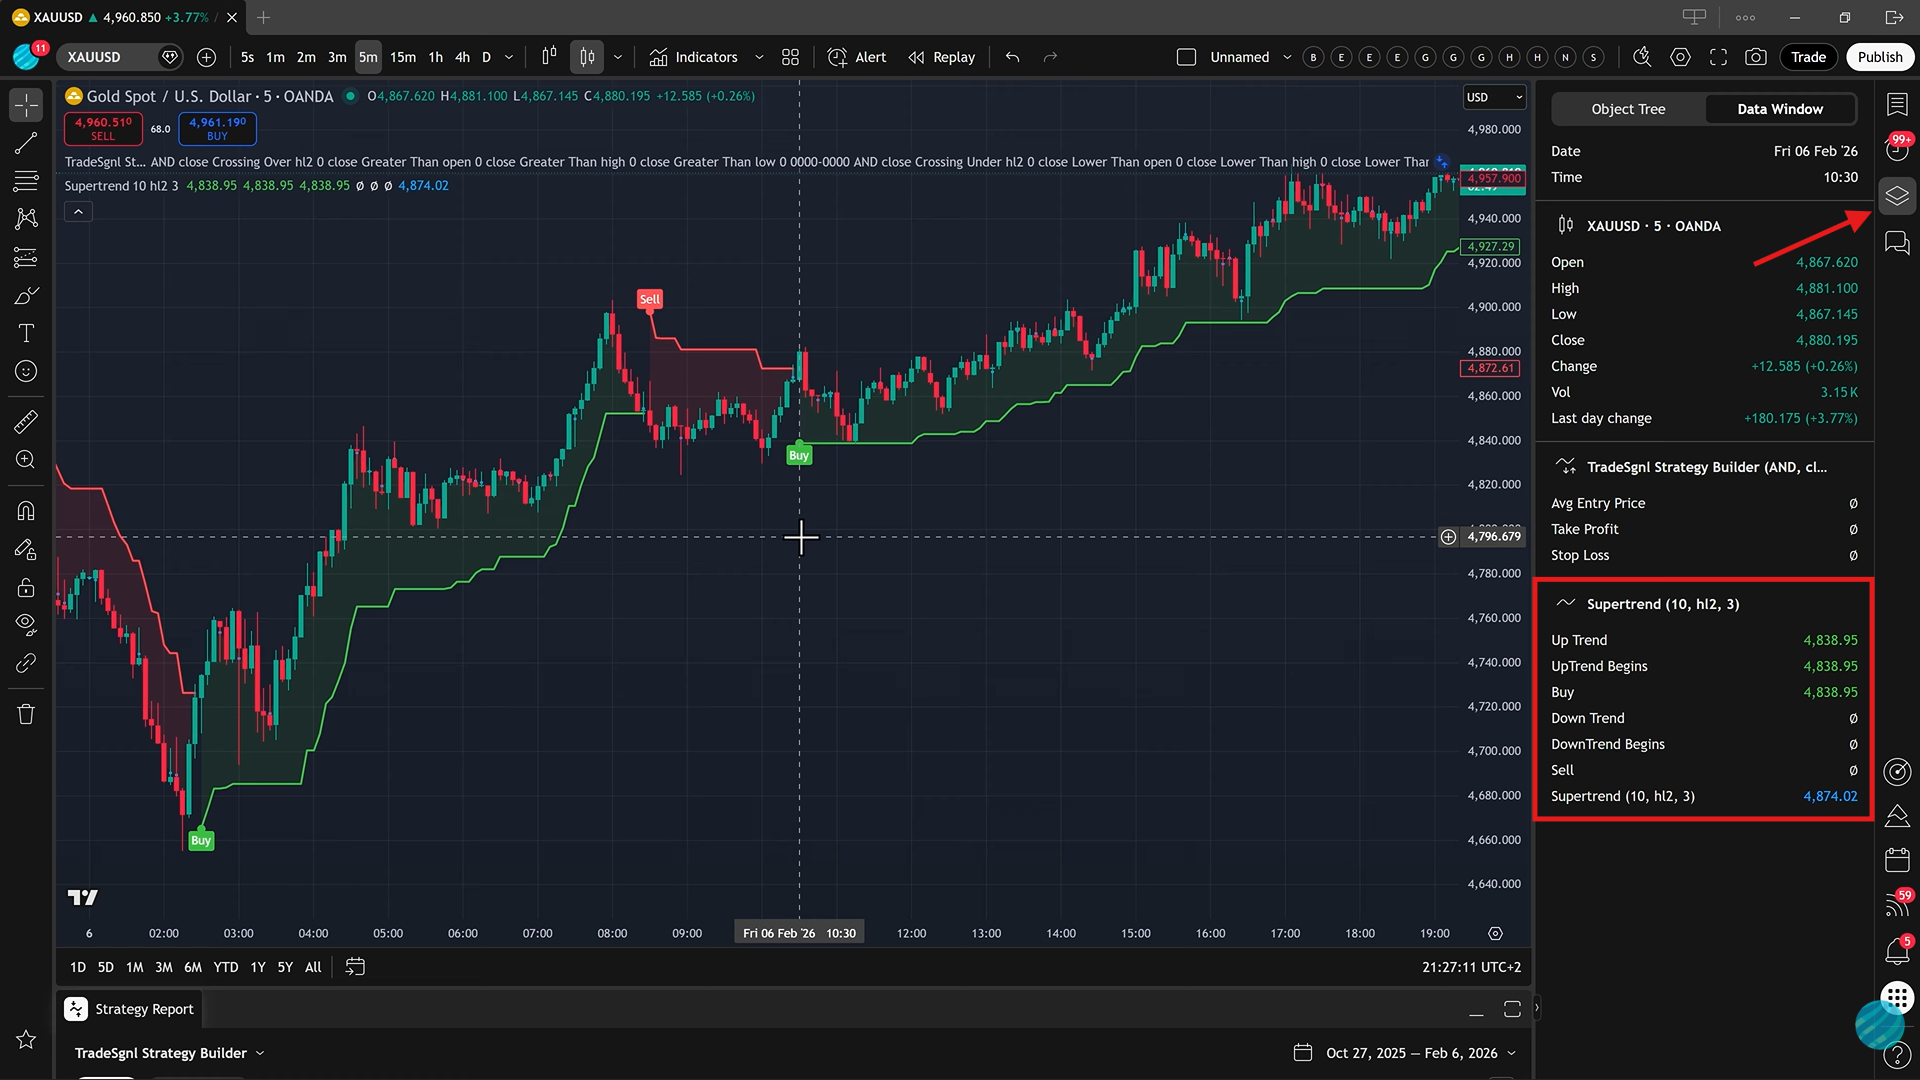
Write down the exact names of the Buy and Sell plots you see in the Data Window. You'll use these when configuring your conditions in the Strategy Builder.
Configure Your Entry Conditions. Open the Strategy Builder settings and navigate to the entry conditions. Configure both Long and Short entries using the signal plots you identified:
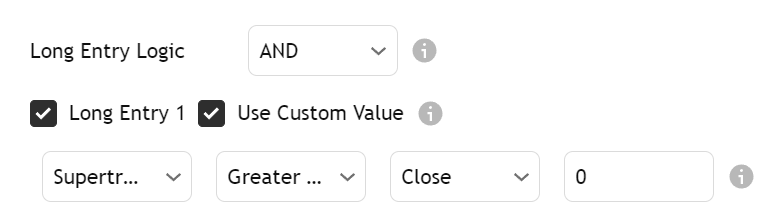
Long Entry 1
- Source A: Select your indicator's Buy plot (e.g., "Supertrend: Buy")
- Operator: Greater Than
- Use Custom Value: Enable this option
- Custom Value: 0
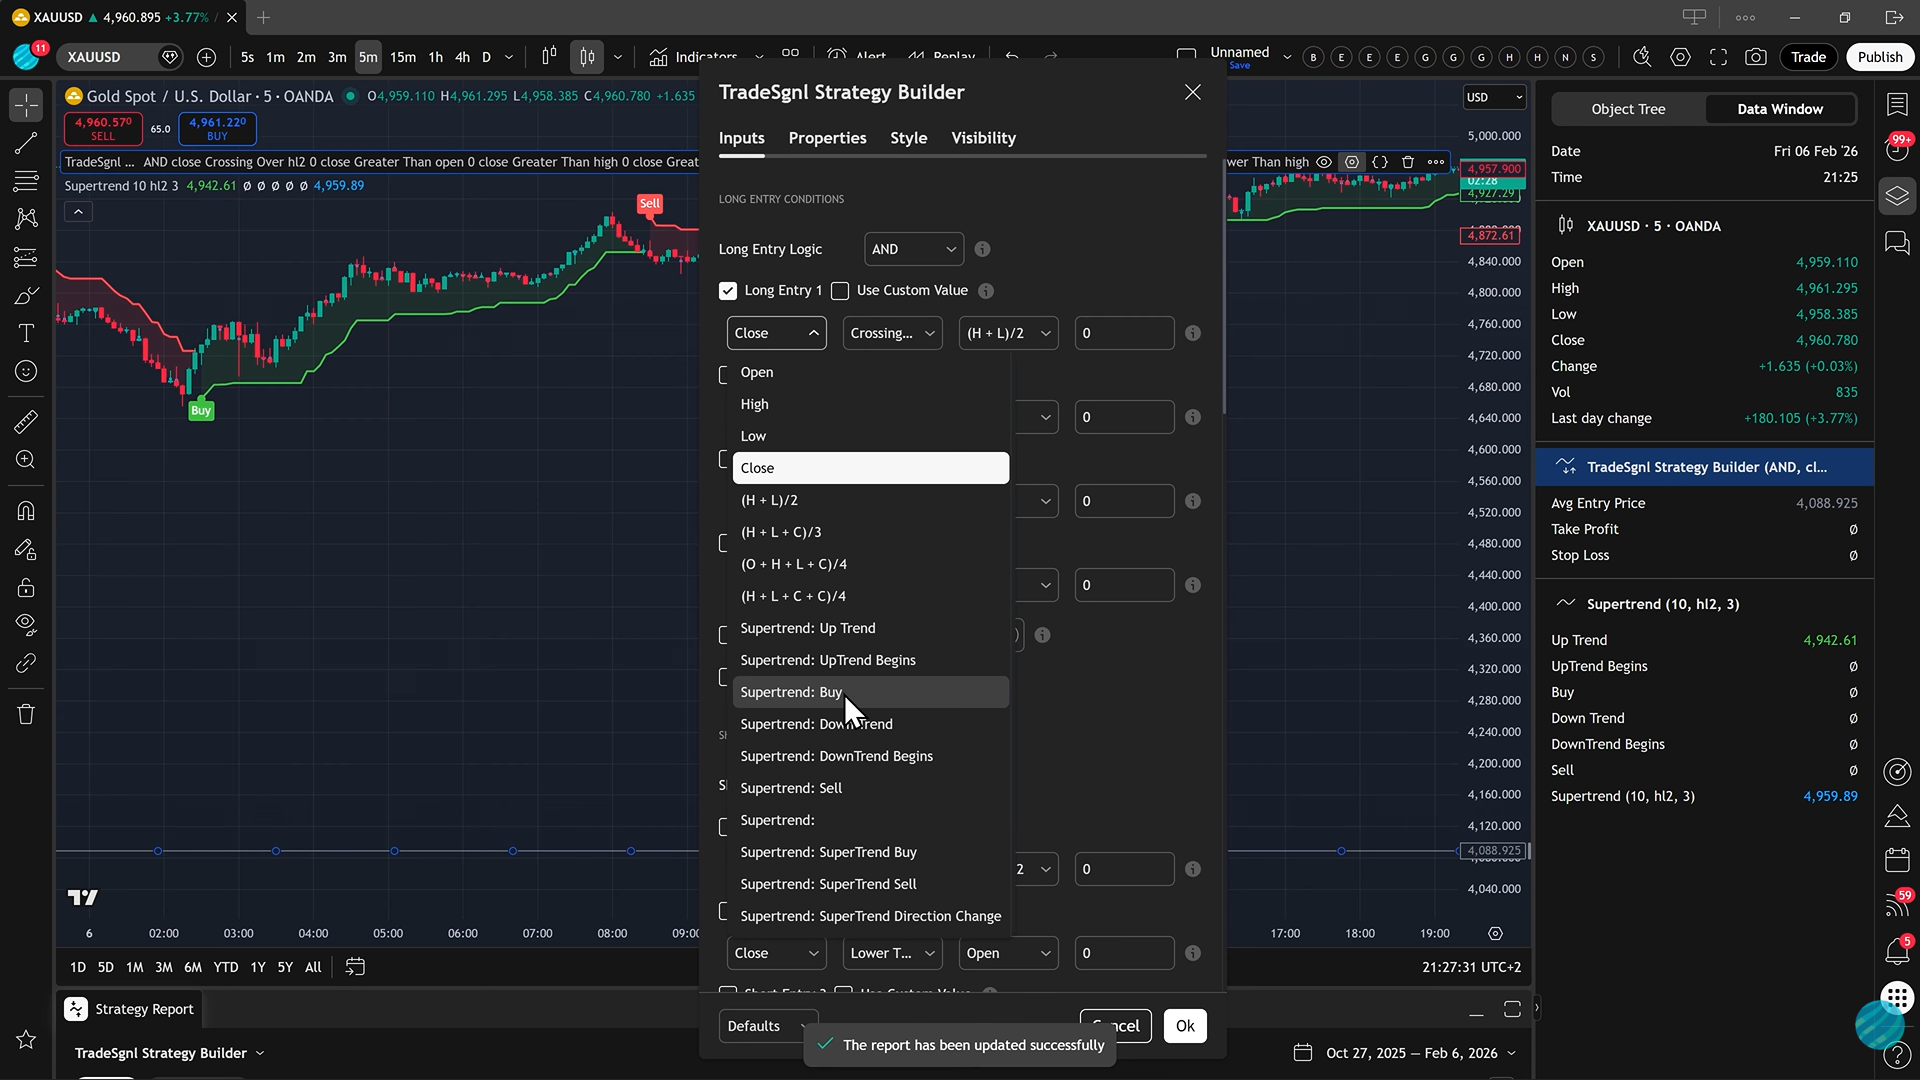

Short Entry 1
- Source A: Select your indicator's Sell plot (e.g., "Supertrend: Sell")
- Operator: Greater Than
- Use Custom Value: Enable this option
- Custom Value: 0
This tells the Strategy Builder to trigger entries whenever the respective plot has any value greater than zero, which happens exactly when your indicator gives a signal.
Once configured, you'll notice the Strategy Builder plots its own entry and exit arrows directly on your candles. This powerful feature lets you visually verify your logic is 100% correct and matches your indicator perfectly before you ever take a live trade.
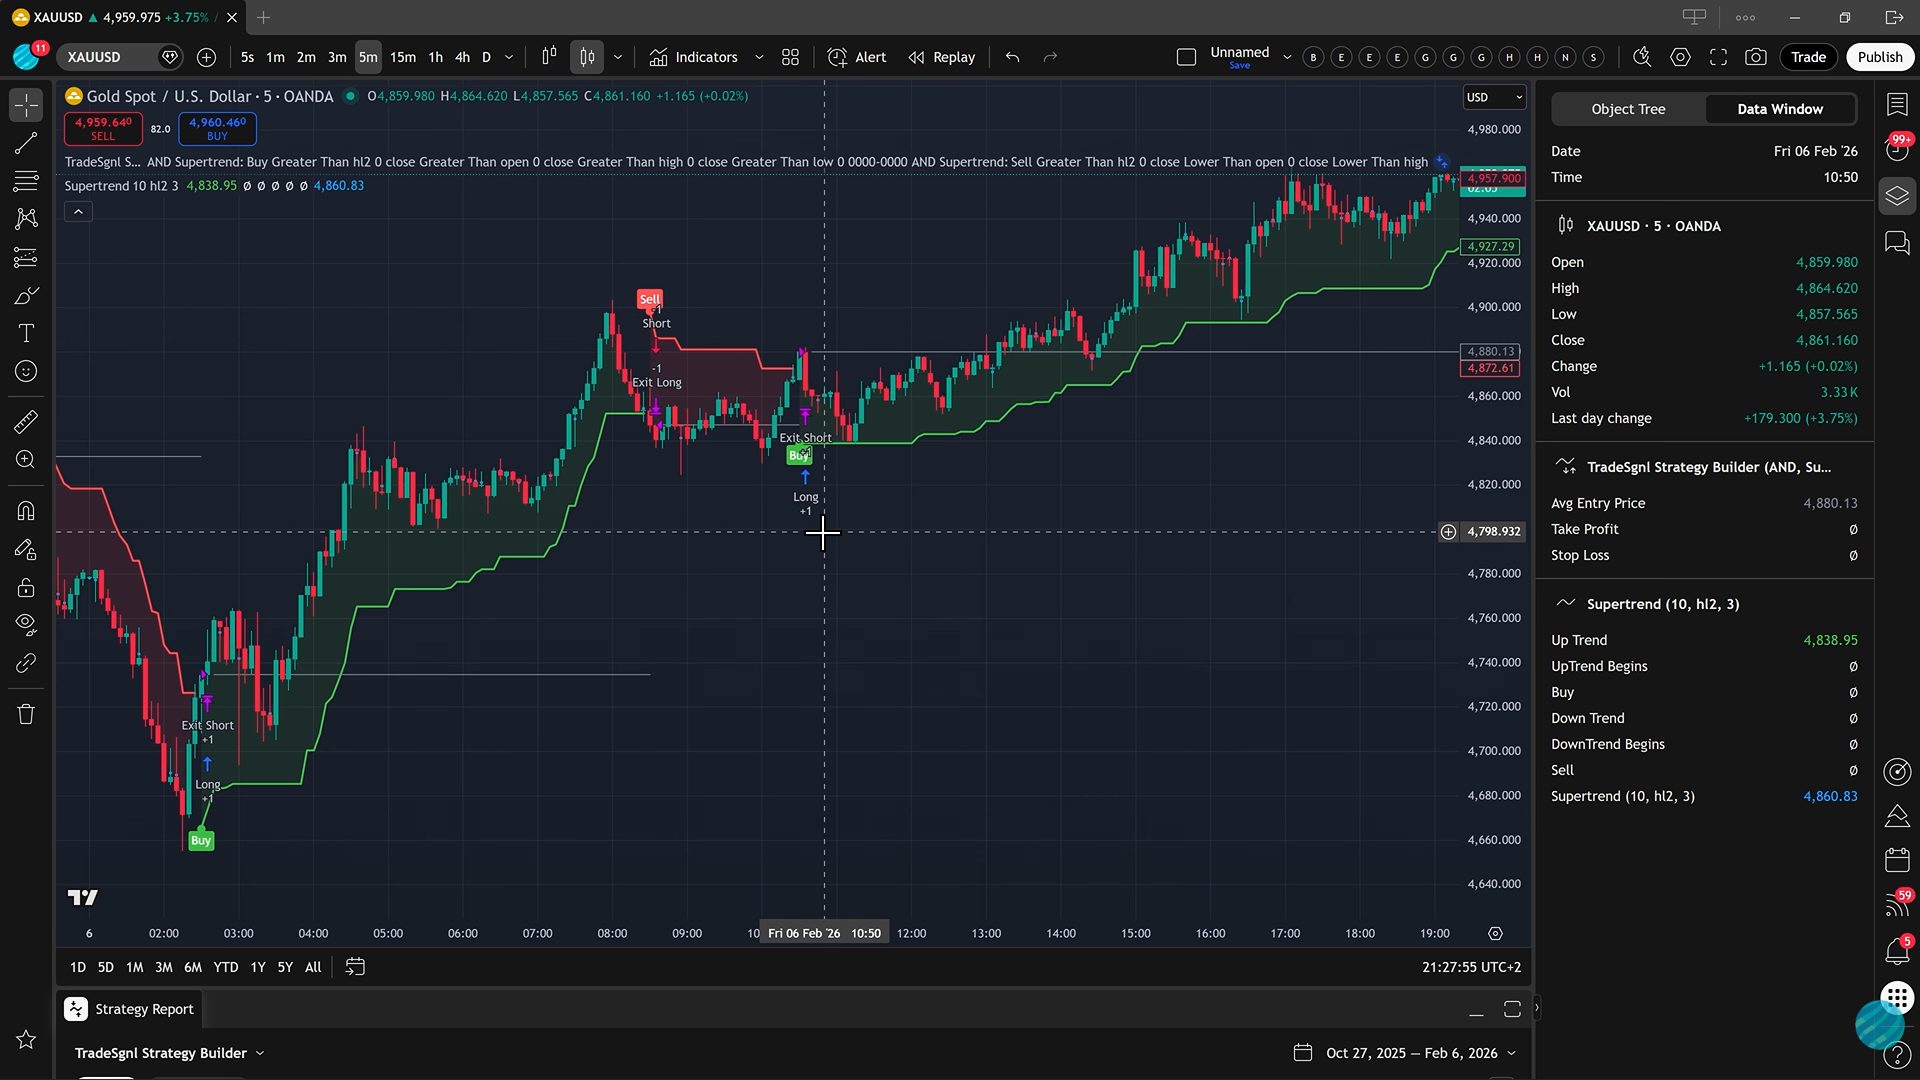
Automatic Position Management
By default, TradeSgnl handles position management automatically. When a Sell signal is triggered, it will automatically close any open Buy trade before opening the new Short position, keeping you perfectly synced with the trend.
Copy the Strategy Builder Preset from the Syntax Generator. Open the Syntax Generator in the TradeSgnl Portal. Configure your entry signal: select your license, symbol, risk, and any optional parameters like SL/TP.
Click "Strategy Builder Preset". This generates your complete config with both long and short signals auto-mirrored, including TP/SL exit messages.
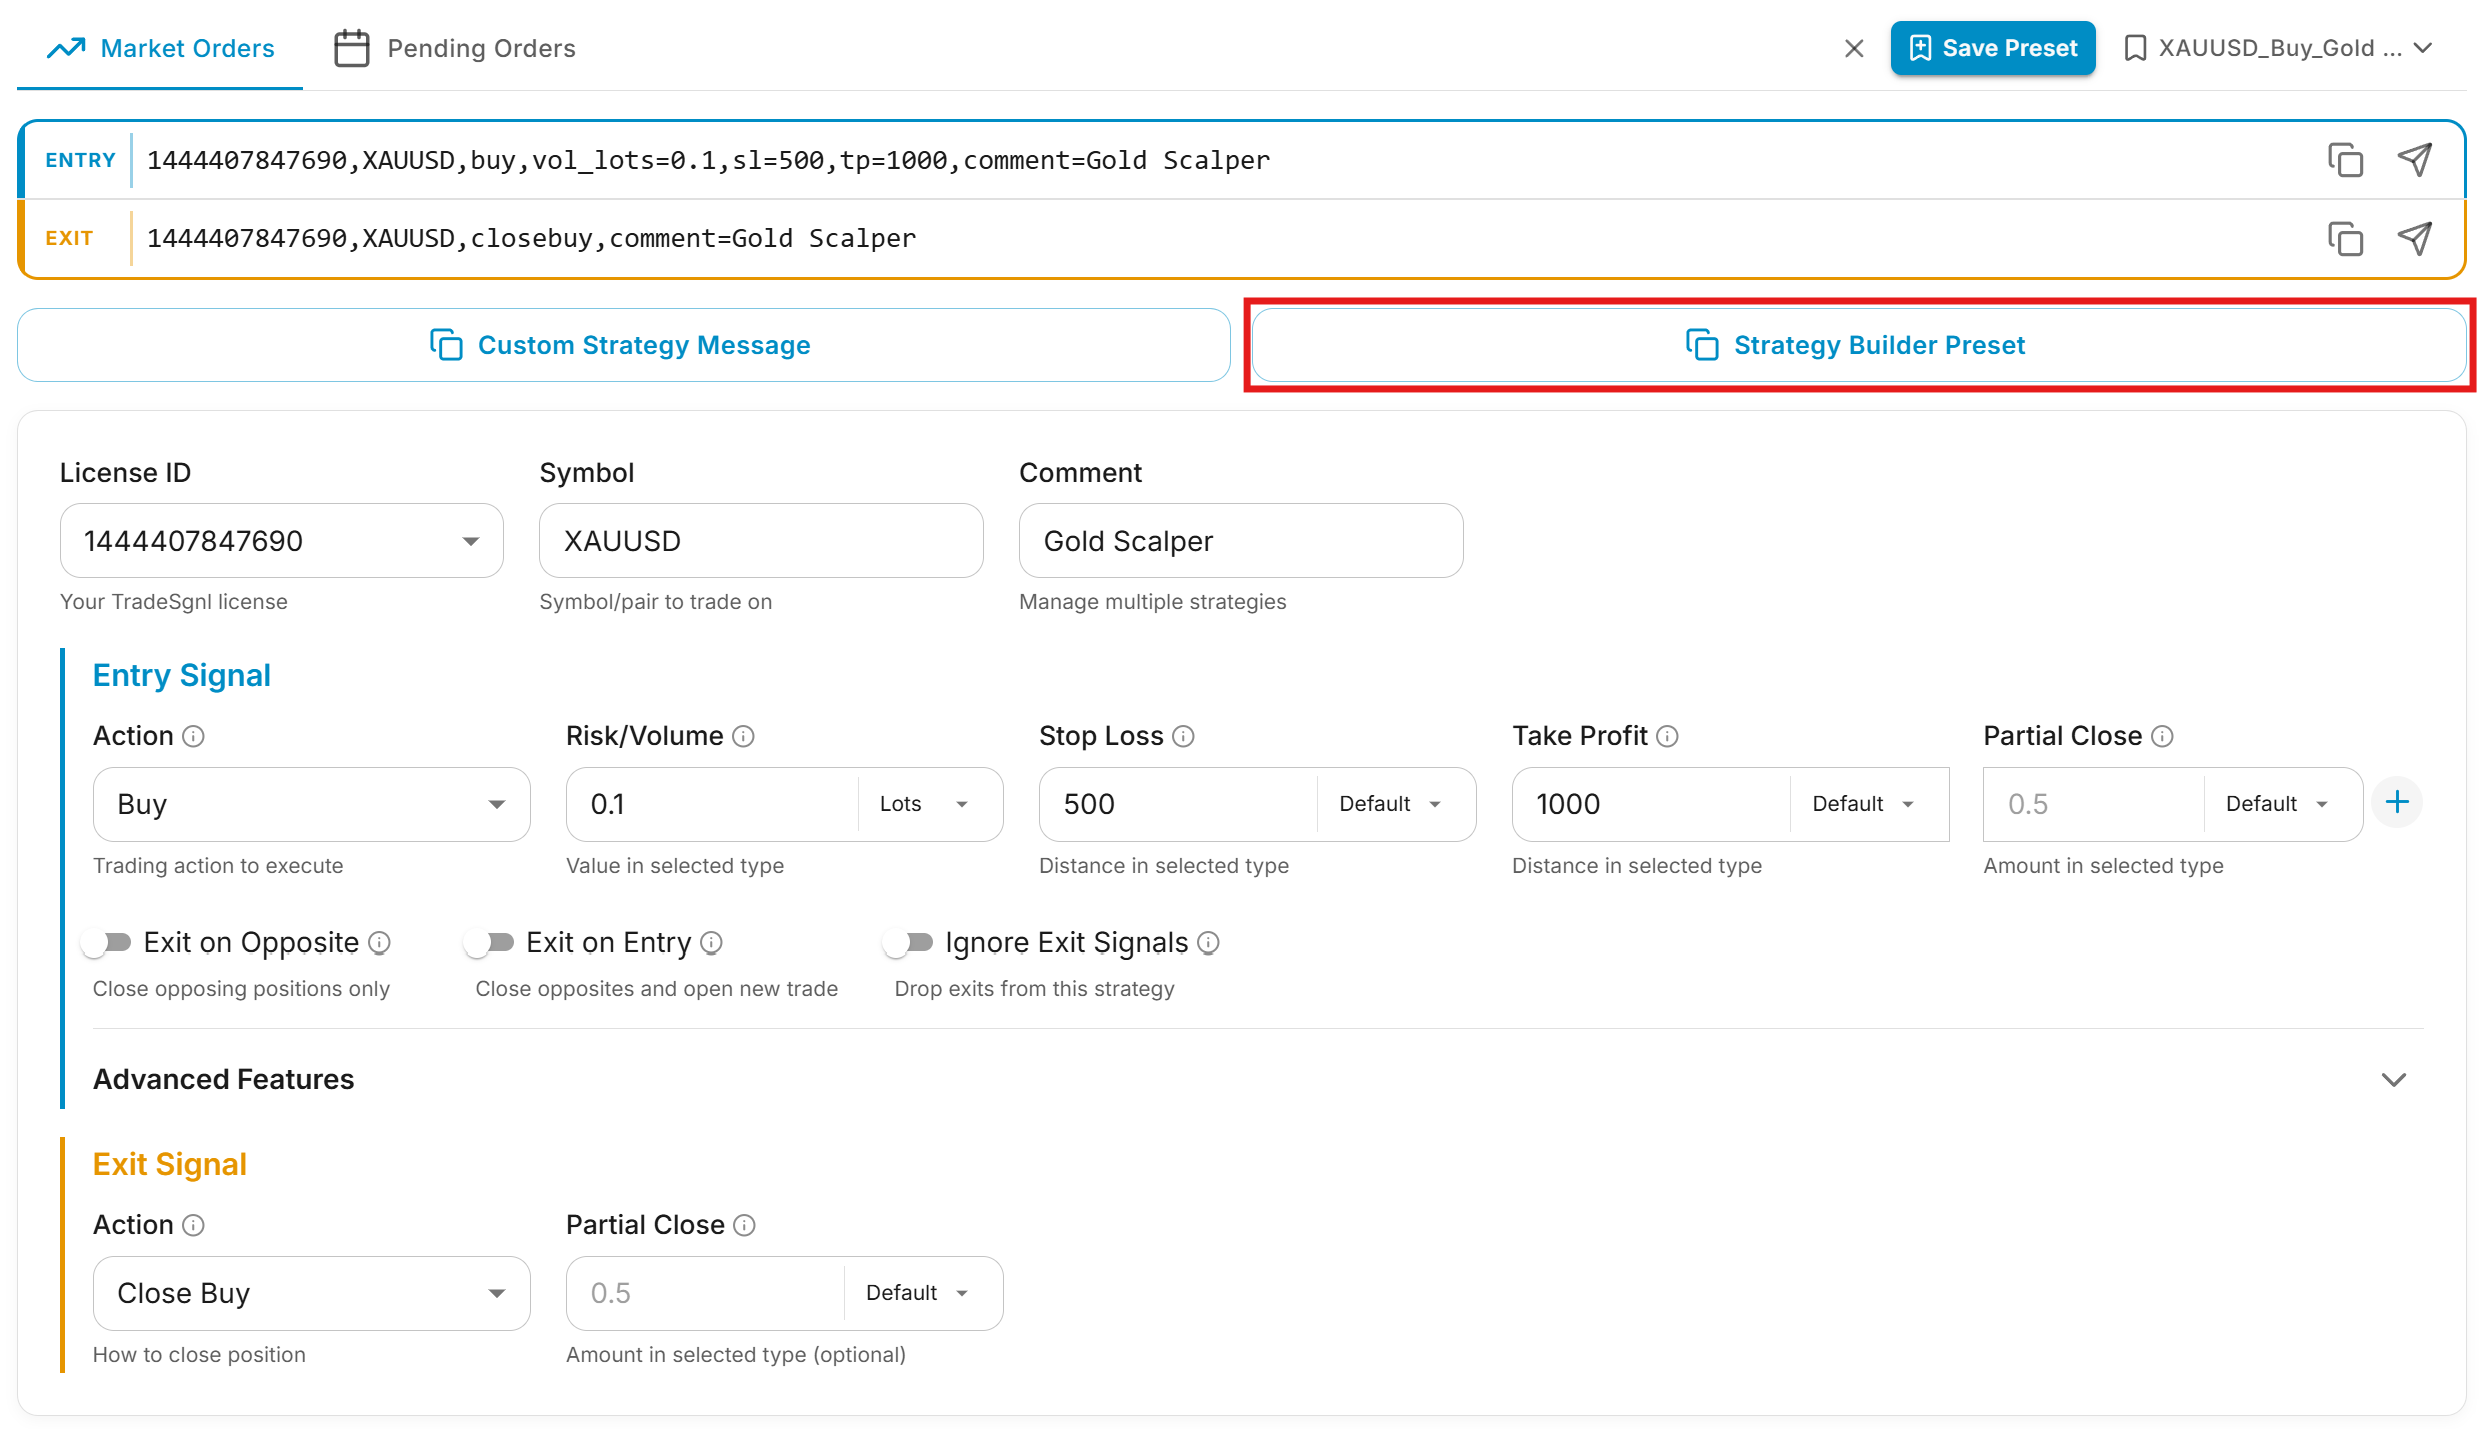
Paste into Strategy Builder and Create Alert. In TradingView, open the Strategy Builder settings and paste into the "Signal Preset" field. A confirmation table appears on the chart showing all parsed messages.
Then create a TradingView alert: set the webhook URL and alert message placeholder. See the Setting Up TradingView Alerts section below for details.
This method works with any indicator that plots Buy/Sell signals: RSI divergence indicators, custom scripts, candlestick pattern detectors, and more. The key is identifying the correct plot names in the Data Window.
Entry Conditions
The TradeSgnl Strategy Builder allows you to create sophisticated entry conditions for both long and short positions. You can define up to four different conditions for each trading direction and combine them using logical operators.
Condition Structure
Each entry condition follows the same structure and consists of the following components:
- Source A: Primary data source (indicator, price data, or other value).
- Operator: Comparison operator (crosses above, is greater than, etc.).
- Source B or Value: Secondary data source or a custom numerical value.
Condition Operators
Available condition operators in the Strategy Builder
| Operator | Description | Example Usage |
|---|---|---|
| Crosses Above | True when Source A crosses above Source B | MACD Line crosses above Signal Line |
| Crosses Below | True when Source A crosses below Source B | Price crosses below 200 EMA |
| Greater Than | True when Source A is greater than Source B | RSI > 70 |
| Less Than | True when Source A is less than Source B | Stochastic < 20 |
| Equal To | True when Source A equals Source B | Parabolic SAR = Price |
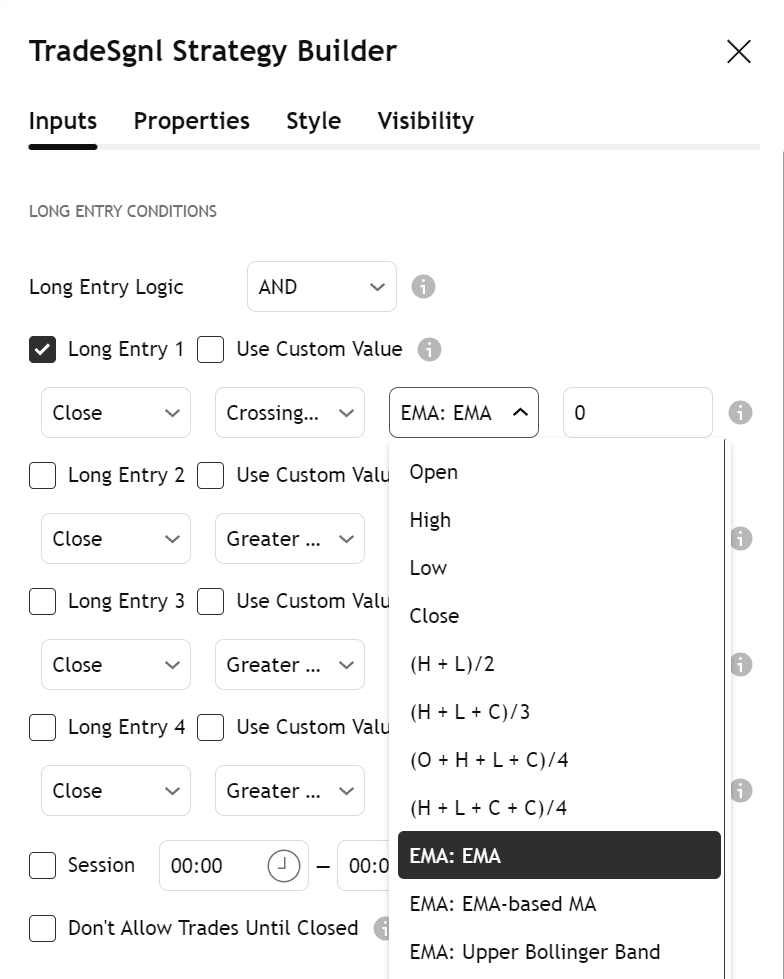
Available Data Sources
One of the most powerful features of the Strategy Builder is the ability to use virtually any data source available on your TradingView chart:
- Price Data: Open, High, Low, Close, HL2 (High+Low/2), OHLC4, and other price aggregations.
- Technical Indicators: Moving Averages, RSI, MACD, Bollinger Bands, Stochastic, custom indicators, etc.
- Volume Data: Volume, Volume MA, On-Balance Volume, and other volume-based indicators.
- Custom Values: Fixed numerical values for thresholds (e.g., RSI > 70, Price < 100).
To use an indicator as a data source, first add it to your chart. For example, if you want to create a condition based on RSI crossing above 30, first add the RSI indicator to your chart, then select it as Source A in your condition.
Combining Multiple Conditions
You can define up to four separate conditions for each trading direction (long/short) and combine them using logical operators:
Logical operators for combining conditions
| Operator | Description | Example Usage |
|---|---|---|
| AND | Both conditions must be true for the result to be true | RSI < 30 AND MACD crosses above Signal Line |
| OR | At least one condition must be true for the result to be true | Price > 200 EMA OR Volume > 1.5x Average Volume |
Important Note
Only enabled conditions participate in the logic evaluation. Disabled conditions are completely ignored, regardless of whether they would be true or false. This allows you to easily test different combinations without deleting your configuration.
Example Entry Condition Scenarios
1. Moving Average Crossover
Long Entry Condition: Fast MA (e.g., MA 10) crossing over Slow MA (e.g., MA 50).
Configuration:
- Source A: MA 10
- Operator: Crossing Over
- Source B: MA 50
- Logic: Single condition (others disabled)
2. RSI With Trend Confirmation
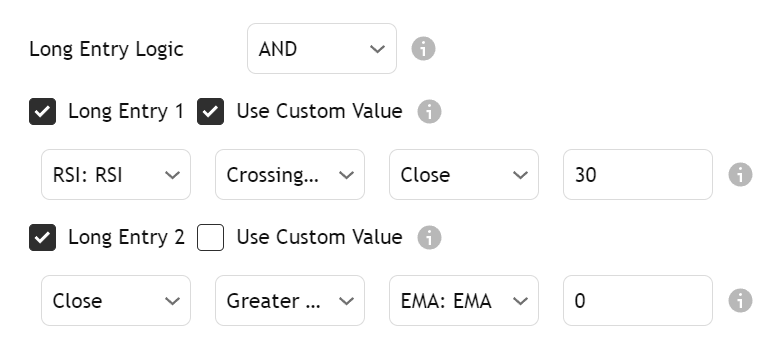
Long Entry Condition: RSI crosses above 30 (oversold) AND price is above 200 EMA (uptrend confirmation).
Configuration:
- Condition 1:
- Source A: RSI
- Operator: Crossing Over
- Source B: Custom Value (30)
- Condition 2:
- Source A: Close
- Operator: Greater Than
- Source B: EMA 200
- Logic: AND (both conditions must be true)
The same condition structure applies to both long and short entries, but typically with inverted operators (e.g., crossing over for longs, crossing under for shorts).
Exit Conditions
The Strategy Builder allows you to create flexible exit conditions separate from your take profit and stop loss levels. This gives you the ability to exit positions based on technical indicators or price action signals.
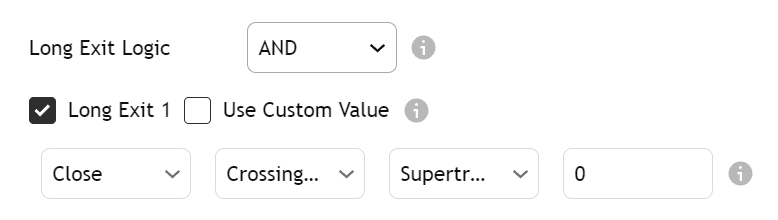
Exit Condition Structure
Exit conditions follow the same structure as entry conditions but are specifically designed to close existing positions:
Up to Two Conditions per Direction
You can define up to two separate exit conditions for long positions and two for short positions.
Same Source Selection Options
Use any indicator or price data on your chart as a trigger for exit signals.
AND/OR Logic
Combine conditions using AND (both must be true) or OR (either can be true) logic.
Independent from TP/SL
Exit conditions work alongside your take profit and stop loss levels. Whichever triggers first will close the position.
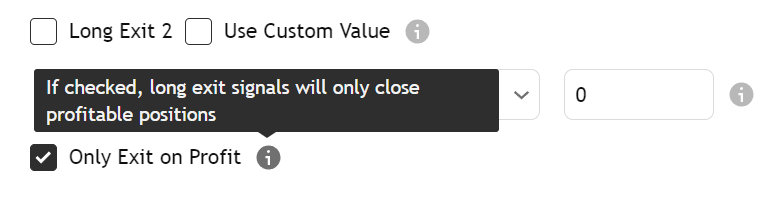
Only Exit on Profit Option
Prevent Exits During Drawdown
The Strategy Builder includes a powerful feature that allows you to prevent conditional exits when a position is in a loss:
Only Exit on Profit: When enabled, the strategy will ignore exit conditions if the position is currently in a drawdown (unrealized loss). This can help prevent premature exits during temporary price fluctuations.
Note: This setting only affects exit conditions, not stop losses. Your stop loss will still trigger regardless of this setting.
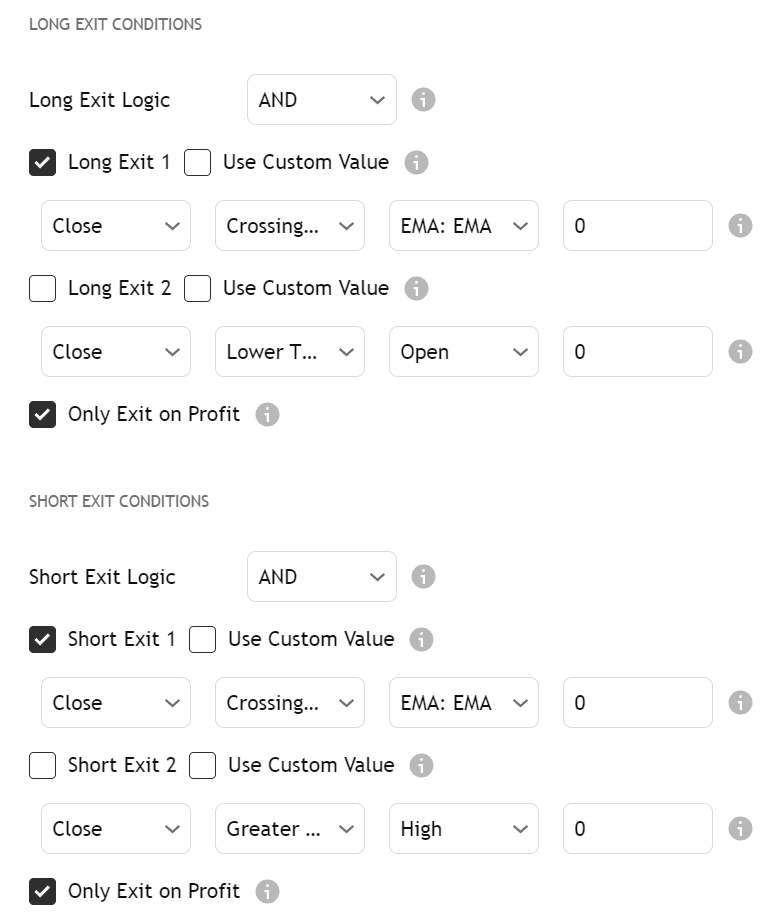
Exit Condition Examples
Here are some common exit condition setups:
Trailing Moving Average Exit
Long Exit Condition: Price crosses below a faster-period moving average.
Configuration:
- Source A: Close
- Operator: Crossing Under
- Source B: EMA 20
- Logic: Single condition (second disabled)
This exit strategy allows your trade to run while it remains above the moving average, but exits when momentum shifts.
RSI Extreme Exit
Long Exit Condition: RSI crosses above 80 (extreme overbought condition).
Configuration:
- Source A: RSI
- Operator: Crossing Above
- Source B: Custom Value (80)
- Logic: Single condition (second disabled)
- Only Exit on Profit: Enabled (to ensure we only exit winning trades)
This exit strategy takes profits when a position becomes extremely overbought, potentially capturing the peak of a move.
Optimizing Exit Conditions
Properly tuned exit conditions often have more impact on overall strategy performance than entries. Consider experimenting with different indicators and timeframes for exit conditions, as well as combining them with appropriate take profit and stop loss levels for comprehensive risk management.
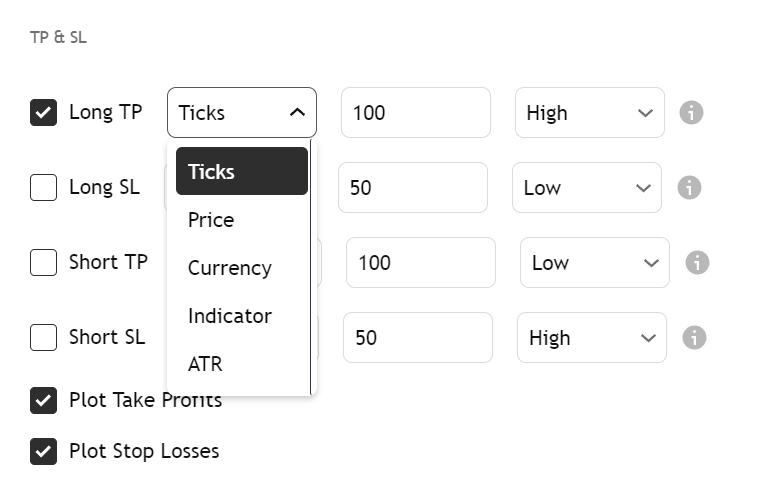
Take Profit & Stop Loss
The Strategy Builder provides flexible take profit (TP) and stop loss (SL) settings that can be configured independently for long and short positions. Unlike conditional exits, take profits and stop losses are fixed price levels calculated when a position is opened.
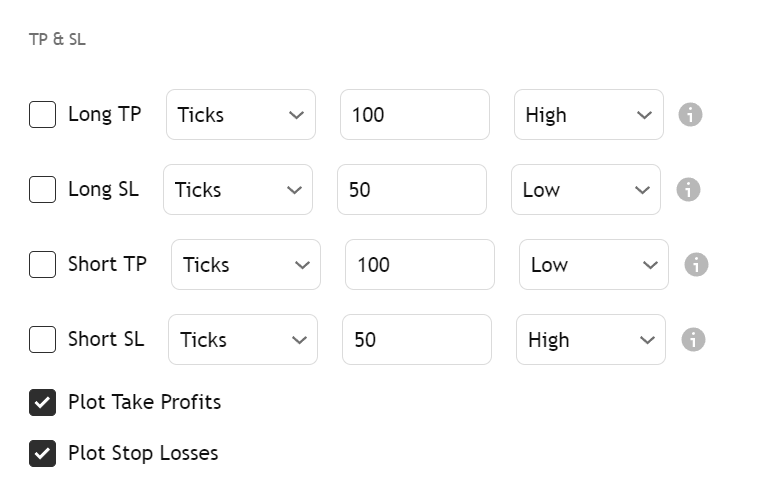
TP/SL Configuration Structure
For each position direction (long/short), you can configure:
- Enable/Disable: Each TP and SL can be individually enabled or disabled.
- Type: Multiple calculation methods for determining the exact TP/SL levels.
- Value: The specific numeric value to use with the selected calculation type.
- Indicator Source: When using Indicator type, the specific indicator to use as the TP/SL level.
TP/SL Types
The Strategy Builder supports five different methods for calculating take profit and stop loss levels:
| Type | Summary | Description |
|---|---|---|
| Ticks | Distance in ticks/pips from entry price | Fixed distance in ticks/pips from entry price. Best for consistent risk management across different instruments. |
| Price | Exact price level for TP/SL | Specific price level. Ideal when you have precise price targets or support/resistance levels. |
| Currency | Fixed amount in account currency | Fixed amount in account currency from entry price. Best for consistent profit/loss targets in monetary terms. |
| Indicator | Dynamic levels based on indicator values | Uses a selected indicator's value as the TP/SL level. Perfect for dynamic exits based on technical indicators (e.g., Bollinger Bands). |
| ATR | ATR-based distance using a multiplier | Uses the Average True Range multiplied by your specified value. Great for volatility-adjusted TP/SL that adapts to market conditions (e.g., 1.5x ATR for SL, 3x ATR for TP). |
While the Strategy Builder allows you to set both conditional exits and TP/SL levels simultaneously, having too many exit methods can sometimes lead to prematurely closed trades. Consider which exit method is most appropriate for your trading style and strategy.
Using {'{{strategy.order.alert_message}}'} as your alert message creates a single alert that works for all signal types (entries, exits, TP/SL). The strategy automatically fills in the correct signal format based on which condition triggered the alert.
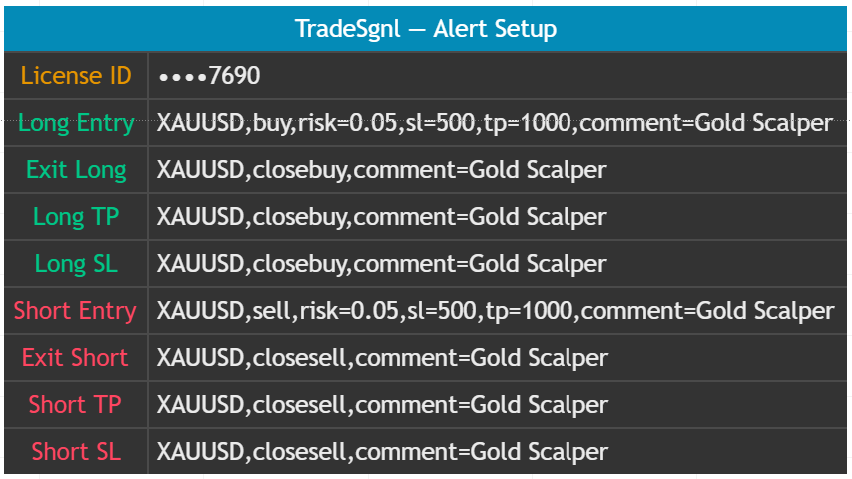
Alert Messages
Alert messages are the text sent to the TradeSgnl EA when a strategy condition is triggered. Properly formatted alert messages are essential for the EA to execute trades correctly based on your strategy signals.
Signal Preset (Recommended)
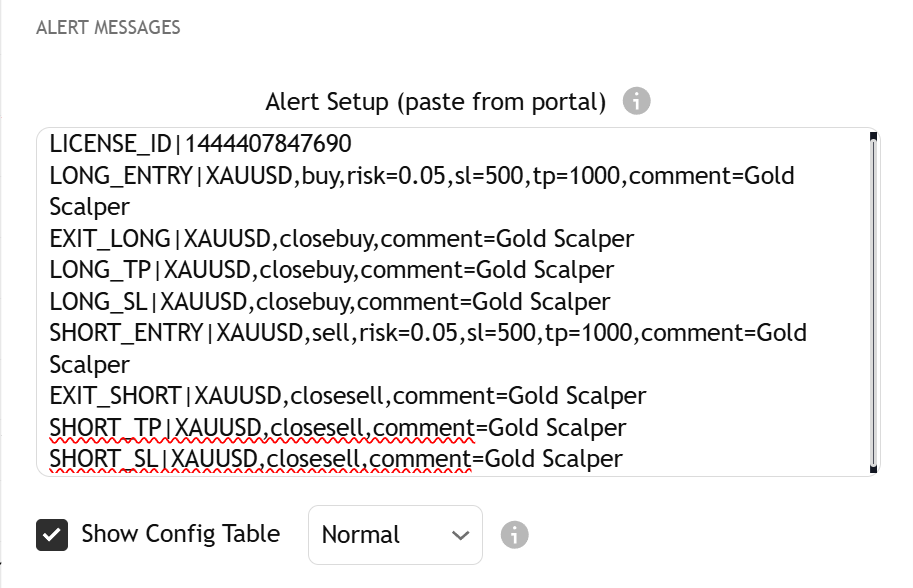
The fastest way to configure all alert messages is using the Signal Preset field. This copies your entire signal config from the portal, including License ID, entry, exit, and TP/SL messages for both long and short directions, in a single paste.
How it works
- Open the Syntax Generator
- Configure your entry and exit signals
- Click "Strategy Builder Preset"
- Paste into the "Signal Preset" field in TradingView Strategy Builder settings
What you get
- Both long and short signals auto-generated from a single direction
- TP/SL messages auto-populated for TV-side take profit and stop loss
- License ID included, editable at the top of the config
- On-chart confirmation table shows all parsed messages
Manual Fields
If you prefer to set alert messages individually, you can paste the full signal syntax from the portal's syntax preview into each field under "Long Messages" and "Short Messages". These fields are only used when the Signal Preset field is empty.
Alert Message Format
The Syntax Generator builds these for you, but here's the format for reference:
Format:
LicenseID,SYMBOL,ACTION,risk=VOLUME,sl=SL,tp=TP,comment=TEXTEntry example:
5643048533453,EURUSD,buy,risk=0.01,sl=30,tp=60Exit example:
5643048533453,EURUSD,closebuyNeed more details on signal formatting?
For a comprehensive guide on all available signal parameters, command options, and advanced usage examples, visit our complete Signal Guide.
View Signal GuideSetting Up TradingView Alerts
Once you've formatted your alert messages, you need to create TradingView alerts to send them to your TradeSgnl EA. Follow these steps to set up your alerts correctly:
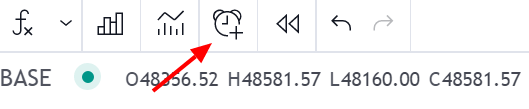
Click the Alerts Button. Find and click the 'Alerts' button located at the top of your TradingView chart interface. This will open the alert creation dialog where you can set up your strategy alerts.
The alert button appears in the top toolbar of any TradingView chart and has a bell icon.
Configure Alert Condition. In the Settings tab, from the Condition dropdown menu select TradeSgnl Strategy Builder. This ensures that alerts will trigger based on your strategy's signals. You can set other options like Interval and expiration.
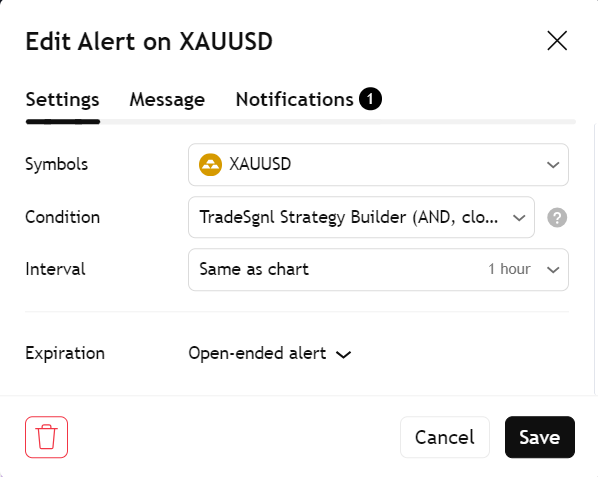
Configure Alert Message. Click on the Message tab within the alert dialog. In this tab, you'll configure the alert name and message.
In the Message field enter the following:
{{strategy.order.alert_message}}This variable will automatically insert the correctly formatted message for any trigger (entry, exit, TP/SL).
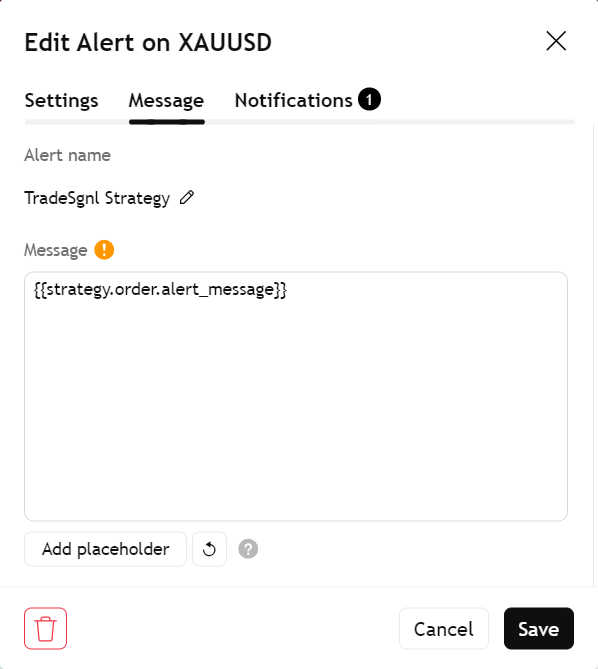
Using {'{{strategy.order.alert_message}}'} as your alert message creates a single alert that works for all signal types (entries, exits, TP/SL). The strategy automatically fills in the correct signal format based on which condition triggered the alert.
Set Up Webhook. Click on the Notifications tab within the alert dialog. Check the Webhook URL option.
Enter the following URL:
https://webhook.tradesgnl.comClick Create to save the alert.
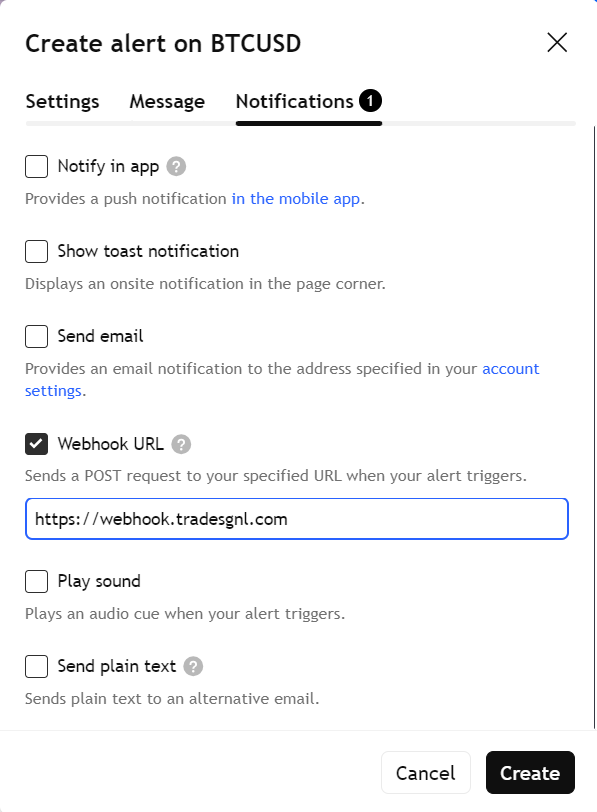
TradingView requires a paid plan (Essential plan or higher) to use webhooks for alert notifications.
Alert Testing Recommendations
Before relying on your alerts for live trading, follow these best practices:
Start with Demo Trading
Test your alerts with a demo account first to ensure they're working correctly with your EA.
Verify Alert Delivery
Check your MT5 EA logs to confirm alerts are being received and processed correctly.
Use Small Position Sizes
Start with minimal risk until you're confident in your alert configuration.
Strategy Lab
Generate or adapt TradingView Pine Script strategies by chatting with the TradeSgnl AI. Copy the result into TradingView, set up the alert, and trade automatically on MT5. No coding required.
No-Code Setup
Set up TradingView automation without any coding. Use the visual interface to create alerts and connect to MetaTrader.