
Syntax Generator
Build TradeSgnl signals visually without typing JSON or alert syntax. Configure entries, exits, stops, multi-level take profits, and advanced features through a guided form. Includes Test Signal verification, saved presets, and three output modes for TradingView.
Introduction
The Syntax Generator is a visual form in the TradeSgnl Portal that builds signals for you. Pick your symbol, action, risk, and any optional parameters; the generator emits the exact text TradingView (or any other webhook source) needs to send. It also has a one-click Test Signal button that fires a signal straight into your terminal, so you can verify your EA is wired up correctly before touching TradingView at all.
No syntax to memorize
Every parameter has a labeled field with units, types, and inline validation. No more guessing whether to write sl= or sl_pips=.
Test before you trade
Click Test Signal to send the configured signal directly to your terminal. Trade appears in MT5 within seconds, no TradingView account required.
Reusable presets
Save a configured strategy once and load it in a click. Useful for managing multiple strategies on one license.
Verify Your Setup with Test Signal
The fastest way to confirm your EA, license, and terminal are all working is to send a Test Signal from the generator. This skips TradingView entirely, so you can isolate "is my EA receiving signals?" from "is my TradingView alert configured correctly?".
Open the Syntax Generator. In the Portal, open Tools → Syntax Generator (or visit it directly).
Open Syntax Generator
Pick your license. Select your license from the License ID dropdown. This determines which terminal the test signal will hit.
Fill the minimum fields. You only need three things to send a test trade:
- Symbol. Any instrument your terminal can trade.
BTCUSDis a safe default because it's tradable 24/7 and most brokers carry it. - Action. Pick
Buyfrom the dropdown. You can close it later in MT5. - Risk. A tiny lot size like
0.01keeps the test cheap.
Click Test Signal. On the Entry preview box (blue left border), click the Test Signal button. The generator sends the configured signal straight to your terminal.
What if the button is disabled?
The Test Signal button is greyed out until License, Symbol, Action, and Risk are all set. Hover the button to see which field is still missing.
Check your terminal. Open your CloudConnect terminal (or your MT5 desktop). A buy position for the symbol you picked should appear within a few seconds.
- Trade appeared? Your EA, license, and connection are all working. Close it manually from MT5 when you're done.
- No trade? Jump to Troubleshooting. The most common causes are: EA not attached to a chart, License ID mismatch, or the symbol isn't visible in Market Watch.
Test passed?
You now have a verified pipeline from Portal → Server → EA. Anything that fails after this point is on the TradingView side (alert message, webhook URL, account plan).
The Interface at a Glance
The page has two top-level tabs that switch what kind of order you're building. Everything below the tabs is one shared form.
| Tab | Use it for |
|---|---|
| Market Orders | Immediate entries at current price — buy, sell, and reversal commands (close-then-buy / close-then-sell). |
| Pending Orders | Orders that fire when price reaches a level you set — buy stop, buy limit, sell stop, sell limit. |
Below the tabs, you'll see:
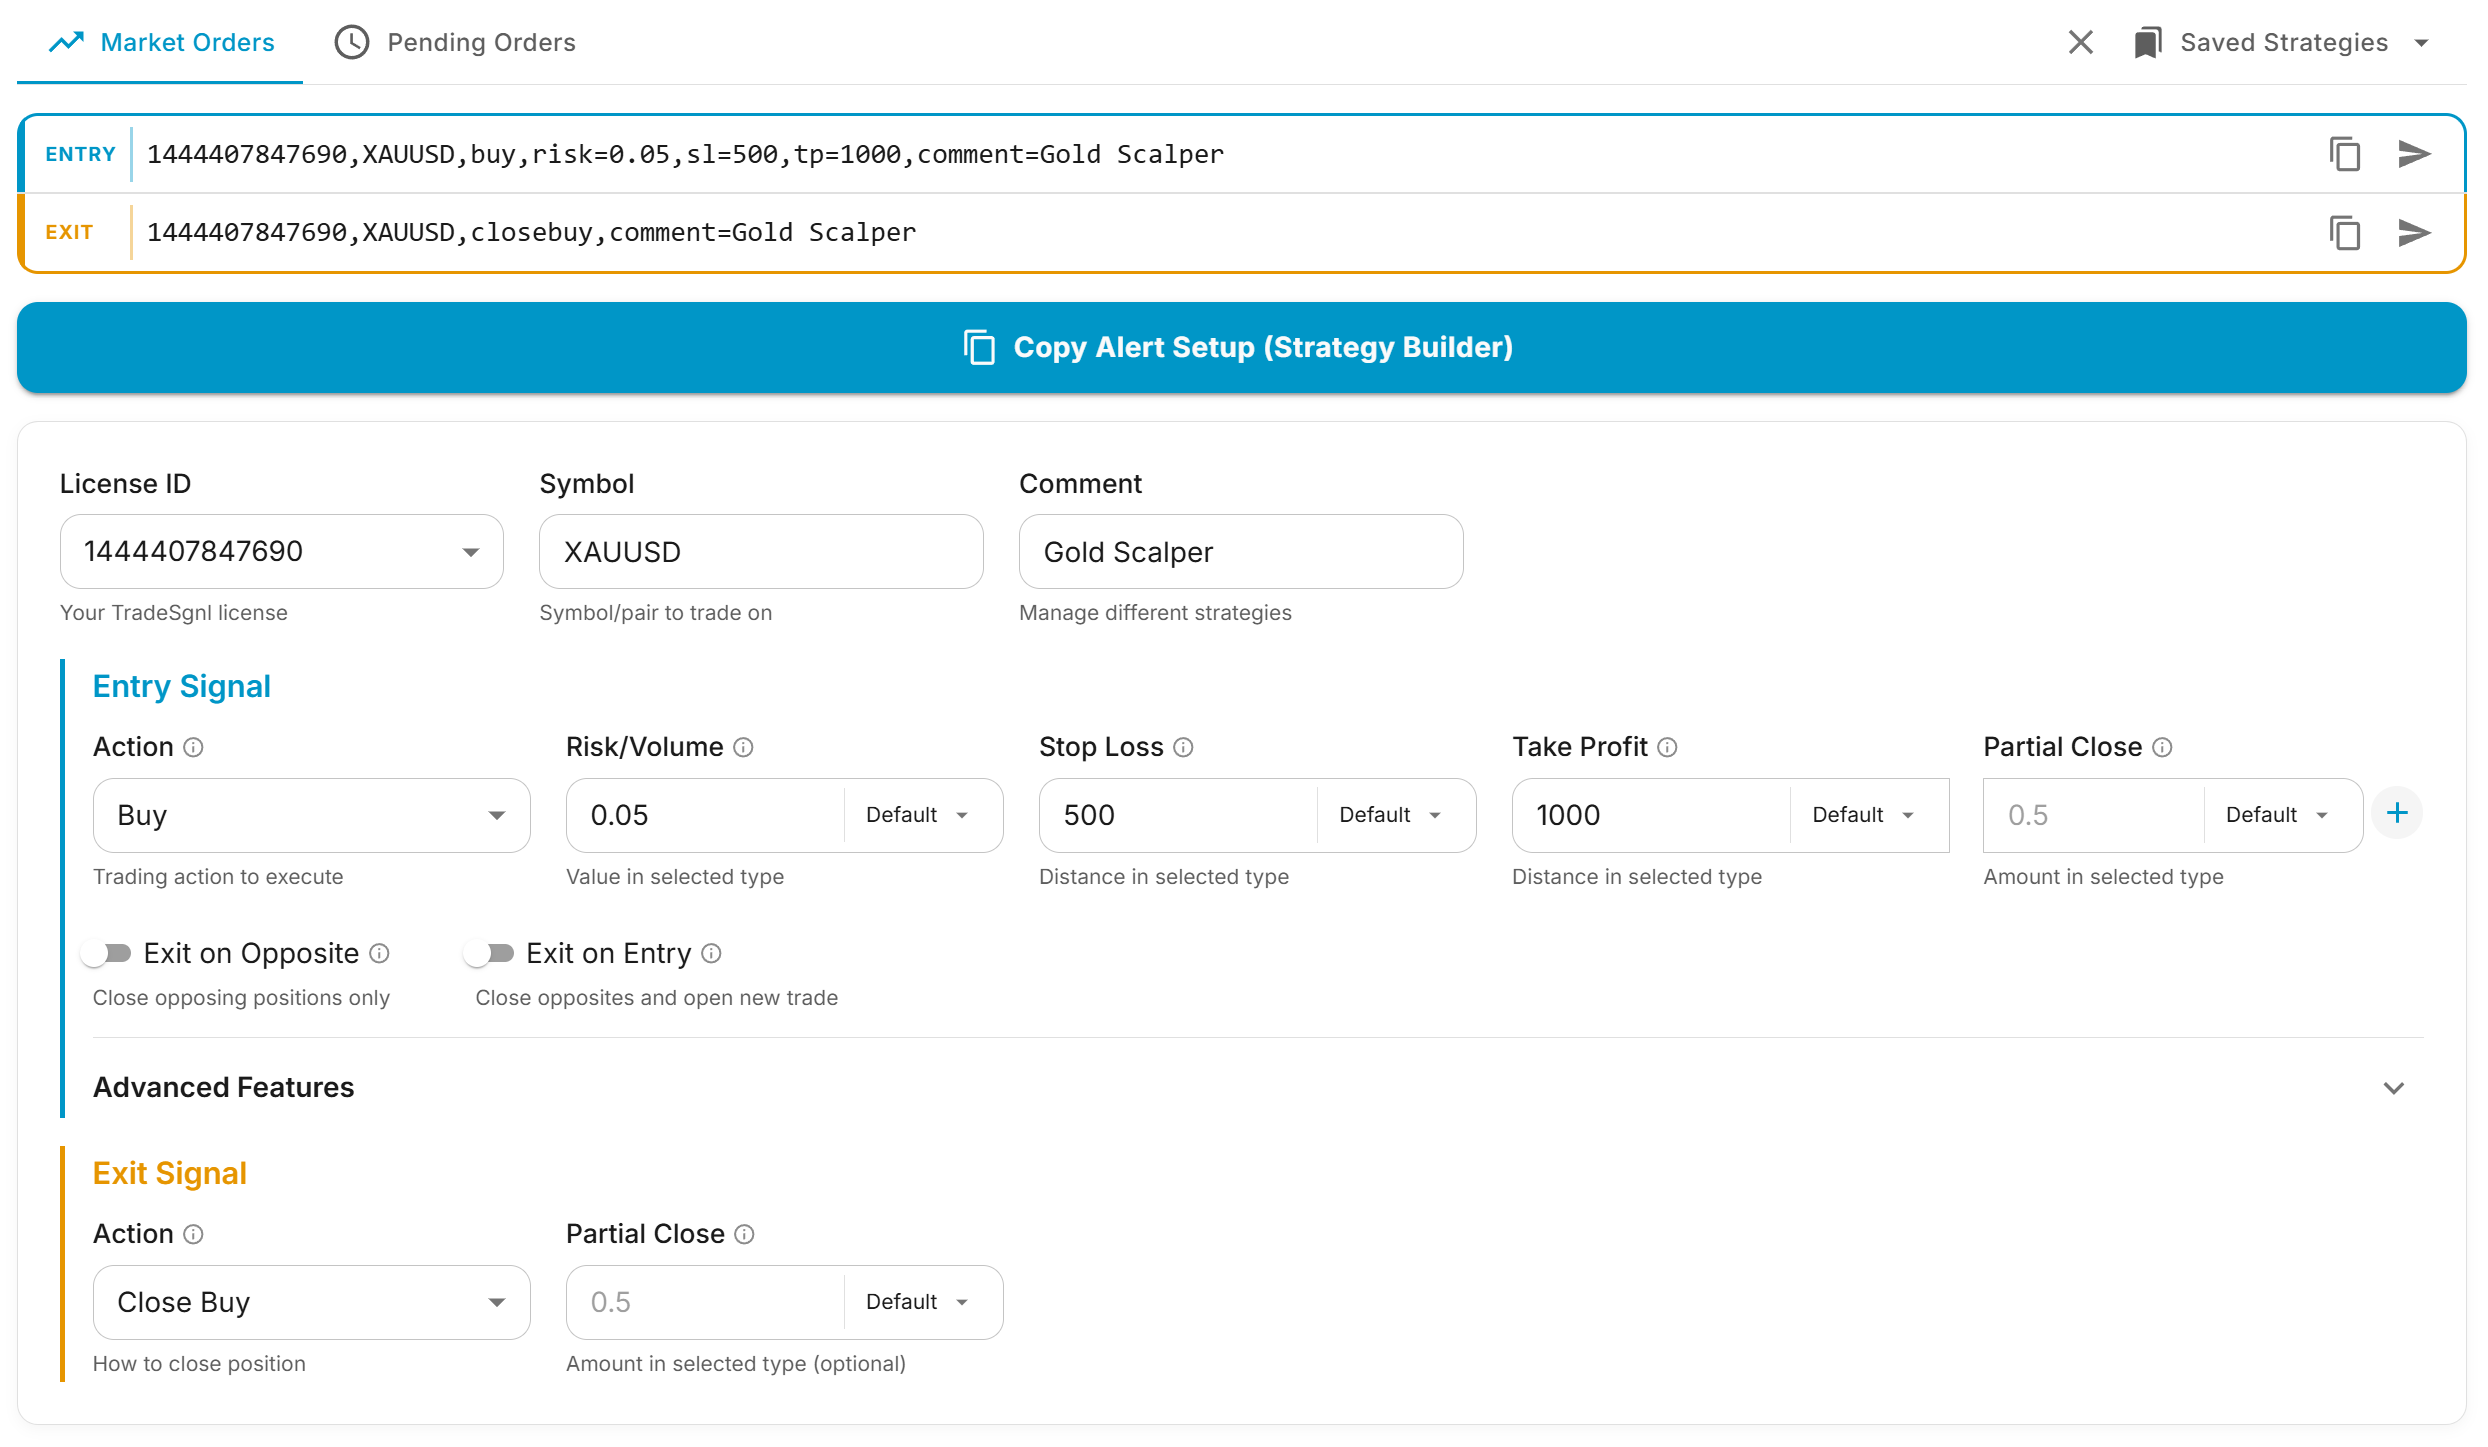
- Two preview boxes (Entry on top with a blue border, Exit on bottom with an orange border). Each shows the live generated signal text and has its own Copy and Test Signal buttons.
- Two output-mode buttons for paste-ready strings: Custom Strategy Message (one alert handles entries, exits, and reversals) and Strategy Builder Preset (JSON for the Strategy Builder UI).
- The configuration card with three grouped sections: shared fields, entry signal, and exit signal.
Configuring a Signal
Shared Fields
These apply to both tabs and to both entry and exit signals.
| Field | What it does | Tip |
|---|---|---|
| License ID | Which terminal receives the signal. | Required for any copy or test action. |
| Symbol | The instrument to trade (EURUSD, BTCUSD, XAUUSD). | Leave blank to insert the TradingView placeholder {{ticker}} automatically. |
| Comment | A label that tags the trade. | Use it to filter close commands later (e.g. closeall,comment=Strategy1). Recommended when you run more than one strategy on the same license. |
Market Orders
The Market Orders tab handles immediate entries and reversal-style commands.
Action options:
- Buy / Sell. Open a new position at market price.
- Close Long Then Buy / Sell. Close any existing long positions, then open the chosen direction. Useful for "always be in a position" strategies.
- Close Short Then Buy / Sell. Same idea, but closes shorts first.
Risk / Volume. Number input plus a type selector that determines how the number is interpreted:
| Type | What the value means | Notes |
|---|---|---|
| Default | Uses the EA's configured volume type. | Pick this if you don't want to override per-signal. |
| Lots | Exact lot size (0.5 = half a standard lot). | |
| % Balance / % Equity | Lot size scaled to account size. | |
| Dollar Risk | Risk a fixed dollar amount if the trade hits SL. | Requires SL. |
| % Bal Loss / % Eq Loss | Lose this percent of balance/equity at SL. | Requires SL. |
Stop Loss & Take Profit. Each has a number and a type selector (Pips, Currency, Price, Percent). The generator emits the correct explicit parameter (sl_pips=, sl_price=, tp_percent=, etc.) so you don't need to remember the naming.
Multi-level take profit with partials. Click the plus icon next to Take Profit to add up to five TP levels. Each level can also have its own partial-close amount, so a single signal can scale out at multiple targets.
Pending Orders
The Pending Orders tab adds a Pending Level field. Everything else (risk, SL, TP, advanced features) works the same way.
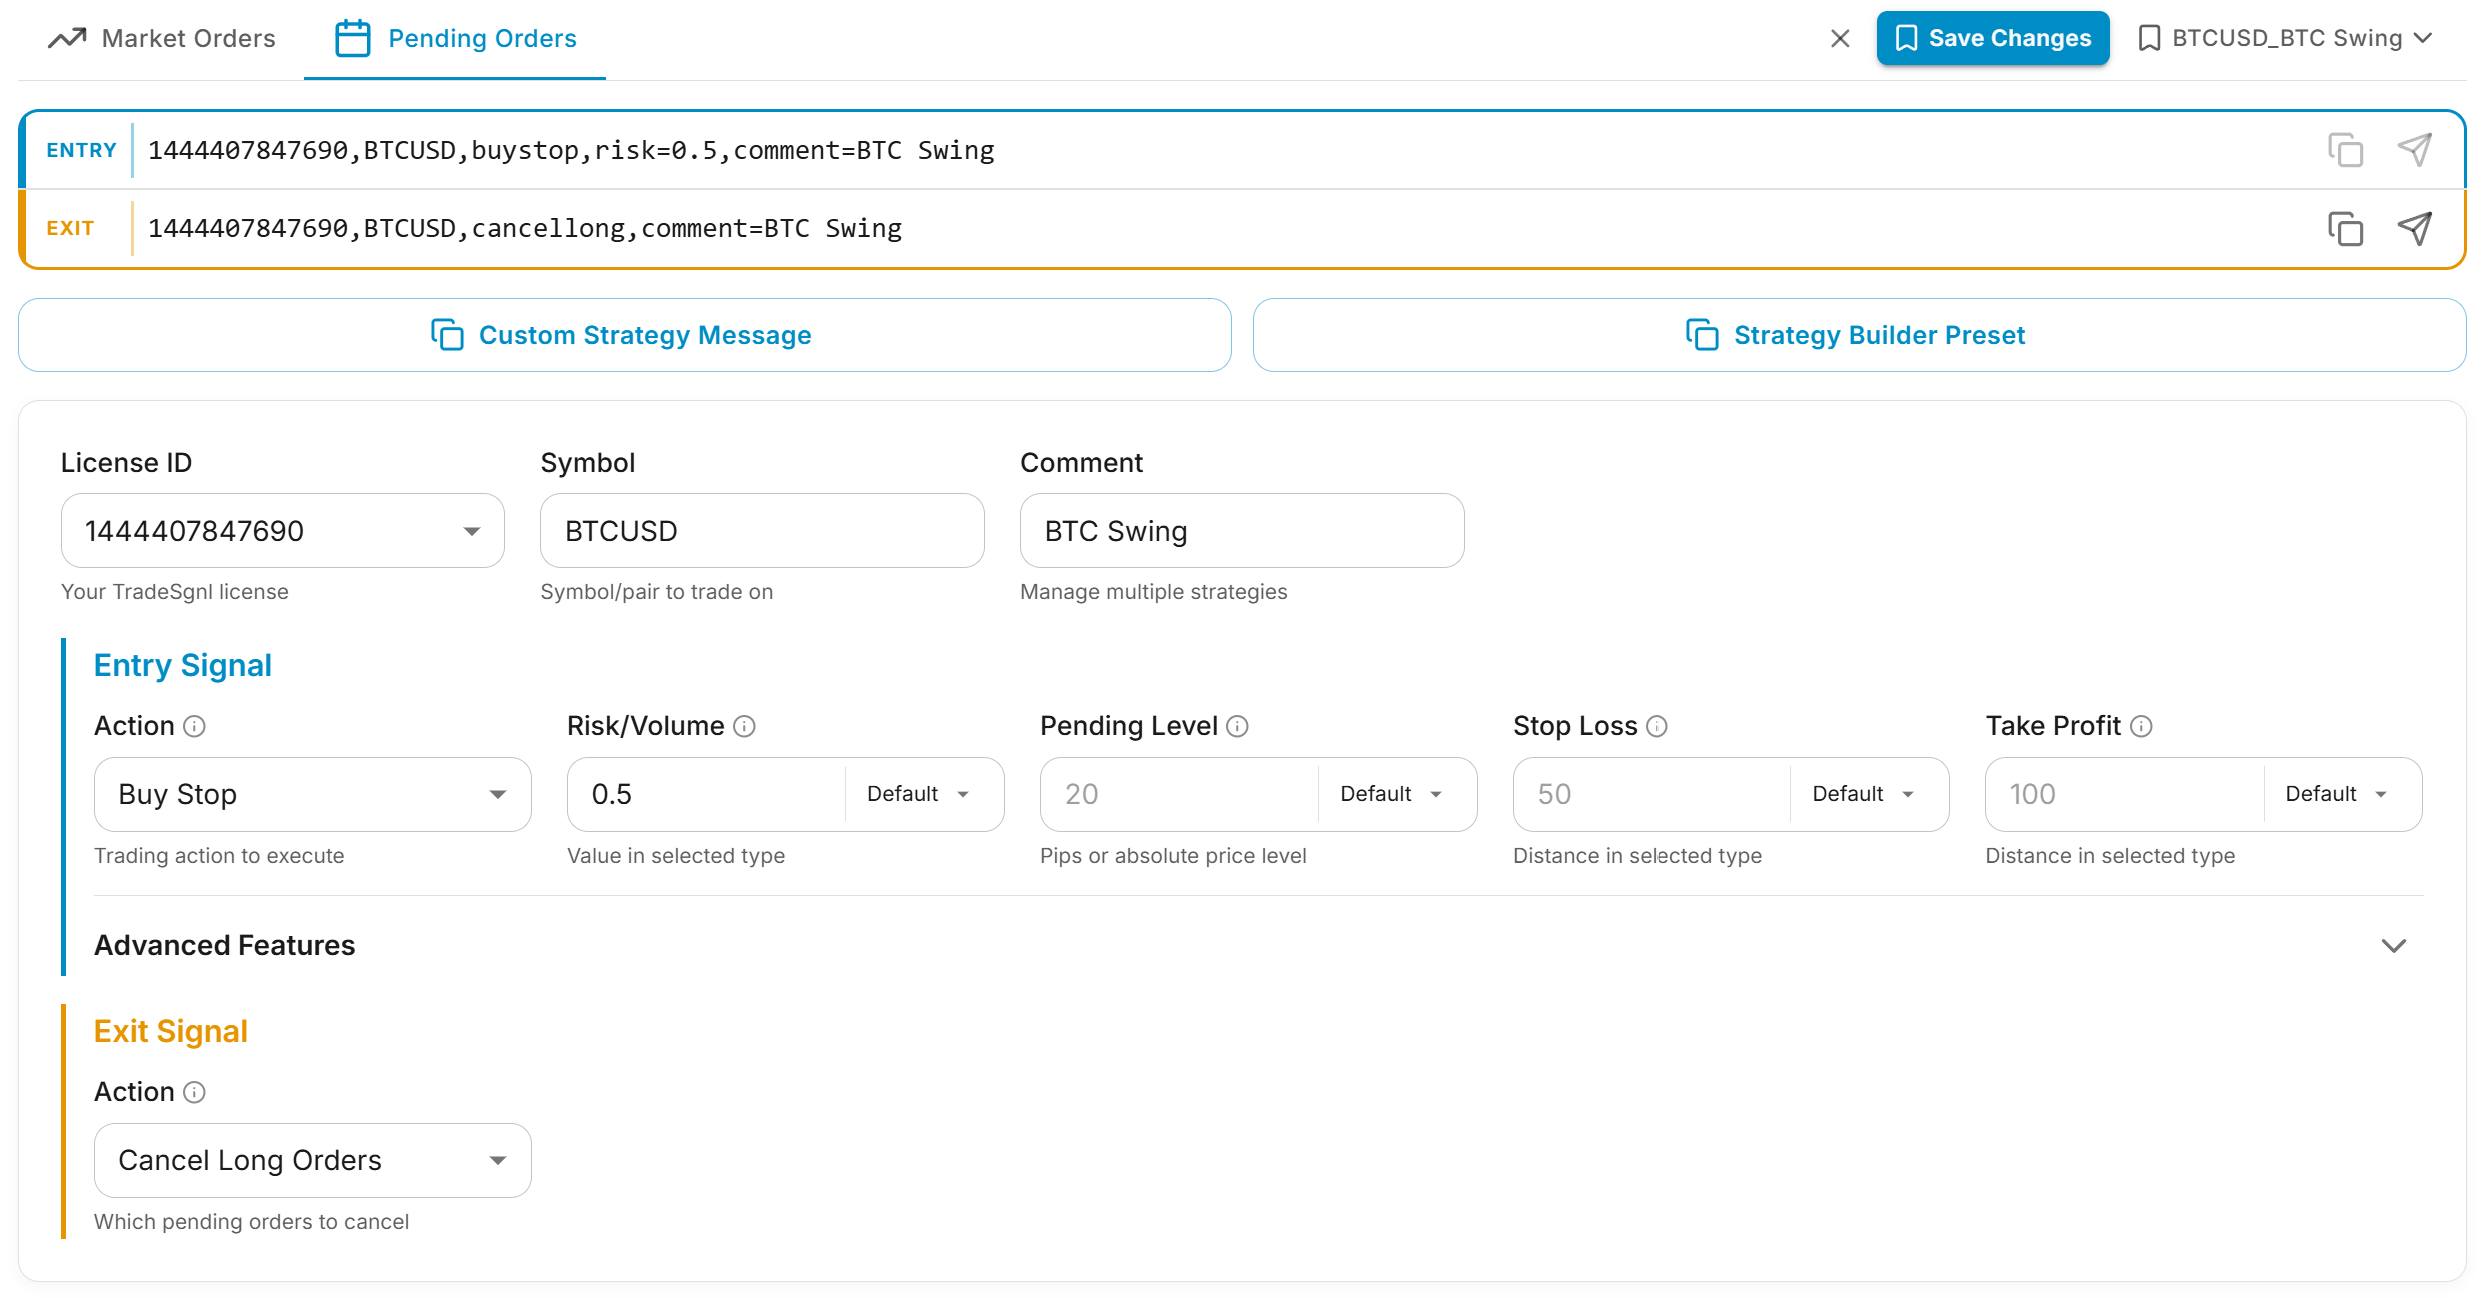
Action options: Buy Stop, Buy Limit, Sell Stop, Sell Limit.
Pending Level has its own type selector:
| Type | What the value means |
|---|---|
| Default | Uses the EA's "Pending Order Entry" setting. |
| Pips | Distance in pips from current price. |
| Price | Absolute price level. |
| Percent | Percentage offset from current price. |
Auto-correction
If you set an absolute price that doesn't match the order type (e.g., a Buy Stop below current price), the EA quietly converts it to the correct order type at execution time. You don't need to worry about getting it backwards.
Exit Signal
The Exit section (orange border) builds the closing half of a strategy. The generator auto-suggests an exit action based on your entry action (Buy → Close Buy, Sell → Close Sell, Close Long Then Buy → Close Buy, etc.), but you can override it.
| Exit Action | Closes |
|---|---|
| Close Buy | All long positions for the symbol. |
| Close Sell | All short positions for the symbol. |
| Close All | Every open position for the symbol, regardless of direction. |
| Cancel Long Orders | Pending buy stop / buy limit orders. (Pending tab only) |
| Cancel Short Orders | Pending sell stop / sell limit orders. (Pending tab only) |
Partial close. Optional — if you want to close only part of the position. The amount can be in lots or percent of the position (0.5 = 50%).
Advanced Features
The Advanced Features section is collapsed by default. Expand it to add trailing stops, breakeven, pyramid, or recovery to any signal.

Trailing Stop
| Field | What it does |
|---|---|
| Trailing Trigger | Profit distance needed before trailing kicks in. |
| Trailing Distance | How far behind price the SL trails. |
| Trailing Step | Minimum price movement before SL re-adjusts. |
Breakeven
| Field | What it does |
|---|---|
| Breakeven Trigger | Profit distance needed before SL moves. |
| Breakeven Offset | How many pips past entry to place the SL (use 0 for true breakeven, positive to lock in a small profit). |
Pyramid
Toggle to include the py flag. The EA opens additional positions in the same direction as the trade moves in your favor, using the rules configured in EA Settings → Pyramid Management.
Recovery
Toggle to include the re flag. The EA opens additional positions in the same direction as the trade moves against you, using the rules configured in EA Settings → Recovery Management.
Recovery increases exposure
Recovery trades grow your position size each level. Read the Recovery System page before enabling.
Exit Controls
Three toggles change how the EA treats opposite-direction positions when the entry fires:
| Toggle | Behavior |
|---|---|
| Exit on Opposite | Close opposite positions, then stop (no new trade). |
| Exit on Entry | Close opposite positions, then open the new trade (reversal). |
| Ignore Exit Signals | Drop this strategy's close commands server-side. Useful if you want the strategy's entries but the EA's TP/SL/trailing to handle exits. |
Output Options
The generator produces three different outputs depending on how you want to use it. Pick based on what you're integrating with.
Entry & Exit Signals
The two preview boxes at the top show the individual entry and exit signal text. Use the per-box Copy button to grab one signal at a time.
When to use: you want to create separate TradingView alerts for entries and exits (or you're integrating with something other than TradingView).
LicenseID,EURUSD,buy,risk=0.01,sl_pips=30,tp_pips=60Custom Strategy Message
Click Custom Strategy Message to copy a single message that handles entries, exits, and reversals. It uses TradingView's {{strategy.prev_market_position}}>{{strategy.market_position}} placeholder, which the TradeSgnl server translates into the right action verb (flat>long → buy, long>flat → closebuy, long>short → closelongsell, etc.).
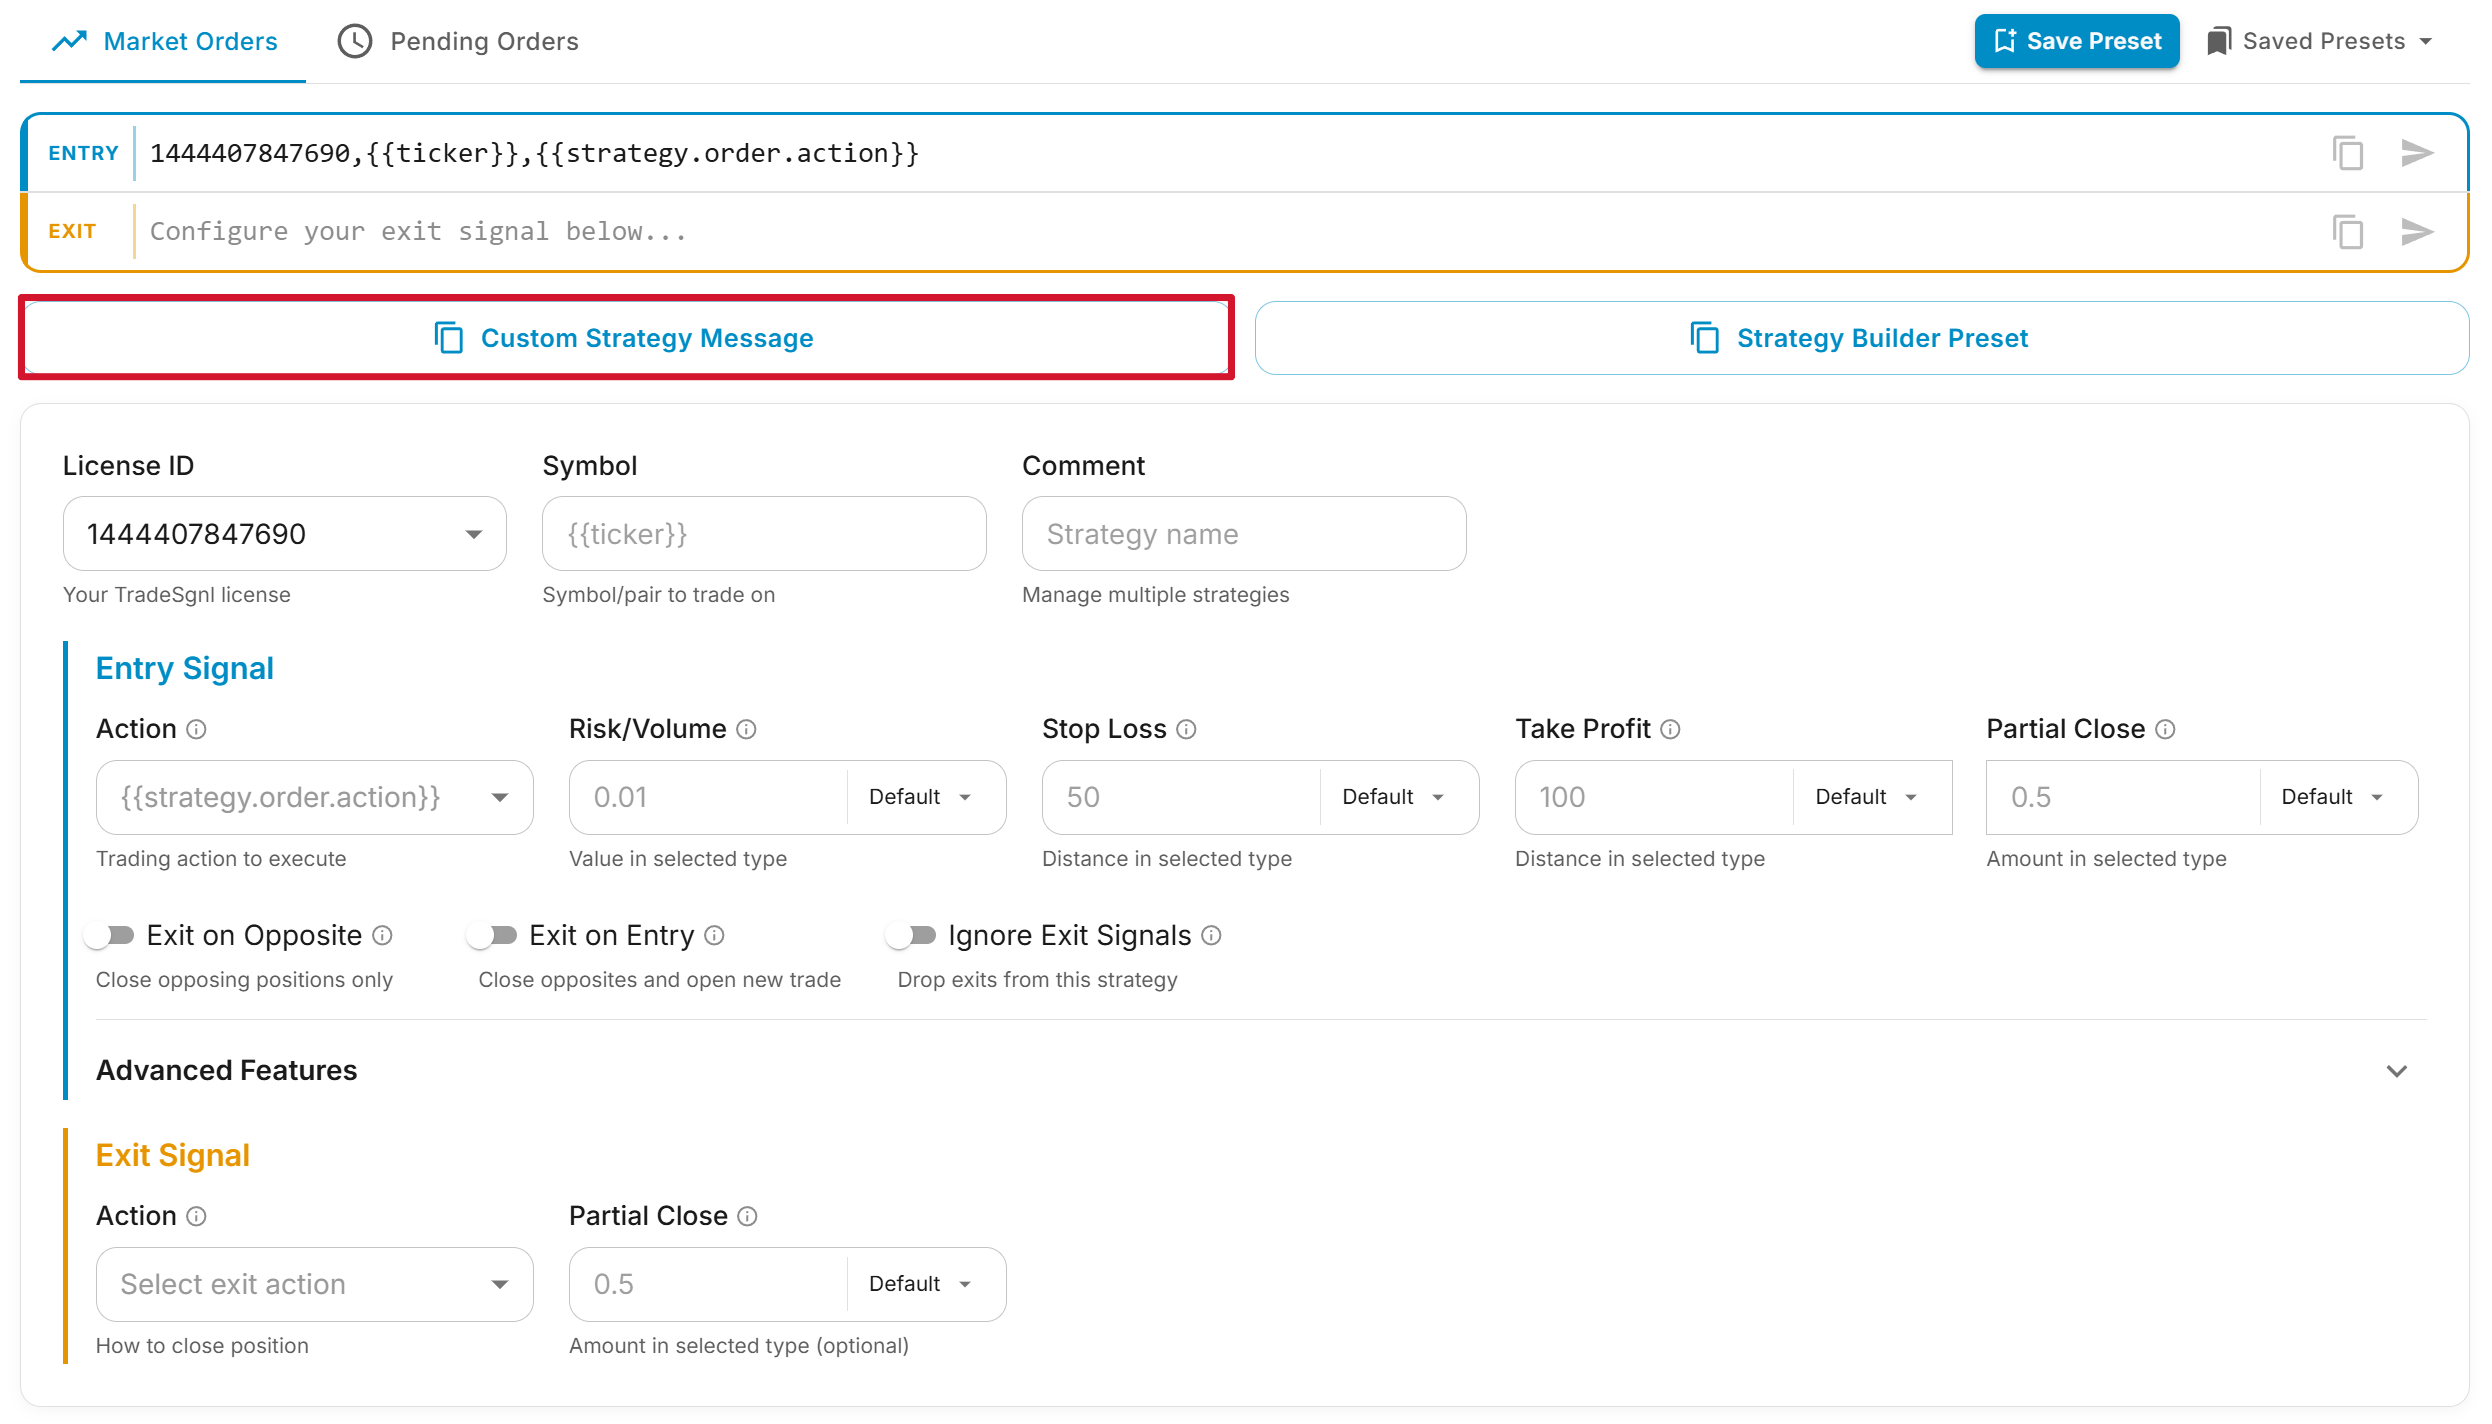
When to use: you have a Pine Script strategy and want one alert to handle every signal it fires.
LicenseID,{{ticker}},{{strategy.prev_market_position}}>{{strategy.market_position}},risk=0.01,sl_pips=30,tp_pips=60Strategy Builder Preset
Click Strategy Builder Preset to copy a JSON preset for pasting into the TradeSgnl Strategy Builder. The Builder is a Pine Script that runs on your TradingView chart and reads the preset to generate signals; you only need to configure your alert message as {{strategy.order.alert_message}} and the Builder does the rest.
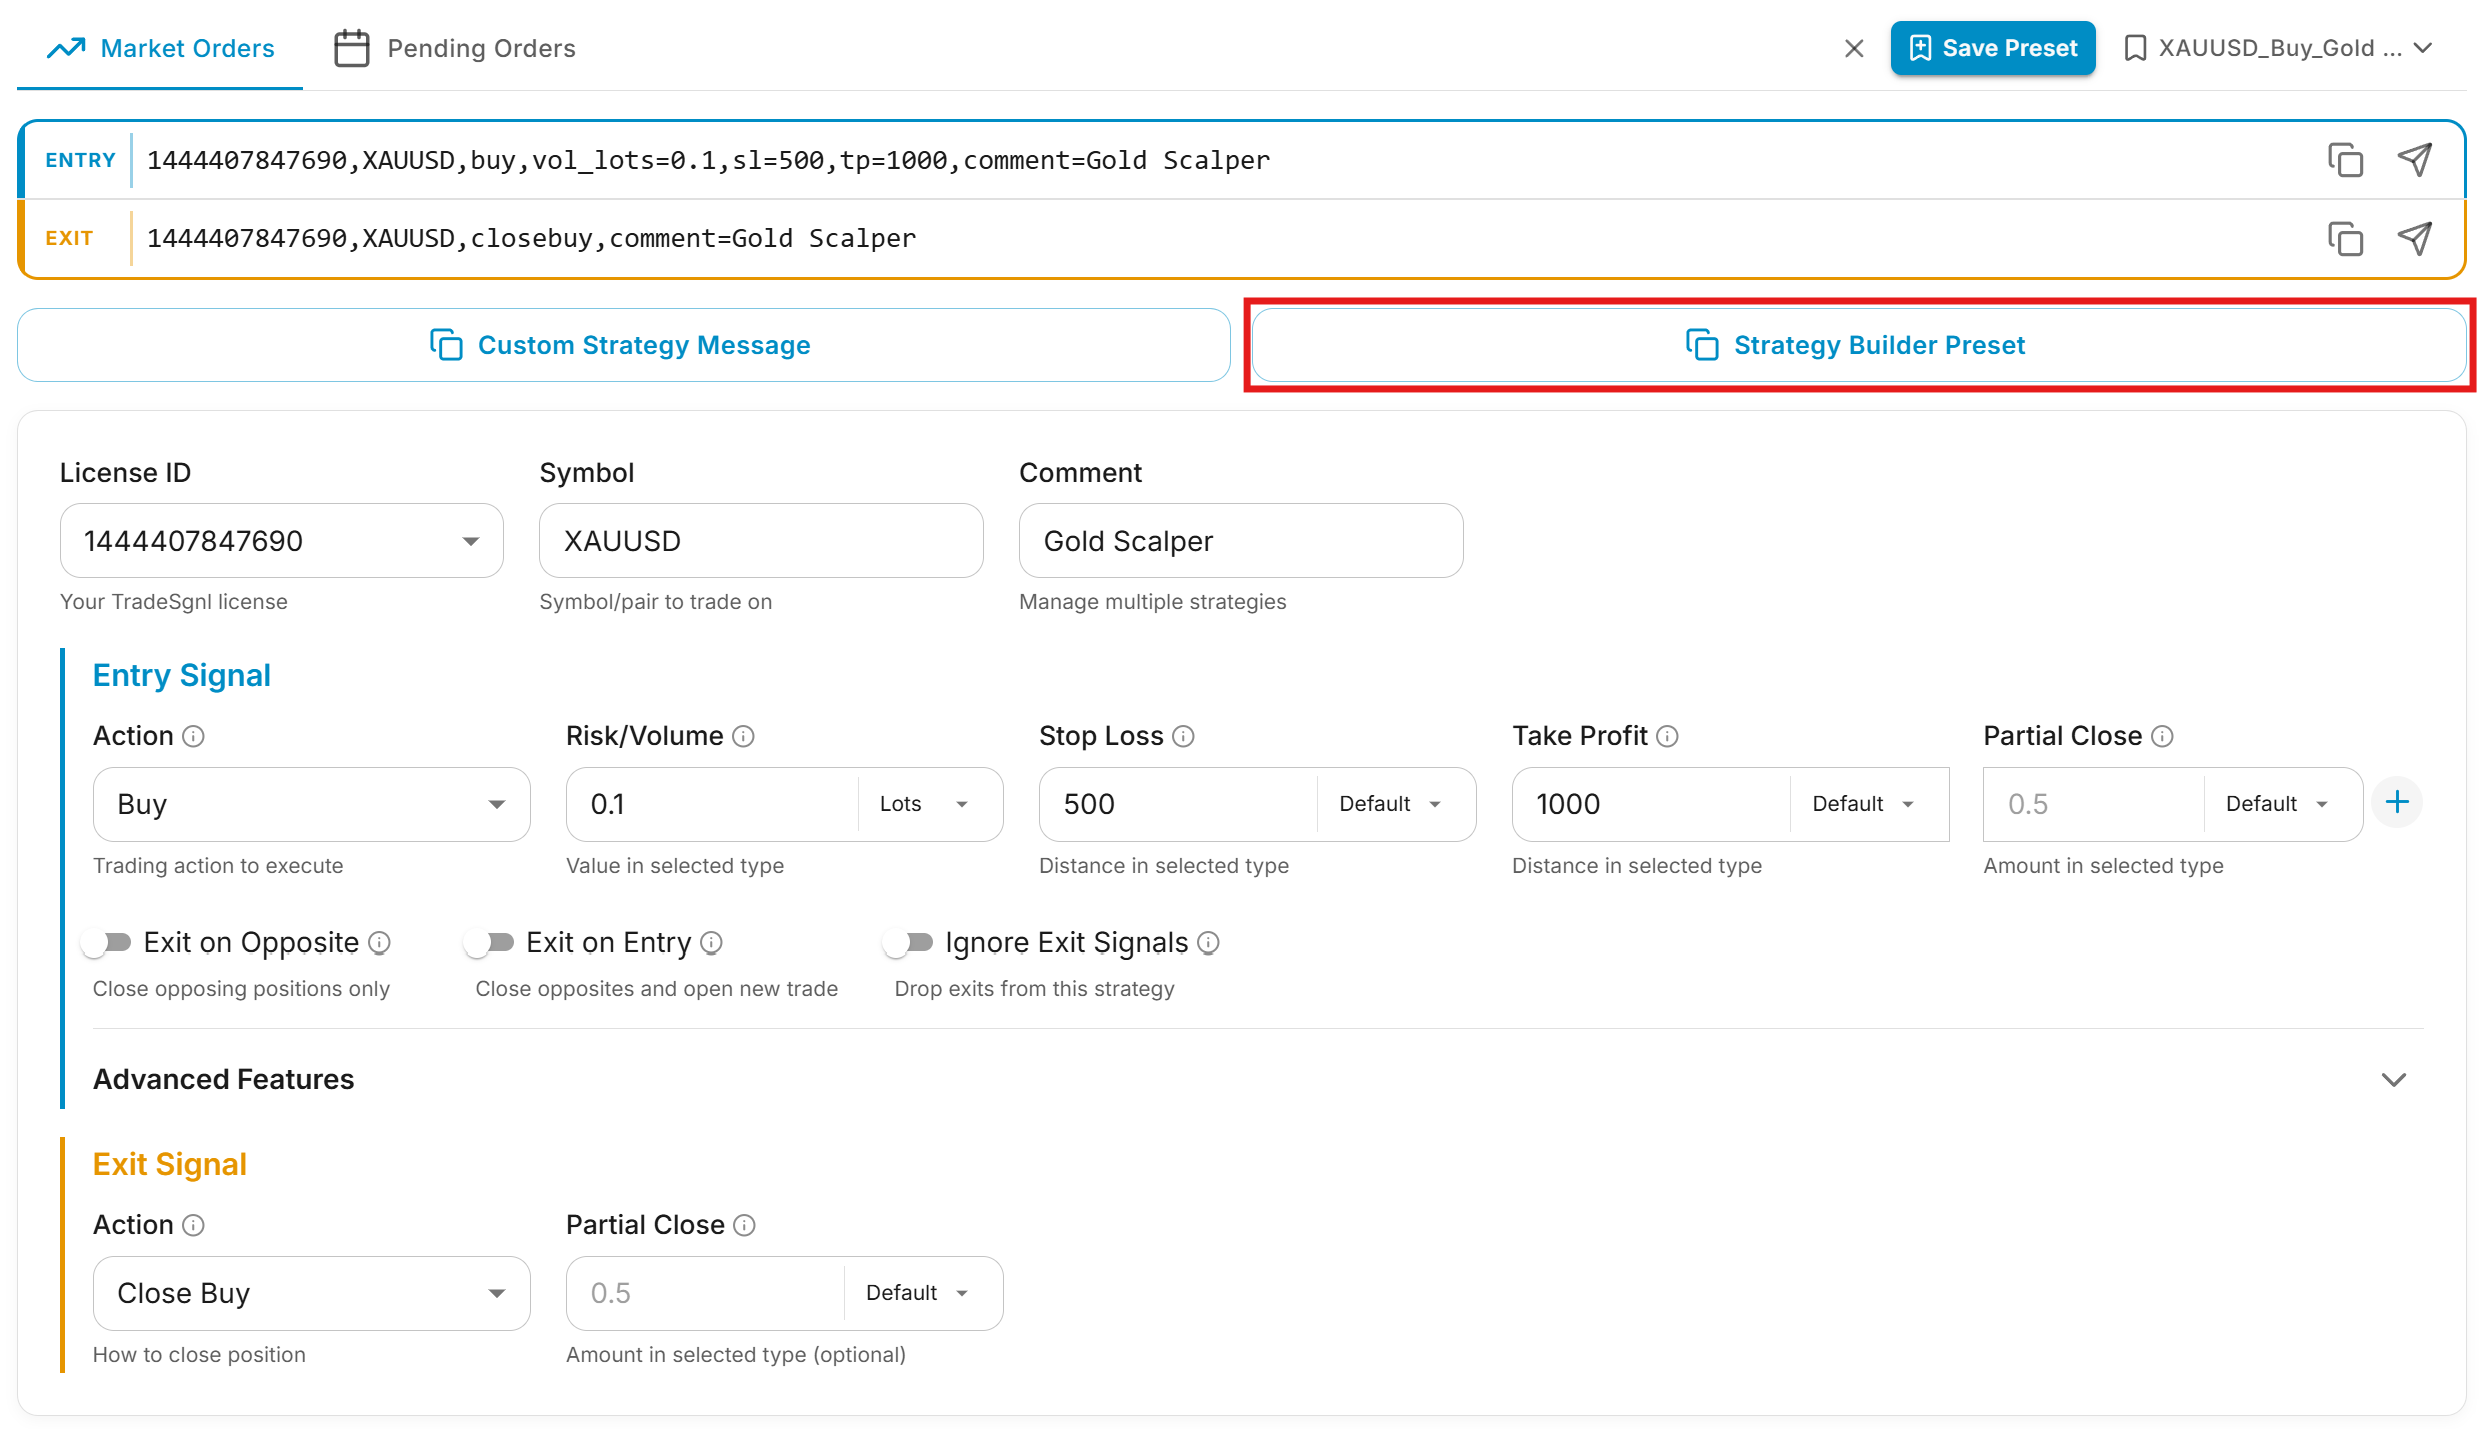
When to use: you're using the TradeSgnl Strategy Builder to wire any strategy or indicator into automated trading.
Strategy Builder setupSaved Presets
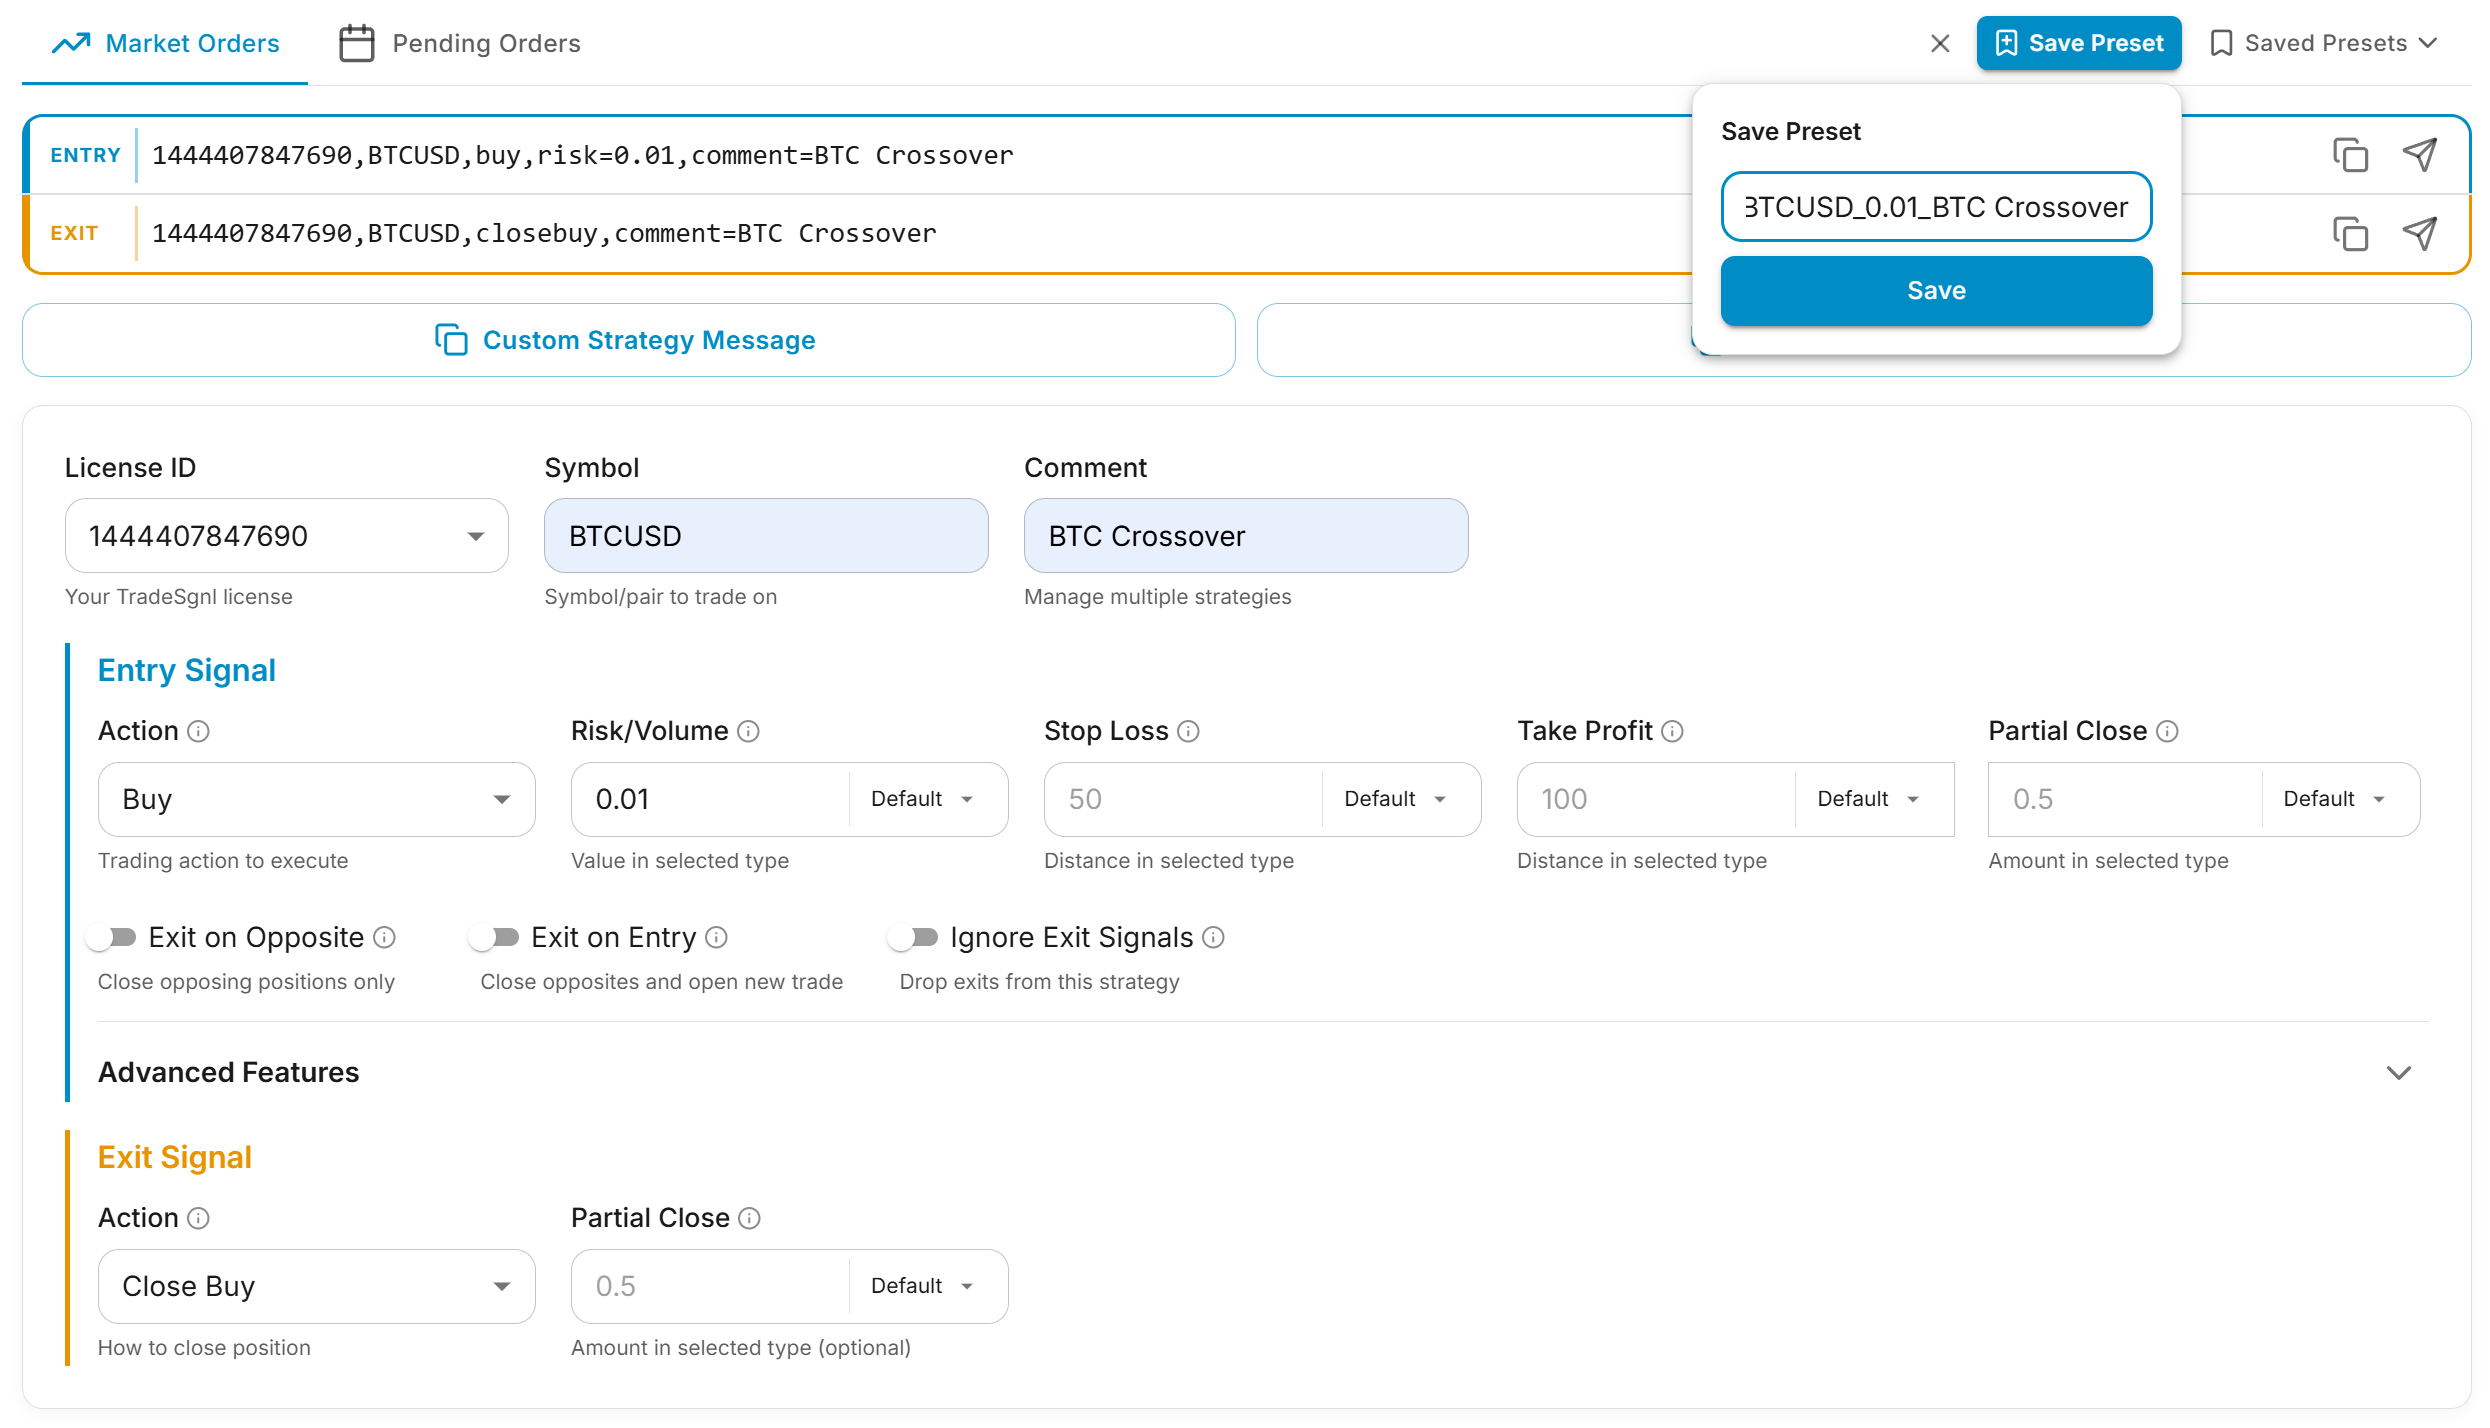
Once a configuration is dialed in, save it for later.
Save a preset. Click Save Preset in the header. The generator auto-suggests a name based on symbol + action + comment. Edit it and confirm.
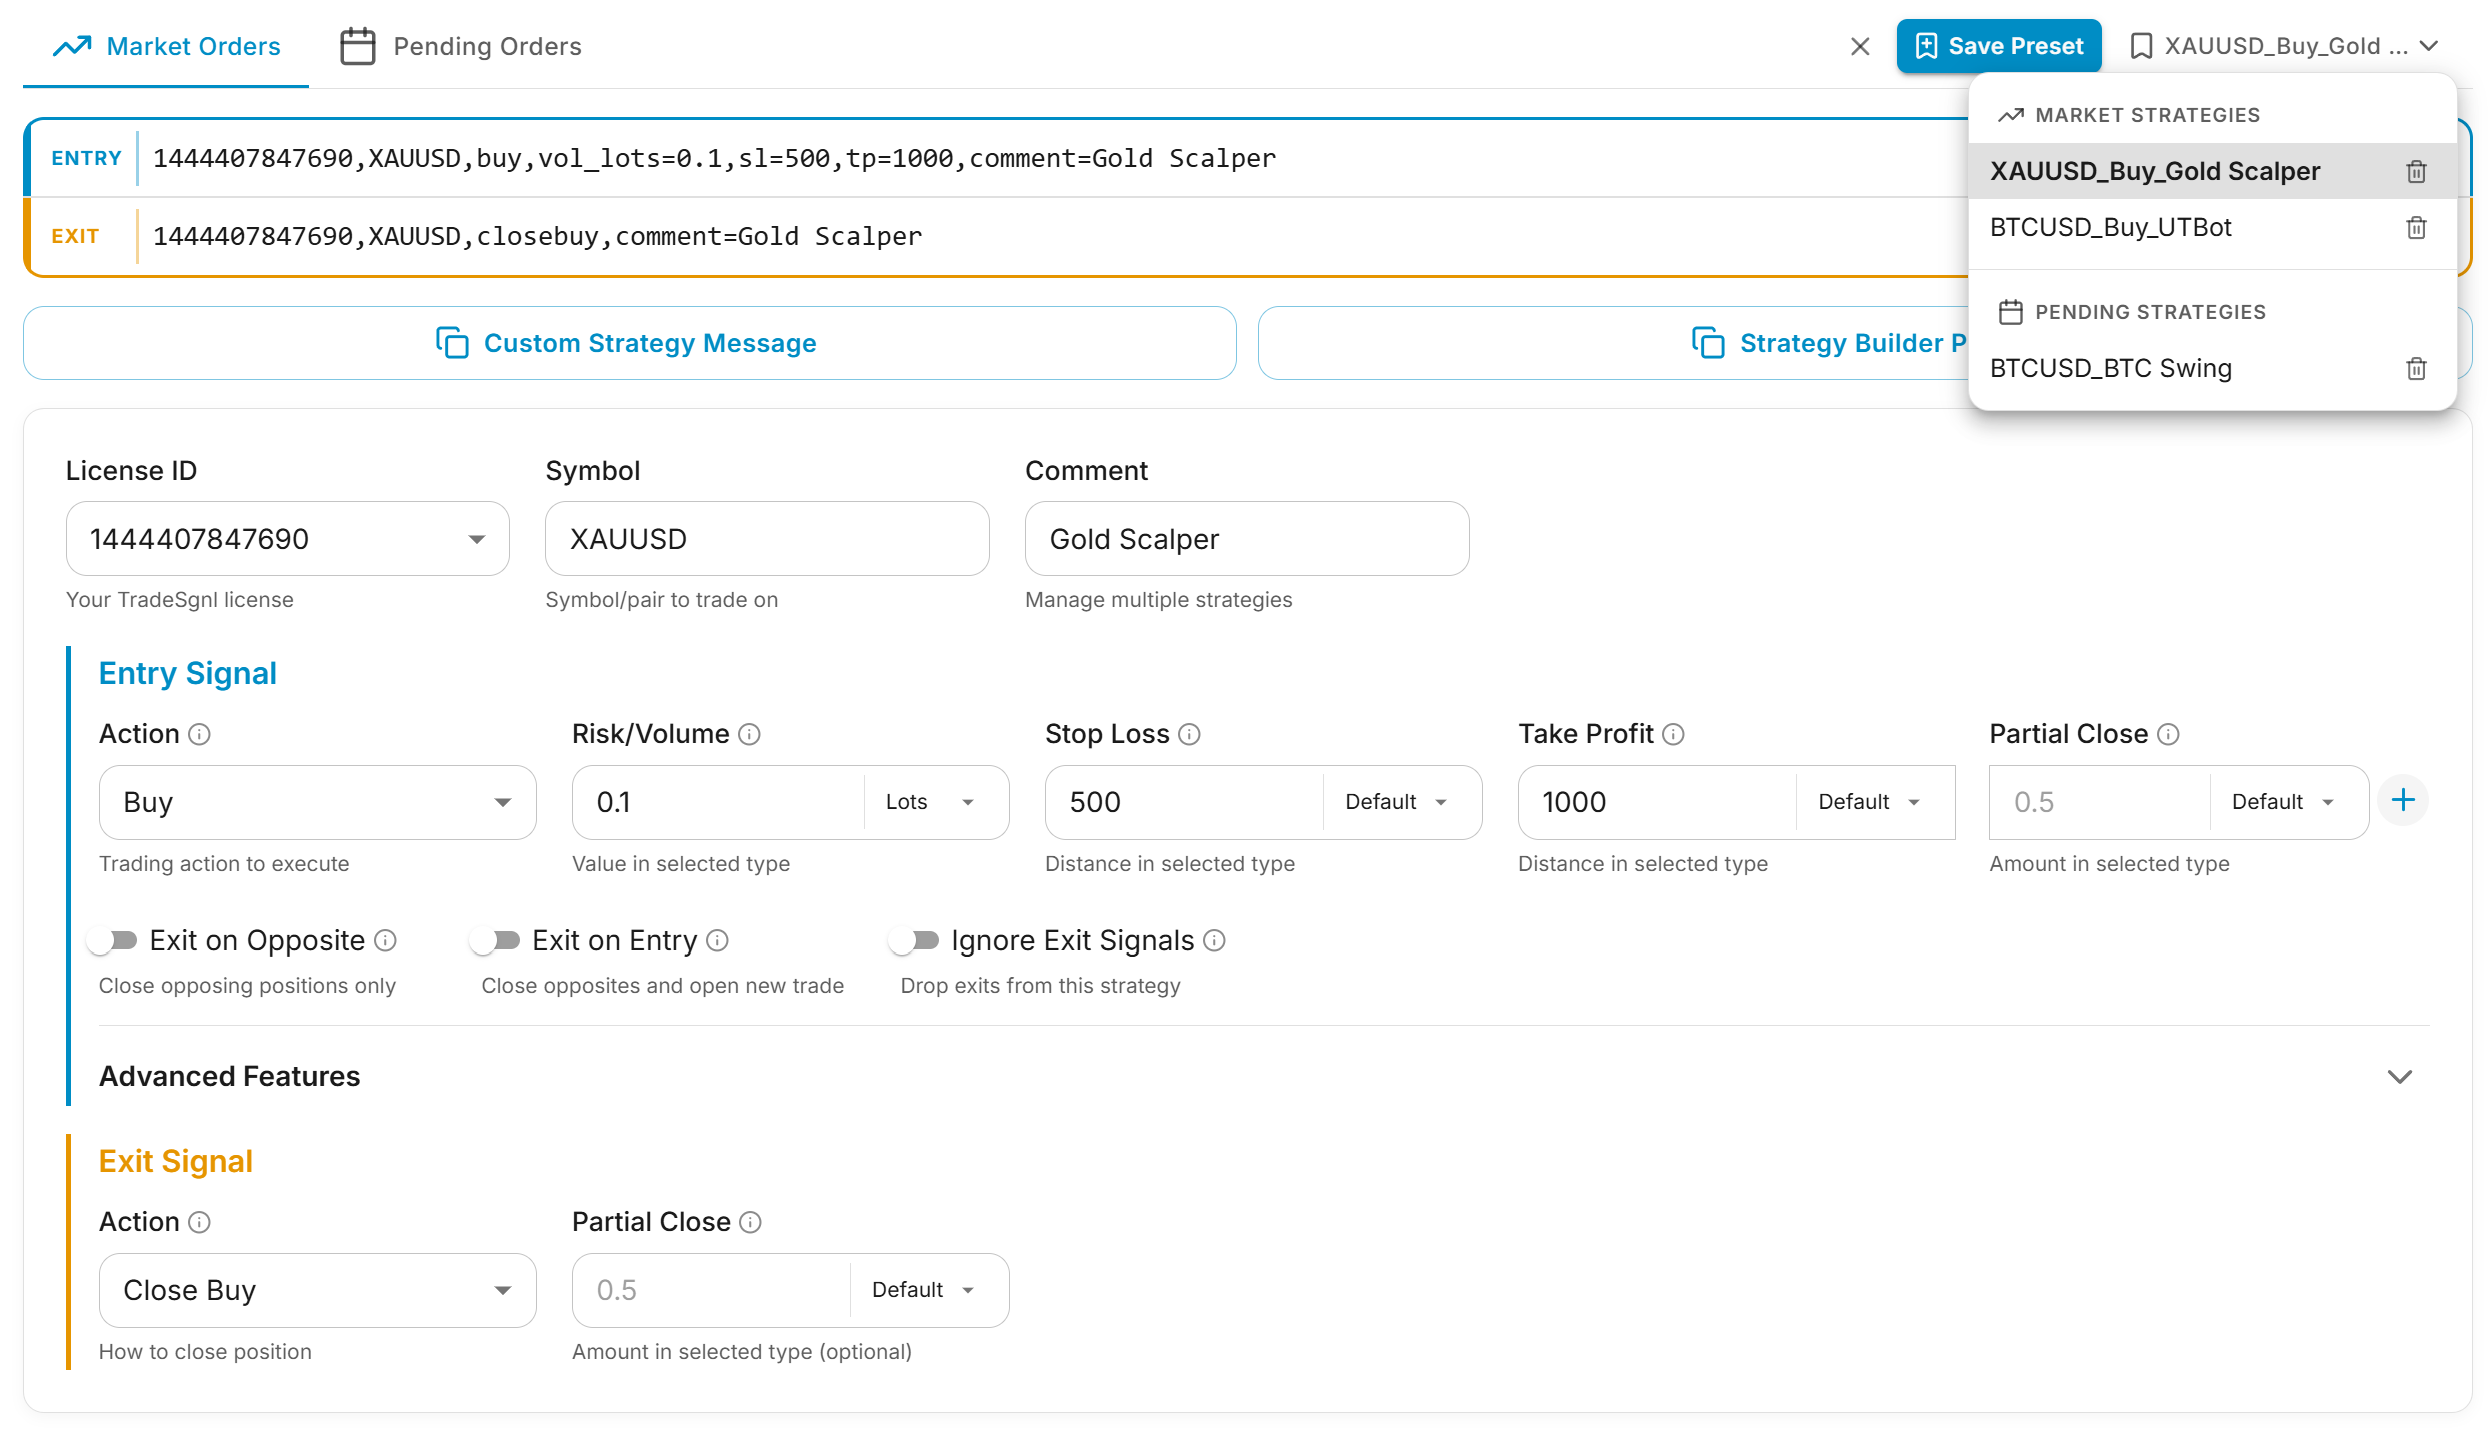
Load a preset. Click Presets in the header to see your saved configurations grouped by Market vs Pending. Click any preset to load it into the form.
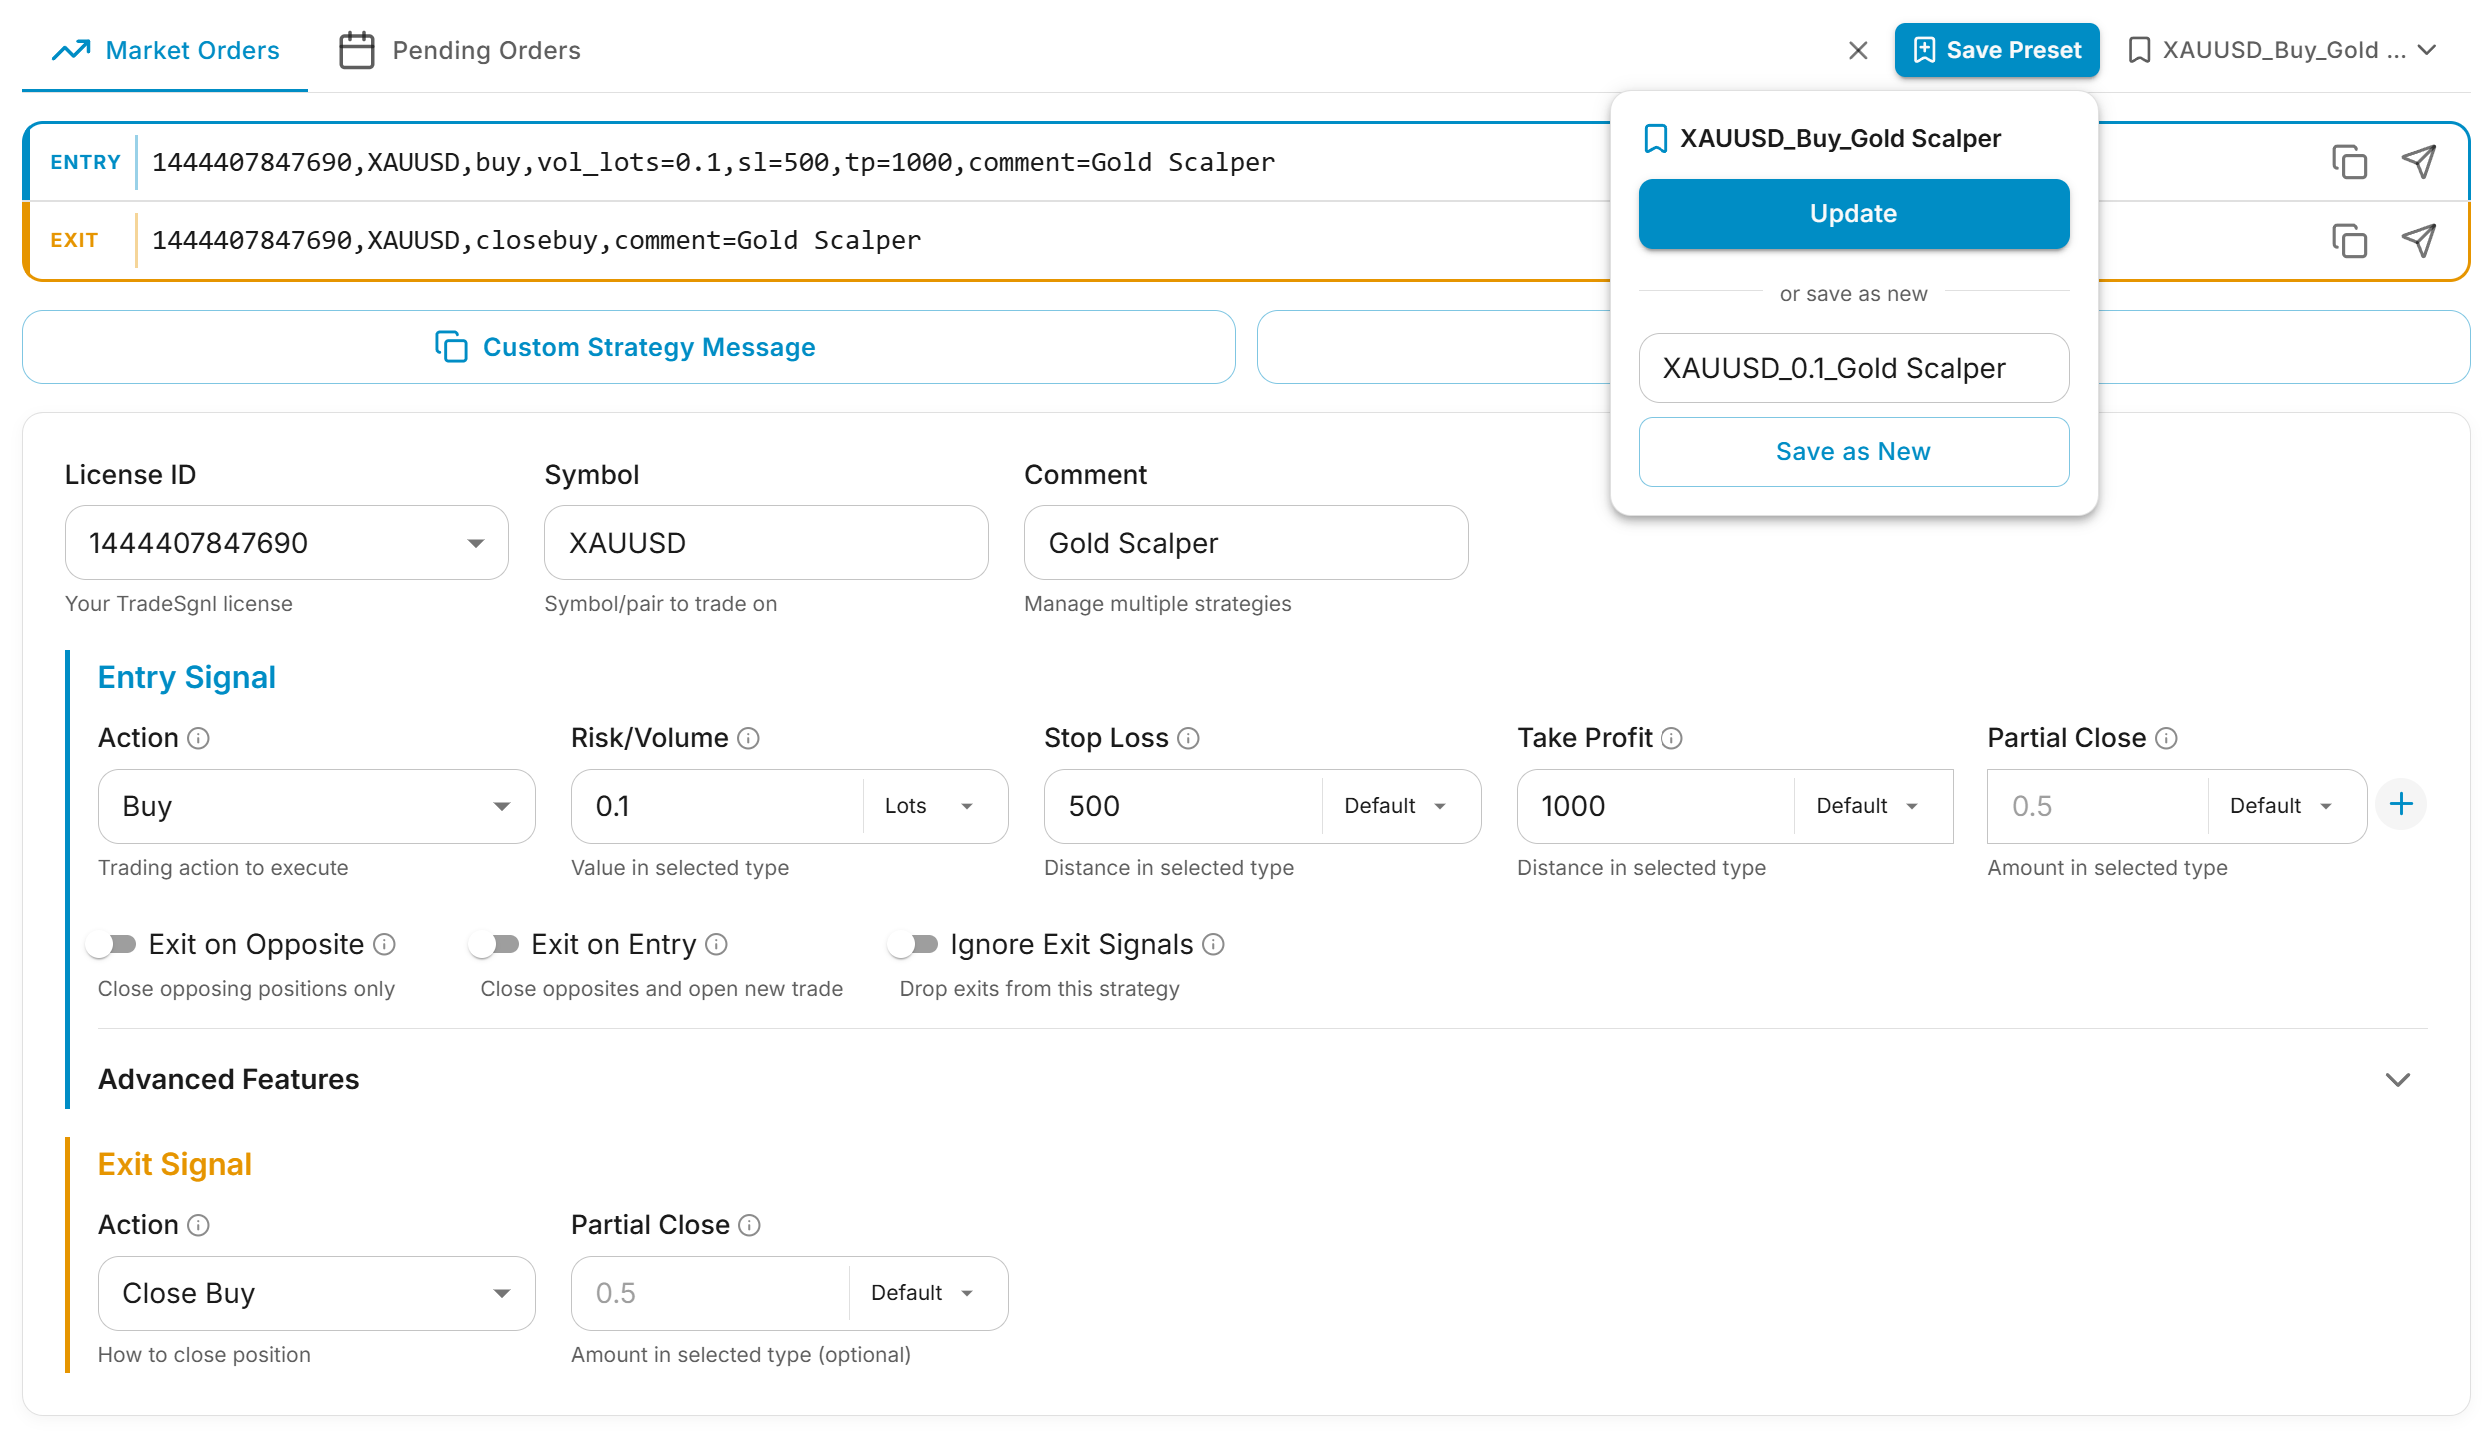
Update or delete. When you edit a loaded preset, the Save button changes to Save Changes. The trash icon next to each preset removes it (with a confirm step).
Multi-strategy workflow
Saved presets pair well with the Comment field. Save one preset per strategy (each with its own comment=Strategy1, comment=Strategy2, etc.) so close commands cleanly target the right positions later.
Where to Use the Output
The Generator produces three different outputs because there are three different ways to automate with TradeSgnl. Pick the card that matches what you're automating — each one links to a full setup guide that covers TradingView alert configuration, webhook URLs, and any strategy-side wiring you need.
TradeSgnl Strategy Builder
Use the Strategy Builder Preset output. Paste the JSON into the Strategy Builder's Signal Preset field on your chart. The Builder runs as a Pine Script that translates any indicator or strategy into signals — best when you want to automate an existing TradingView indicator without touching its source.
No-Code Setup for Pine Script Strategies
Use the Custom Strategy Message output. One alert handles entries, exits, and reversals via TradingView's transition pair. Best when your Pine Script is a strategy (not an indicator) and emits position changes the platform can read.
Strategy Lab (AI-Authored)
Ask the AI to write a Pine Script strategy for you, then send the Custom Strategy Message to it. Best when you have a trading idea in plain English but no Pine Script experience.
Individual TradingView Alerts
Use the per-signal Copy buttons on the Entry and Exit previews. Each output is one signal — create separate TradingView alerts on indicator conditions, breakouts, or any non-strategy trigger. Also works for non-TradingView sources sending to the webhook.
Webhook URL is always the same
Every TradingView alert points at https://webhook.tradesgnl.com in the Notifications tab — the message body is what changes per setup. TradingView's Essential plan or higher is required for webhook alerts.
Frequently Asked Questions
Telegram Copier
Automatically copy trading signals from Telegram channels to MetaTrader 5. Configure signal parsing with AI or regex, set up templates, and execute trades in real-time.
Signal Reference
Learn how to configure and manage trading signals with TradeSgnl. Understand signal formats, webhook setup, and automated signal processing.